Proxmox Unprivelliged LXC with shared Intel ARC GPU for Plex or Jellyfin transcoding

Status: CURRENT
Last reviewed: 31 August 2026
Applies to: Proxmox VE 8.2+ / 9.x, unprivileged LXC, Intel Arc GPU
Example LXC: Debian Trixie

This guide originally used manual cgroup, UID/GID, subuid and subgid mappings. Modern Proxmox has native LXC Device Passthrough, so the current method is much simpler.

This guide is for running Plex and/or Jellyfin in Docker inside an unprivileged Proxmox LXC, while sharing an Intel Arc GPU from the Proxmox host for hardware transcoding.

I’m using a Debian Trixie LXC for this example. This assumes you have:

  • Created an unprivileged LXC (Proxmox instructions)
  • Installed Docker inside the LXC (Docker instructions)
  • An Intel Arc GPU detected and working on the Proxmox host
  • An active Plex Pass subscription if you want to use Plex hardware transcoding

Find the Intel Arc render device

On the Proxmox host, check the available render devices:

ls -l /dev/dri/render*


Example output from my host:

crw-rw---- 1 root render 226, 128 Nov 16 21:02 /dev/dri/renderD128
crw-rw---- 1 root render 226, 129 Nov 16 21:02 /dev/dri/renderD129


In my system, renderD128 is the Intel iGPU and renderD129 is the Intel Arc A310. Your device numbers may be different, so don’t blindly copy mine.

If you’re not sure which render device belongs to which GPU, check the DRI device links:

ls -l /dev/dri/by-path/


You can compare the PCI addresses shown there with:

lspci | grep -Ei 'VGA|Display'


Pass the Arc GPU into the LXC

This is the bit that became much easier in newer Proxmox versions.

In the Proxmox web interface, select the LXC and go to:

Resources → Add → Device Passthrough

  • Device Path: select your Intel Arc render device. Mine is /dev/dri/renderD129
  • Mode: 0666
  • UID: leave blank
  • GID: leave blank

For my system, Proxmox creates an LXC config entry equivalent to:

dev0: /dev/dri/renderD129,mode=0666


That’s it. No manual lxc.idmap entries, no editing /etc/subuid or /etc/subgid, and no manually-created cgroup or bind-mount rules.

Why 0666?
This gives processes inside the LXC read/write access to the passed-through render device, which avoids the UID/GID mapping mess used by older methods. For a dedicated unprivileged Plex/Jellyfin LXC this is the simple option. If you want tighter permissions, Proxmox also supports assigning a specific UID/GID to the device instead.

Restart the LXC after adding the device, then check from inside the LXC:

ls -l /dev/dri/


You should see the render device you passed through. In my case that is renderD129.

Docker Compose

The Arc render device also needs to be passed from the LXC into the Plex or Jellyfin Docker container.

Add the following to the Plex or Jellyfin service in your Compose file, changing the render device if yours is different:

devices:
  - /dev/dri/renderD129:/dev/dri/renderD129


If your Arc GPU is renderD128, use /dev/dri/renderD128:/dev/dri/renderD128 instead.

After recreating the Docker container, you can confirm the device is visible inside it:

docker exec -it <container-name> ls -l /dev/dri/


Plex

In Plex, go to Settings → Server → Transcoder and enable Show Advanced if required.

  • Enable Use hardware acceleration when available
  • Enable Use hardware-accelerated video encoding
  • Under Hardware transcoding device, select the Intel Arc GPU

Mine appears as Intel DG2 [Arc A310].

To test it, play a video and force a transcode by changing the quality to something lower. Then go to Activity → Dashboard. The video transcode should show the hardware (hw) tag.

If the Arc GPU doesn’t appear in Plex, check the device in this order:

  1. Proxmox host: ls -l /dev/dri/
  2. Inside the LXC: ls -l /dev/dri/
  3. Inside the Docker container: docker exec -it <container-name> ls -l /dev/dri/

Note: Plex hardware-accelerated transcoding requires an active Plex Pass subscription.
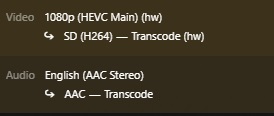
Plex hardware transcoding using Intel Arc

Jellyfin

For Jellyfin, open the Administration Dashboard, then go to Playback → Transcoding.

  • Under Hardware Acceleration, select Intel Quick Sync (QSV)
  • Set the QSV device to the Intel Arc render device. Mine is /dev/dri/renderD129

If the Arc GPU is the only Intel GPU in your system it will often be /dev/dri/renderD128. Again, use the device you identified earlier rather than assuming the number.

To test Jellyfin, play a video, lower the playback quality so it has to transcode, then open Playback Info. Look for Play method: Transcoding.

If transcoding fails completely, first confirm that the render device exists inside both the LXC and the Jellyfin Docker container. Jellyfin’s Intel hardware acceleration documentation also includes additional QSV/VA-API and driver checks if required:

Jellyfin Intel GPU hardware acceleration documentation

Jellyfin Intel Quick Sync transcoding settings

Verify the GPU is actually being used

If you want to confirm the GPU itself is doing the work, install intel-gpu-tools on the Proxmox host and run intel_gpu_top while a transcode is active. You should see activity on the Intel GPU’s video engines.

Archived method: manual UID/GID mapping

ARCHIVED – November 2025 method

The original version of this guide manually added lxc.cgroup2.devices.allow, bind-mounted the DRI devices, created custom lxc.idmap rules and edited /etc/subuid and /etc/subgid.

That method worked, but it is no longer the recommended path for a current Proxmox install. Native LXC Device Passthrough creates the device node for the container and can assign its mode, UID and GID directly, so the old mapping instructions have been removed from the active guide to avoid unnecessary complexity.

If you’re deliberately running an older Proxmox release, use documentation appropriate for that version rather than copying the old mappings from this article.

Credit: Thanks to gnd-7000 in the comments for pointing out that Proxmox 9 no longer needs the old GID mapping method and that the GPU can be added directly through Resources → Device Passthrough. Much cleaner 🙂

References: Proxmox pct documentation · Jellyfin Intel GPU documentation · Plex Transcoder documentation

Browser VSCode docker image used to manage docker host with addon

Status: CURRENT — SECURITY SENSITIVE
Last reviewed: 31 August 2026
Applies to: LinuxServer.io code-server, Docker Engine, Docker Compose

This setup deliberately gives a browser-accessible code-server instance control of the Docker daemon on the host. That is extremely powerful and should be treated as effectively giving the application administrator-level access to the Docker host.

What this does

This setup runs VS Code in the browser using LinuxServer.io’s code-server image, then adds the LinuxServer universal-docker mod so the Docker CLI and Docker Compose are available inside the container.

I also mount my host’s Docker Compose and Docker data folders into the code-server workspace. This lets me edit Compose files, configs and other Docker-related files from the browser, then use the built-in terminal to run normal Docker commands against the host.

The important bits are:

  • DOCKER_MODS=linuxserver/mods:universal-docker installs the Docker CLI, Buildx and Compose plugin inside code-server.
  • The Docker socket is mounted into the container so those Docker commands control the host Docker daemon.
  • Host folders containing Compose files and container data can be mounted into the workspace for easy editing.

⚠️ Security warning — read this before copying the Compose file

Mounting /var/run/docker.sock into a container is a major security decision. Docker’s own documentation warns that only trusted users should be able to control the Docker daemon because Docker can mount arbitrary host directories into containers. In practical terms, a process with unrestricted access to the Docker socket can usually gain root-level control of the host.

That means if this code-server instance is compromised, you should assume the Docker host is compromised as well.

Do not expose this directly to the public internet unless you fully understand and accept that risk.

How I recommend accessing it

When I originally wrote this guide I used Traefik and Authentik in front of code-server. That’s still useful, but for an application with this much control I now recommend keeping it private to your LAN/Tailscale network wherever possible.

My preferred setup is:

  1. Do not publish the code-server hostname publicly.
  2. Use Tailscale when accessing your home network remotely.
  3. Use Tailscale Split DNS to resolve your private domain to your internal reverse proxy only while connected to your tailnet.
  4. Keep Authentik in front of code-server as another authentication layer. MFA is strongly recommended.
  5. Optionally keep code-server’s own hashed password enabled as a second independent authentication layer.

I have a separate guide for the private DNS side here: Tailscale Split DNS by Domain for Secure Home Server Access.

Tailscale’s current documentation calls this a restricted nameserver, or Split DNS. Queries for only your chosen private domain are sent to your own DNS server while other DNS continues normally.

Start with the LinuxServer.io code-server image

LinuxServer.io’s current base Compose example looks like this:

services:
  code-server:
    image: lscr.io/linuxserver/code-server:latest
    container_name: code-server
    environment:
      - PUID=1000
      - PGID=1000
      - TZ=Etc/UTC
      - PASSWORD=password # optional
      - HASHED_PASSWORD= # optional
      - SUDO_PASSWORD=password # optional
      - SUDO_PASSWORD_HASH= # optional
      - PROXY_DOMAIN=code-server.my.domain # optional
      - DEFAULT_WORKSPACE=/config/workspace # optional
      - PWA_APPNAME=code-server # optional
    volumes:
      - /path/to/code-server/config:/config
    ports:
      - 8443:8443
    restart: unless-stopped


Check the current LinuxServer.io code-server documentation before deploying, as image options can change over time.

Add Docker host control

LinuxServer provides the universal-docker Docker Mod, which adds the Docker CLI, Buildx and Docker Compose plugin to the container.

DOCKER_MODS=linuxserver/mods:universal-docker


The Docker socket then needs to be mounted:

/var/run/docker.sock:/var/run/docker.sock:ro


Important: The :ro on the bind mount does not make the Docker API read-only. It prevents the container from replacing or modifying the socket file itself, but commands sent through that socket can still create, stop, remove and otherwise control containers if the Docker API permits them.

If you only need to view Docker information rather than manage the host, LinuxServer also publishes a Docker Socket Proxy that can restrict which API endpoints are available. That is safer, but it defeats the purpose of this particular setup if you want full Docker/Compose management.

My folder layout

On my Docker host I keep:

/home/richay/docker-compose/


for Compose files and small hand-managed configuration files, and:

/home/richay/docker/


for persistent container data.

Mounting those into the code-server workspace gives me quick browser access to the files I normally need to edit.

Recommended Compose — private reverse proxy + Authentik

This is the version closest to what I use. There is no published Docker port; Traefik reaches code-server over the external proxy network.

I recommend making the hostname available only through your LAN/private DNS or Tailscale Split DNS rather than creating a public DNS record for it.

services:
  code-server:
    image: lscr.io/linuxserver/code-server:latest
    container_name: code-server
    environment:
      - PUID=1000
      - PGID=1000
      - TZ=Australia/Perth
      - DEFAULT_WORKSPACE=/config/workspace
      - PWA_APPNAME=code-server
      - DOCKER_MODS=linuxserver/mods:universal-docker

      # Optional but recommended as a second auth layer.
      # Generate a strong hash rather than using PASSWORD in plain text.
      # - HASHED_PASSWORD=$2a$...

    volumes:
      - /home/richay/docker/code:/config
      - /home/richay/docker-compose:/config/workspace/docker-compose
      - /home/richay/docker:/config/workspace/docker
      - /var/run/docker.sock:/var/run/docker.sock:ro

    restart: unless-stopped

    labels:
      - "traefik.enable=true"
      - "traefik.docker.network=proxy"
      - "traefik.http.routers.code-secure.entrypoints=https"
      - "traefik.http.routers.code-secure.rule=Host(`code-server.richay.au`)"
      - "traefik.http.routers.code-secure.tls=true"
      - "traefik.http.routers.code-secure.tls.certresolver=cloudflare"
      - "traefik.http.routers.code-secure.service=code"
      - "traefik.http.services.code.loadbalancer.server.port=8443"
      - "traefik.http.routers.code-secure.middlewares=authentik@file"

    networks:
      - proxy

networks:
  proxy:
    external: true


The port is deliberately not published with ports:. That stops code-server bypassing Traefik/Authentik through something like http://host-ip:8443.

With Split DNS, code-server.richay.au can resolve to the internal reverse proxy while you’re at home or connected to Tailscale, without exposing that hostname/service publicly.

If you don’t use a reverse proxy

You can still run code-server directly, but I would keep it on a trusted LAN/VPN rather than forwarding port 8443 from the internet.

Use a hashed password and bind the port to the Docker host’s private LAN address rather than every interface. Replace 192.168.1.10 with the actual LAN IP of your Docker host:

services:
  code-server:
    image: lscr.io/linuxserver/code-server:latest
    container_name: code-server
    environment:
      - PUID=1000
      - PGID=1000
      - TZ=Australia/Perth
      - HASHED_PASSWORD=$2a$...
      - DEFAULT_WORKSPACE=/config/workspace
      - PWA_APPNAME=code-server
      - DOCKER_MODS=linuxserver/mods:universal-docker

    volumes:
      - /path/to/code-server/config:/config
      - /path/to/docker-compose:/config/workspace/docker-compose
      - /path/to/docker:/config/workspace/docker
      - /var/run/docker.sock:/var/run/docker.sock:ro

    ports:
      - 192.168.1.10:8443:8443

    restart: unless-stopped


You would then access it at:

http://192.168.1.10:8443


Again: do not port-forward 8443 from your router to this container. If you need it away from home, use Tailscale or another trusted VPN.

Test Docker access

Open a terminal inside code-server and run:

docker ps


If the Docker Mod and socket are working, you should see the containers running on the host.

Docker Compose should also be available:

docker compose version


From there you can open your mounted Compose folder in VS Code, edit a stack and use the terminal as you normally would.

What happens if code-server is compromised?

This is worth spelling out because mounting the Docker socket can look harmless if you’ve never dealt with Docker’s security model.

An attacker who gains usable access to the Docker daemon could potentially create a container that mounts the host filesystem, access other containers and their volumes, read Docker secrets/configuration, start privileged workloads or otherwise take control of the machine.

So the security boundary is not:

attacker → code-server container → stopped by Docker container isolation


It is much closer to:

attacker → code-server → Docker socket → host control


That’s why I now recommend keeping this service private behind Tailscale/LAN access even if you also use Authentik.

Optional: Docker Socket Proxy for read-only use

If your goal is only to view containers rather than start/stop/deploy them, don’t give code-server unrestricted access to the raw Docker socket.

LinuxServer’s Docker Socket Proxy can expose only selected Docker API endpoints. For example, a proxy can allow container listing while blocking API POST requests.

For full Docker Compose management this isn’t particularly useful because the permissions required to create containers and mount host paths are the same powerful permissions we’re trying to protect. But for monitoring/read-only workflows it’s a much safer design.

References

Once it’s locked down properly, having direct browser access to your Compose files and the Docker CLI is bloody convenient 🙂

Docker Stack with ExpressVPN

Status: CURRENT — MAJOR 2026 UPDATE
Last reviewed: 31 August 2026
Applies to: Docker Compose, ExpressVPN, qBittorrent, Prowlarr, Sonarr, Radarr and Lidarr

The original idea is still solid: make selected containers share a VPN container’s network namespace so their traffic cannot casually wander out through your normal WAN connection. The old stack still mostly makes sense, but I’ve rebuilt the recommended version around Gluetun because it handles the firewall/killswitch and DNS side much more cleanly.

This article started life as a giant entertainment stack using polkaned/expressvpn, with qBittorrent and all the *arr containers set to:

network_mode: service:expressvpn


That Docker trick is still completely valid. Docker Compose still supports network_mode: service:<name>, which makes one service use another service’s network stack.

The result is basically:

qBittorrent ─┐
Prowlarr    ├── shares VPN network namespace ── ExpressVPN ── Internet
Sonarr      │
Radarr      │
Lidarr     ─┘


If the VPN container’s firewall is doing its job, those applications don’t get an independent route straight out through your home connection.

What was wrong with my old stack?

Nothing catastrophically wrong, but a few bits have aged.

  • polkaned/expressvpn is actually still maintained, so that part didn’t die. Nice.
  • The current polkaned documentation warns that containers sharing its network namespace need the VPN container’s DNS configuration copied/shared as well to avoid DNS leakage. My old Compose didn’t do that.
  • The old VPN container ran privileged: true. Gluetun can do the job with NET_ADMIN and /dev/net/tun instead.
  • LinuxServer now documents its images using lscr.io/linuxserver/....
  • The old qBittorrent variable UMASK_SET has been replaced by UMASK.
  • I was using the Prowlarr develop tag for no particularly good reason. Stable latest is the sensible default now.
  • The old stack had separate /tv, /movies and /downloads mounts. A single common /data mount makes hardlinks and atomic moves far less cactus.

Recommended 2026 method: Gluetun + ExpressVPN

Gluetun has native ExpressVPN support and can act as the network container for everything else. Its firewall stays active and effectively acts as the VPN killswitch.

One limitation: Gluetun connects to ExpressVPN using ExpressVPN’s manual OpenVPN credentials. ExpressVPN’s own Linux app can use newer protocols such as Lightway, but their manual configuration currently supports OpenVPN.

1. Get the ExpressVPN manual credentials

These are not your normal ExpressVPN account email/password.

In your ExpressVPN account go to the manual configuration area and grab the generated OpenVPN username and password.

I keep mine in an .env file next to the Compose file instead of hard-coding them into the stack:

EXPRESSVPN_USER=replace_me
EXPRESSVPN_PASSWORD=replace_me
EXPRESSVPN_COUNTRY=Australia

PUID=1000
PGID=1000
TZ=Australia/Perth


Then lock the file down:

chmod 600 .env


2. Folder layout

My current Docker layout is:

/home/richay/docker-compose/   # Compose files + small hand-managed config
/home/richay/docker/           # Persistent container data


For this stack:

mkdir -p /home/richay/docker-compose/media-vpn
mkdir -p /home/richay/docker/{gluetun,qbittorrent,prowlarr,sonarr,radarr,lidarr}
mkdir -p /mnt/media/{downloads,tv,movies,music}


Change /mnt/media to wherever your real media/download storage is mounted.

3. Current Compose stack

services:
  gluetun:
    image: qmcgaw/gluetun:latest
    container_name: gluetun
    cap_add:
      - NET_ADMIN
    devices:
      - /dev/net/tun:/dev/net/tun
    environment:
      - VPN_SERVICE_PROVIDER=expressvpn
      - VPN_TYPE=openvpn
      - OPENVPN_USER=${EXPRESSVPN_USER}
      - OPENVPN_PASSWORD=${EXPRESSVPN_PASSWORD}
      - SERVER_COUNTRIES=${EXPRESSVPN_COUNTRY:-Australia}
      - TZ=${TZ:-Australia/Perth}
    volumes:
      - /home/richay/docker/gluetun:/gluetun
    ports:
      - "8080:8080" # qBittorrent WebUI
      - "9696:9696" # Prowlarr
      - "8989:8989" # Sonarr
      - "7878:7878" # Radarr
      - "8686:8686" # Lidarr
    restart: unless-stopped

  qbittorrent:
    image: lscr.io/linuxserver/qbittorrent:latest
    container_name: qbittorrent
    network_mode: service:gluetun
    environment:
      - PUID=${PUID:-1000}
      - PGID=${PGID:-1000}
      - TZ=${TZ:-Australia/Perth}
      - WEBUI_PORT=8080
      - TORRENTING_PORT=6881
      - UMASK=022
    volumes:
      - /home/richay/docker/qbittorrent:/config
      - /mnt/media:/data
    depends_on:
      gluetun:
        condition: service_healthy
    restart: unless-stopped

  prowlarr:
    image: lscr.io/linuxserver/prowlarr:latest
    container_name: prowlarr
    network_mode: service:gluetun
    environment:
      - PUID=${PUID:-1000}
      - PGID=${PGID:-1000}
      - TZ=${TZ:-Australia/Perth}
    volumes:
      - /home/richay/docker/prowlarr:/config
    depends_on:
      gluetun:
        condition: service_healthy
    restart: unless-stopped

  sonarr:
    image: lscr.io/linuxserver/sonarr:latest
    container_name: sonarr
    network_mode: service:gluetun
    environment:
      - PUID=${PUID:-1000}
      - PGID=${PGID:-1000}
      - TZ=${TZ:-Australia/Perth}
    volumes:
      - /home/richay/docker/sonarr:/config
      - /mnt/media:/data
    depends_on:
      gluetun:
        condition: service_healthy
    restart: unless-stopped

  radarr:
    image: lscr.io/linuxserver/radarr:latest
    container_name: radarr
    network_mode: service:gluetun
    environment:
      - PUID=${PUID:-1000}
      - PGID=${PGID:-1000}
      - TZ=${TZ:-Australia/Perth}
    volumes:
      - /home/richay/docker/radarr:/config
      - /mnt/media:/data
    depends_on:
      gluetun:
        condition: service_healthy
    restart: unless-stopped

  lidarr:
    image: lscr.io/linuxserver/lidarr:latest
    container_name: lidarr
    network_mode: service:gluetun
    environment:
      - PUID=${PUID:-1000}
      - PGID=${PGID:-1000}
      - TZ=${TZ:-Australia/Perth}
    volumes:
      - /home/richay/docker/lidarr:/config
      - /mnt/media:/data
    depends_on:
      gluetun:
        condition: service_healthy
    restart: unless-stopped


All five application containers share Gluetun’s network namespace. Because they are effectively living in the same network stack, they can also talk to each other over localhost.

For example:

qBittorrent from Sonarr/Radarr: http://127.0.0.1:8080
Prowlarr:                       http://127.0.0.1:9696
Sonarr:                         http://127.0.0.1:8989
Radarr:                         http://127.0.0.1:7878
Lidarr:                         http://127.0.0.1:8686


The ports are published on the Gluetun service because containers using network_mode: service:gluetun cannot publish their own ports.

Do not router-port-forward those WebUI ports. They’re management interfaces, not things you want flapping around on the public internet. If you want remote access, use a VPN/Tailscale and private DNS rather than raw WAN exposure.

If you want the same private hostname setup I use, see my Tailscale Split DNS guide.

4. Bring it up

cd /home/richay/docker-compose/media-vpn
docker compose up -d


Then check Gluetun first:

docker logs -f gluetun


Once it reports a healthy VPN connection, check the stack:

docker compose ps
docker exec gluetun wget -qO- https://ifconfig.me


The public IP shown from Gluetun should be the VPN exit IP, not your normal home WAN address.

5. qBittorrent login changed too

Current LinuxServer qBittorrent generates a temporary password for the admin user on startup. Grab it from the logs:

docker logs qbittorrent 2>&1 | grep -i password


Then log into:

http://DOCKER-HOST-IP:8080


and change the password.

About the torrent port

The old stack published TCP/UDP 6881 and it was easy to assume that meant qBittorrent had an externally forwarded VPN port.

It doesn’t.

ExpressVPN does not support port forwarding on its VPN servers. Publishing 6881 in Docker only exposes that port on the Docker host. It does not punch an inbound port through the ExpressVPN server.

qBittorrent will still download and seed through outbound connections, but unsolicited inbound peer connections through the VPN aren’t available. That can reduce peer connectivity compared with a VPN provider that offers torrent-friendly port forwarding.

Do Sonarr/Radarr/Lidarr really need the VPN?

Nope.

The stack above keeps everything behind Gluetun because it’s simple and matches the design of my old stack. But the important ones are generally:

  • qBittorrent: definitely the one whose traffic I want through the VPN.
  • Prowlarr: useful behind the VPN if your ISP blocks tracker/indexer sites.
  • Sonarr / Radarr / Lidarr: usually fine on the normal Docker network because they can talk to Prowlarr/qBittorrent locally.

If you want a cleaner split, move Sonarr/Radarr/Lidarr back onto a normal user-defined Docker network and leave only qBittorrent/Prowlarr sharing Gluetun. Slightly more networking to configure, slightly less “everything goes through the magic tunnel”. Pick your poison 🙂

What about polkaned/expressvpn?

It is not dead. I genuinely expected to find a dusty abandoned image here, but Docker Hub shows fresh 2026 builds and the current README supports ExpressVPN 5.x plus protocol selection including Lightway, OpenVPN and WireGuard.

A current minimal container still looks roughly like:

services:
  expressvpn:
    image: polkaned/expressvpn:latest
    container_name: expressvpn
    environment:
      - ACTIVATION_CODE=${EXPRESSVPN_ACTIVATION_CODE}
      - PROTOCOL=wireguard
    cap_add:
      - NET_ADMIN
    devices:
      - /dev/net/tun:/dev/net/tun
    privileged: true
    tty: true
    command: /bin/bash
    restart: unless-stopped


If you specifically want the real ExpressVPN client/protocols, that remains an option.

However, if other containers share that ExpressVPN container’s network namespace, follow the maintainer’s current DNS-sharing instructions. Their README explicitly warns that the dependent containers need the VPN-side resolv.conf handling to avoid DNS leakage.

That’s why I’m using Gluetun as the recommended fresh install: less janky plumbing, built-in firewall behaviour, and it was designed specifically for this sidecar/network-container use case.

Why Plex is no longer in this stack

The old article bundled Plex and get_iplayer into the same giant Compose file even though they weren’t using the VPN.

These days I keep unrelated services in separate stacks. It makes upgrades, troubleshooting and the inevitable “why the fuck did restarting my VPN also restart Plex?” moment much easier to avoid.

Plex should generally have its own stack/LXC and normal networking. It has absolutely no need to ride out through ExpressVPN just because qBittorrent does.

Old 2024 stack — historical note

HISTORICAL

The original stack used polkaned/expressvpn with qBittorrent, Prowlarr, Sonarr, Radarr and Lidarr all sharing the ExpressVPN network namespace. The architecture itself was valid, but the old example lacked the DNS-sharing requirement documented by the current image and used several now-stale image/environment conventions.

So I’m not pretending the original idea was wrong. It just needed its plumbing replaced before it flooded the carpet.

References

The nice bit is the original trick still survives: one VPN container, everything else borrows its network. The new version just has fewer opportunities to quietly leak DNS or make me wonder why I gave a VPN container the keys to the entire bloody kingdom 🙂

Docker Compose for Entertainment Stack

Status: CURRENT — MAJOR 2026 UPDATE
Last reviewed: 31 August 2026
Applies to: Docker Compose, Bazarr, Jellyfin, Seerr, Plex, Prowlarr, Radarr, Sonarr and Tautulli

The original idea behind this stack is still good: put related containers on one Docker network so they can find each other by service name instead of hard-coding IP addresses. A few of the actual applications and Docker habits from the old stack are now cactus though, so this is the cleaned-up version.

My entertainment stack has always been built around one simple Docker feature:

http://prowlarr:9696


No memorising container IP addresses. No changing configs when Docker hands a container a different IP. If two containers are on the same user-defined Docker network, Docker’s internal DNS lets them talk to each other using the service/container name.

That part of the original article was spot on and is still how I’d do it today.

What’s changed since the old stack?

  • Overseerr is gone. The original project was archived in February 2026. Overseerr and Jellyseerr have effectively converged into Seerr, which is the current maintained project.
  • Watchtower is gone. The upstream project was archived in December 2025 and now explicitly says it is no longer maintained.
  • The top-level Compose version: "3.6" line is obsolete and ignored by modern Docker Compose.
  • I’ve changed application configs from anonymous/named Docker volumes to obvious bind mounts under /home/richay/docker/. Much easier to back up and inspect when something inevitably goes sideways at 1am.
  • Radarr/Sonarr/Bazarr now see one consistent /data tree instead of three completely different host paths.
  • Prowlarr and Seerr don’t need access to your entire media library, so they no longer get it. Less access, less bullshit.
  • Plex still uses host networking in this example because LinuxServer continues to document that as its standard setup, but its old ports: entry has been removed because Docker ignores published ports in host-network mode.

Overseerr → Seerr

The old stack used:

sctx/overseerr:latest


That repository was archived on 15 February 2026. The current maintained project is Seerr, which supports Plex, Jellyfin and Emby and still integrates with Sonarr and Radarr.

The current official Docker image is:

ghcr.io/seerr-team/seerr:latest


If you’re migrating an existing Overseerr/Jellyseerr database rather than starting fresh, use Seerr’s official migration guide. Don’t just point a random new image at the old database and hope Docker Jesus sorts it out 🙂

Watchtower has been removed

The old stack let Watchtower automatically pull and replace containers. The Watchtower maintainers archived the project on 17 December 2025 and now state that it is no longer maintained.

I don’t think unattended auto-updates are worth handing permanent Docker-socket access to an abandoned container.

Updating this stack manually is hardly an ordeal:

docker compose pull
docker compose up -d
docker image prune


LinuxServer currently recommends Diun if you want notifications that new images are available, rather than automatically updating everything while you’re asleep and waking up to seven broken services and a strong urge to throw the server into the pool.

Folder layout

I keep Compose files and persistent Docker data separate:

/home/richay/docker-compose/   # Compose files and small hand-managed config
/home/richay/docker/           # Persistent container data


A simple media tree might look like:

/mnt/media/
├── downloads/
└── media/
    ├── movies/
    ├── tv/
    └── music/


The important part is that Radarr/Sonarr and your download client see the same filesystem through the same /data container path. That allows hardlinks and atomic moves instead of copying a massive file from one mount to another and then deleting the original.

Create the config folders:

mkdir -p /home/richay/docker-compose/entertainment
mkdir -p /home/richay/docker/{bazarr,jellyfin,seerr,plex,prowlarr,radarr,sonarr,tautulli}
mkdir -p /mnt/media/{downloads,media/movies,media/tv,media/music}


Current entertainment Compose stack

This keeps the spirit of my original stack without carrying all the old baggage:

services:
  bazarr:
    image: lscr.io/linuxserver/bazarr:latest
    container_name: bazarr
    environment:
      - PUID=1000
      - PGID=1000
      - TZ=Australia/Perth
    volumes:
      - /home/richay/docker/bazarr:/config
      - /mnt/media:/data
    ports:
      - "6767:6767"
    restart: unless-stopped
    networks:
      - entertainment

  jellyfin:
    image: lscr.io/linuxserver/jellyfin:latest
    container_name: jellyfin
    environment:
      - PUID=1000
      - PGID=1000
      - TZ=Australia/Perth
    volumes:
      - /home/richay/docker/jellyfin:/config
      - /mnt/media/media:/data/media:ro
    ports:
      - "8096:8096"
      # Optional local discovery:
      # - "7359:7359/udp"
      # Optional DLNA/service discovery:
      # - "1900:1900/udp"
    # Intel/AMD hardware acceleration:
    # devices:
    #   - /dev/dri:/dev/dri
    restart: unless-stopped
    networks:
      - entertainment

  seerr:
    image: ghcr.io/seerr-team/seerr:latest
    container_name: seerr
    init: true
    environment:
      - LOG_LEVEL=info
      - TZ=Australia/Perth
      - PORT=5055
    volumes:
      - /home/richay/docker/seerr:/app/config
    ports:
      - "5055:5055"
    healthcheck:
      test: wget --no-verbose --tries=1 --spider http://localhost:5055/api/v1/settings/public || exit 1
      start_period: 20s
      timeout: 3s
      interval: 15s
      retries: 3
    restart: unless-stopped
    networks:
      - entertainment

  plex:
    image: lscr.io/linuxserver/plex:latest
    container_name: plex
    network_mode: host
    environment:
      - PUID=1000
      - PGID=1000
      - TZ=Australia/Perth
      - VERSION=docker
      - PLEX_CLAIM=
    volumes:
      - /home/richay/docker/plex:/config
      - /mnt/media/media:/data/media:ro
    # Intel/AMD hardware acceleration:
    # devices:
    #   - /dev/dri:/dev/dri
    restart: unless-stopped

  prowlarr:
    image: lscr.io/linuxserver/prowlarr:latest
    container_name: prowlarr
    environment:
      - PUID=1000
      - PGID=1000
      - TZ=Australia/Perth
    volumes:
      - /home/richay/docker/prowlarr:/config
    ports:
      - "9696:9696"
    restart: unless-stopped
    networks:
      - entertainment

  radarr:
    image: lscr.io/linuxserver/radarr:latest
    container_name: radarr
    environment:
      - PUID=1000
      - PGID=1000
      - TZ=Australia/Perth
    volumes:
      - /home/richay/docker/radarr:/config
      - /mnt/media:/data
    ports:
      - "7878:7878"
    restart: unless-stopped
    networks:
      - entertainment

  sonarr:
    image: lscr.io/linuxserver/sonarr:latest
    container_name: sonarr
    environment:
      - PUID=1000
      - PGID=1000
      - TZ=Australia/Perth
    volumes:
      - /home/richay/docker/sonarr:/config
      - /mnt/media:/data
    ports:
      - "8989:8989"
    restart: unless-stopped
    networks:
      - entertainment

  tautulli:
    image: lscr.io/linuxserver/tautulli:latest
    container_name: tautulli
    environment:
      - PUID=1000
      - PGID=1000
      - TZ=Australia/Perth
    volumes:
      - /home/richay/docker/tautulli:/config
    ports:
      - "8181:8181"
    restart: unless-stopped
    networks:
      - entertainment

networks:
  entertainment:
    name: entertainment


Why keep an explicit entertainment network?

Docker Compose automatically creates a default network and provides service-name DNS anyway, so technically the explicit network isn’t required if everything lives in this one Compose project.

I still like naming it entertainment because it gives me a stable network name that another stack can deliberately join later.

For example, Radarr can talk to Sonarr/Prowlarr-style services using names such as:

http://prowlarr:9696
http://radarr:7878
http://sonarr:8989
http://seerr:5055
http://jellyfin:8096


No container IPs required. Docker handles the internal DNS. Fucking lovely.

Plex is the odd bastard

Plex uses network_mode: host in the LinuxServer recommended configuration, so it does not join the entertainment bridge network in this example.

That also means this old combination was pointless:

network_mode: host
ports:
  - 32400:32400


Docker explicitly ignores published ports when host networking is enabled because Plex is already binding directly to the host’s network stack.

So Tautulli/Seerr should reach Plex using the Docker host’s LAN address, for example:

http://192.168.1.10:32400


Replace that with your actual Docker/Plex host address.

Jellyfin ports

The only Jellyfin port I expose by default in the stack is:

8096/tcp  # normal Jellyfin HTTP web/API


LinuxServer still documents 8920/tcp, 7359/udp and 1900/udp as optional ports. I don’t bother with Jellyfin’s own HTTPS port 8920 when Traefik is handling TLS in front of it.

7359/udp is useful for local client discovery and 1900/udp is used for service/DLNA discovery. Uncomment them only if you actually use those features.

Hardware transcoding

For Intel/AMD hardware acceleration, LinuxServer’s Jellyfin image still supports mapping the host’s DRI device:

devices:
  - /dev/dri:/dev/dri


The same mapping can be used for Plex when the Docker host has the GPU available.

If you’re running Docker inside a Proxmox LXC, get the GPU working in the LXC first. Then pass it to Docker. Debugging Proxmox → LXC → Docker → Jellyfin all at once is how hobbies turn into drinking problems 🙂

Where’s qBittorrent?

I deliberately left the download client out of this stack.

If qBittorrent needs to live behind a VPN, I prefer it in a dedicated VPN/download stack rather than mixing VPN networking into Plex, Jellyfin and everything else.

See my updated Docker Stack with ExpressVPN article for the VPN side.

Radarr and Sonarr can still use that qBittorrent instance as their download client — it does not need to be in the same Compose file.

Don’t mount everything into everything

My old stack gave Prowlarr and Overseerr access to media, storage and downloads even though they had no bloody reason to touch those files.

The new split is:

  • Radarr / Sonarr / Bazarr: access to the shared /data tree.
  • Plex / Jellyfin: read-only access to /data/media.
  • Prowlarr / Seerr / Tautulli: config only; no media filesystem access required.

It’s cleaner and reduces the blast radius if one container ever gets compromised.

Starting and checking the stack

cd /home/richay/docker-compose/entertainment
docker compose up -d
docker compose ps


Then confirm the internal Docker DNS works from one of the containers:

docker exec sonarr getent hosts prowlarr
docker exec sonarr getent hosts radarr


If those return container IPs, the service-name networking is doing exactly what we wanted.

Old stack — what I’d keep and what I’d bin

  • Keep: one shared Docker network and service-name communication.
  • Keep: LinuxServer images for the *arr apps, Jellyfin, Plex and Tautulli.
  • Keep: Perth timezone and sensible PUID/PGID ownership.
  • 🛠️ Change: Overseerr → Seerr.
  • 🛠️ Change: named volumes → obvious bind-mounted config folders.
  • 🛠️ Change: multiple inconsistent media paths → one /data tree.
  • 🗑️ Bin: obsolete Compose version: "3.6".
  • 🗑️ Bin: Watchtower.
  • 🗑️ Bin: pointless Plex ports: while using host networking.

References

The original stack wasn’t bad at all — the networking idea aged really well. It just accumulated a couple of dead projects, redundant mounts and Docker archaeology around it. A bit of a clean-out and she’s good again 🙂

Portainer: Deleting a Broken Stack Throwing Errors on Linux

Status: CURRENT — RECOVERY WORKAROUND
Last reviewed: 31 August 2026
Applies to: Portainer CE/BE on Docker Standalone when a stack exists in Portainer but its stored Compose file is missing

This is still a real Portainer failure mode. Recent Portainer issues show stacks can become undeletable when the stored /data/compose/<stack-id> directory or Compose file disappears. This workaround recreates the minimum Portainer expects so the stack can be deleted normally.

Every now and again Portainer manages to get itself into a stupid state where a stack still exists in its database, but the Compose file behind it has disappeared.

You then try to delete the broken stack and Portainer throws something along the lines of:

could not get the contents of the file 'docker-compose.yml'

or

open /data/compose/234/docker-compose.yml:
no such file or directory


Excellent. The stack is broken because the file is missing, and Portainer refuses to delete the broken stack because the file is missing. Very helpful 😂.

Is this still relevant?

Yep.

This bug has been reported in Portainer for years, and there are still current examples. A July 2026 Portainer issue describes a failed Git Pull and redeploy operation leaving the stack’s /data/compose/<id> directory without the Compose file, after which the stack cannot be edited or redeployed normally.

Older reports describe the same basic workaround as this article: recreate the missing directory/file, then let Portainer perform the deletion itself.

Important: we’re touching Portainer’s persistent /data directory directly. Don’t start randomly deleting folders in there because some bloke on the internet — including me — said so. Back up Portainer first 🙂

1. Find the stack ID

The easiest clue is normally the error itself. Portainer may show a path such as:

/data/compose/234/docker-compose.yml


In that example the stack ID is:

234


You may also be able to see the stack ID in the Portainer URL when viewing the stack.

2. Find where Portainer’s /data actually lives

My old article assumed Portainer used the default named volume at:

/var/lib/docker/volumes/portainer_data/_data


That’s common, but it is not guaranteed. Portainer might be using a different named volume or a bind mount.

Ask Docker where the Portainer container’s /data mount actually points:

docker inspect portainer   --format '{{range .Mounts}}{{if eq .Destination "/data"}}{{.Source}}{{end}}{{end}}'


For a standard named volume that may return:

/var/lib/docker/volumes/portainer_data/_data


If your Portainer container isn’t actually called portainer, find it first:

docker ps --format 'table {{.Names}}\t{{.Image}}' | grep -i portainer


3. Back up Portainer before poking it

Set the returned path as a variable:

PORTAINER_DATA="$(docker inspect portainer   --format '{{range .Mounts}}{{if eq .Destination "/data"}}{{.Source}}{{end}}{{end}}')"

echo "$PORTAINER_DATA" 


Make sure that printed the correct Portainer data directory before continuing.

Then take a quick filesystem backup:

sudo tar -czf "/root/portainer-data-backup-$(date +%Y%m%d-%H%M%S).tar.gz"   -C "$PORTAINER_DATA" .


For a tiny recovery job this takes bugger-all effort and gives you an escape hatch if your fingers become enthusiastic.

4. Check the Compose storage

List Portainer’s stored stack directories:

sudo ls -lah "$PORTAINER_DATA/compose/" 


If your broken stack is ID 234, check it directly:

sudo ls -lah "$PORTAINER_DATA/compose/234/" 


You will normally find one of two things:

  • The entire 234 directory is missing.
  • The directory exists but docker-compose.yml is missing.

5. Recreate only what Portainer is complaining about

If the whole stack directory is missing:

sudo mkdir -p "$PORTAINER_DATA/compose/234" 


Now create the missing Compose file:

sudo nano "$PORTAINER_DATA/compose/234/docker-compose.yml" 


It does not need to recreate your entire original stack if your only goal is to get rid of the dead Portainer record.

I put a single YAML comment in it:

# recovery placeholder so Portainer can delete the broken stack


Save the file.

You can do the same thing without opening an editor:

echo '# recovery placeholder so Portainer can delete the broken stack' |   sudo tee "$PORTAINER_DATA/compose/234/docker-compose.yml" >/dev/null


6. Try deleting the stack again

Go back to:

Portainer → Stacks → broken stack → Delete this stack


If the missing Compose file was the blocker, Portainer should now be able to finish deleting the stale stack record.

That’s it. We essentially gave Portainer the world’s saddest Compose file so it would finally agree to clean up its own mess 😀

What if it complains about stack.env instead?

Another reported version of this bug complains about:

failed to create env file:
open /data/compose/234/stack.env:
no such file or directory


In that case, recreating the missing stack directory may be enough because Portainer can then create stack.env itself.

If the error specifically says a required file is missing, follow the error rather than blindly manufacturing a dozen random files.

Git-backed stacks are a bit different

If the stack originally came from Git, first consider whether restoring the Compose file/repository path is the cleaner fix.

Portainer’s current Git stack handling still expects the configured Compose path to exist. Renaming/removing that file can leave Portainer unable to redeploy or delete the stack cleanly.

If you only want the stale Portainer entry gone and the Git source is already toast, the placeholder-file recovery above is still useful.

What I would NOT do

  • Don’t delete the entire portainer_data volume. That’s the nuclear option and wipes Portainer’s persistent state.
  • Don’t start editing Portainer’s database manually just to remove one broken stack unless you absolutely know what you’re doing.
  • Don’t delete random numbered directories from /data/compose.
  • Don’t assume the stack ID is the same thing as a Docker container ID.

The goal here is deliberately boring: identify the exact missing stack directory, recreate the minimum expected file, let Portainer delete it normally, fuck off and do something more interesting.

Old command from the original article

The original guide started with:

sudo ls /var/lib/docker/volumes/portainer_data/_data/compose/


That is still correct if Portainer uses a Docker named volume called portainer_data. The current article simply discovers the mount first so the same fix also works with custom volumes and bind mounts.

References

A very small fix for a very annoying circular error. Portainer: “I can’t delete the stack because the file doesn’t exist.” Me: “Fine, here’s a fucking comment file.” Portainer: “Oh okay then.” 🙂