Status: CURRENT — MAJOR 2026 UPDATE Last reviewed: 31 August 2026 Applies to: Current ExpressVPN Linux app / CLI using expressvpnctl
The original idea still works, but ExpressVPN replaced its old Linux CLI in late 2025. Commands such as expressvpn list all, expressvpn refresh and expressvpn connect belong to the old client. The current CLI is expressvpnctl.
The original version of this article forced ExpressVPN to disconnect, choose another server and reconnect every hour.
I originally borrowed the idea from an Ubuntu 101 article and then tweaked it with suggestions from commenters. The old method did the job, but the ExpressVPN Linux app has changed enough that copying the old script today will mostly result in Linux staring back at you like you’ve personally offended it.
Do you actually need to change VPN server every hour?
Probably not.
Changing servers every hour doesn’t magically make the VPN more private. It also interrupts existing connections, changes your public IP and can annoy websites/services that suddenly see you teleport from one location to another.
But there are still legitimate reasons to automate a reconnect — for example, working around a server that gets shitty after running for a long time, periodically refreshing the public IP, or because you simply enjoy making networking unnecessarily complicated. I can’t judge; look at the rest of this website 🙂
What changed in ExpressVPN for Linux?
ExpressVPN introduced a redesigned Linux app in version 5.0.0 in November 2025 and replaced the old command-line interface with a new CLI.
The command now starts with:
expressvpnctl
The current app also has built-in:
Smart Location
Auto-connect rules
Network Lock / kill switch
Split tunnelling
Background mode for headless CLI use
Automatic protocol selection
So we don’t need the old @reboot expressvpn connect cron bodge anymore.
1. Enable ExpressVPN background mode
Current ExpressVPN requires either the GUI to be running or background mode to be enabled before CLI connection commands can work unattended.
For a headless/server-style setup:
expressvpnctl background enable
Check the current CLI options at any time with:
expressvpnctl -h
2. Test Smart Location
ExpressVPN’s current Smart Location chooses a location based on things such as speed and proximity.
Connect explicitly to Smart Location with:
expressvpnctl connect smart
To see the currently available location names:
expressvpnctl get regions
And if you want to manually choose one:
expressvpnctl connect "Australia - Sydney"
Use the exact location name shown by expressvpnctl get regions. Server/location names can change, so don’t assume my example is immortal.
3. Create the hourly Smart Location script
I now keep little user scripts under ~/.local/bin rather than dumping homemade scripts into /usr/sbin.
#!/usr/bin/env bash
set -euo pipefail

export PATH=/usr/local/sbin:/usr/local/bin:/usr/sbin:/usr/bin:/sbin:/bin

# Ask ExpressVPN to select its current Smart Location.
# No explicit disconnect first - just switch/reconnect.
expressvpnctl connect smart
Why I don’t disconnect first anymore: the old script deliberately ran disconnect before reconnecting. The current CLI can connect/switch directly to another location. Avoiding a deliberate disconnected window is cleaner, especially on a machine carrying traffic you actually care about.
4. Use a systemd user timer instead of cron
Cron would still work, but systemd timers give better logging and are easier to inspect when something goes cactus.
If this is a headless machine and you want the user timer to keep running when you’re not logged in, enable lingering for that Linux user:
sudo loginctl enable-linger "$USER"
Optional: actually choose a random location
Smart Location is not random. It deliberately chooses what ExpressVPN thinks is the best location. It may happily choose the same location again.
If you genuinely want random rotation, I prefer keeping a small list of locations I am happy to use rather than scraping whatever format expressvpnctl get regions happens to print this month.
First get the current valid names:
expressvpnctl get regions
Then create:
nano ~/.local/bin/expressvpn-random-reconnect.sh
Example:
#!/usr/bin/env bash
set -euo pipefail

export PATH=/usr/local/sbin:/usr/local/bin:/usr/sbin:/usr/bin:/sbin:/bin

# Pick locations YOU are happy to use.
# Confirm current names first with: expressvpnctl get regions
LOCATIONS=(
  "Australia - Sydney"
  "Australia - Melbourne"
)

LOCATION="${LOCATIONS[RANDOM % ${#LOCATIONS[@]}]}"

printf 'Switching ExpressVPN to: %s\n' "$LOCATION"
expressvpnctl connect "$LOCATION"
Yeah, the timer name still says “smart” if you do that. Rename it too if that sort of thing keeps you awake at night. My brain would absolutely notice it six months later and become irrationally annoyed.
Network Lock / kill switch
ExpressVPN’s current Linux CLI has Network Lock enabled by default. It is designed to block traffic when the VPN connection unexpectedly drops.
You can explicitly enable it with:
expressvpnctl set networklock true
For the best experience ExpressVPN recommends leaving the VPN protocol on Automatic unless you have a reason to force something else:
expressvpnctl set protocol auto
Don’t confuse “hourly server switching” with a kill switch. The timer changes location. Network Lock is what protects traffic when the VPN unexpectedly disappears. They solve completely different problems.
Checking your public IP
The old article used expressvpn status. With the new client I prefer simply confirming the outside world sees a different IP:
curl -4 https://ifconfig.me ; echo
Run it before and after a reconnect. If the location/server actually changed, the public IP will normally change too.
Old method — archived
ARCHIVED — OLD EXPRESSVPN LINUX CLI
The original article used the pre-5.x Linux CLI. These commands are preserved so old search results and installations make sense, but don’t use them with the current client.
The original connection-at-boot cron entry was:
MAILTO=""
@reboot expressvpn connect
And the old randomisation script did roughly this:
The cron concept wasn’t wrong. The commands underneath it simply got replaced when ExpressVPN rebuilt the Linux app.
A note about the original random script
The old script parsed human-readable command output using tail, awk, grep and shuf. It even relied on specific column positions.
That kind of script is fine until the application changes one heading or adds one bloody space and suddenly your “VPN location” variable contains a decorative column title.
The current version either asks ExpressVPN directly for smart, or chooses from a small explicit list of valid locations. Much less clever. Much less likely to fuck itself.
Status: CURRENT — SIMPLE WORKAROUND Last reviewed: 31 August 2026 Applies to: Forza Horizon 5 on Windows when Alt+Tab causes the game/menu to stop responding properly
This still appears to be a useful workaround. It is not really a Thrustmaster T300RS fix — the wheel just happened to be what made me Alt+Tab in and out of Forza constantly while I was setting everything up.
I was given a Thrustmaster T300RS wheel and, while configuring it for Forza Horizon 5, I kept Alt+Tab‘ing out of the game to change settings.
Every now and again I’d return to Forza and end up stuck in the menu or unable to get the game responding properly.
After a bit of hunting around, I found a stupidly simple workaround: flick the game into windowed mode and then back to fullscreen.
The shortcut is:
Alt + Enter
Press it once to switch display mode, then press it again to switch back.
For me that was enough to wake the game back up and let me get out of the menu.
So basically:
Alt + Tab out of Forza
        ↓
Come back and menus/input are cactus
        ↓
Alt + Enter
        ↓
Windowed mode
        ↓
Alt + Enter again
        ↓
Fullscreen again
        ↓
Game behaves itself :)
Is this still a thing?
Yep, or at least variations of it are.
Forza Horizon 5 players have reported fullscreen/window-focus problems since launch, including the game behaving differently after Alt+Tab. Toggling between windowed and fullscreen has repeatedly been used as a workaround.
There were still player reports in 2026 where Alt + Enter and temporarily running FH5 in windowed mode helped get around loading/display weirdness.
Important: this doesn’t mean every stuck-menu problem has the same cause. If Alt+Enter fixes it, fantastic. If it doesn’t, don’t start reinstalling your Thrustmaster drivers just because this page mentions a T300RS.
If Alt + Enter doesn’t fix it
Try the boring stuff before tearing your sim rig apart:
Alt+Tab out and back into the game again.
Switch Windowed/Fullscreen from Forza’s video settings.
Click directly inside the game window to make sure it has focus.
Restart Forza if the input state is completely borked.
If the problem only happens with the wheel connected, then start checking the Thrustmaster control panel, firmware and bindings.
But for the particular problem I had, two presses of Alt + Enter saved me from restarting the whole bloody game every time 😀
Status: CURRENT Last reviewed: 31 August 2026 Applies to: Single-site WordPress behind Nginx
The original fix in this article is still the standard WordPress/Nginx permalink configuration: if a requested file or directory doesn’t exist, send the request to WordPress’s index.php front controller instead of immediately returning a 404.
Back when I was very new to WordPress, my post URLs looked like this:
https://richay.au/?page_id=2
They worked, but they’re ugly as shit and not exactly memorable.
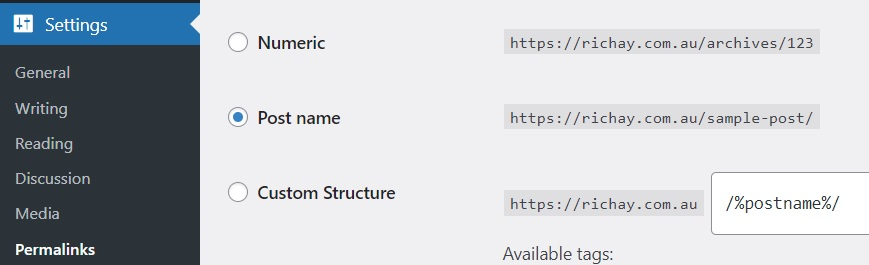
WordPress lets you change this under:
Settings → Permalinks → Post name
After changing from the default/plain URL structure to a nice permalink such as:
https://richay.au/my-post-name/
the homepage still worked, but every post/page immediately returned:
404 Not Found
At first it looks like WordPress broke the URLs. It didn’t. Nginx just wasn’t handing those nice-looking URLs back to WordPress.
Why this happens on Nginx
WordPress pretty permalinks rely on the web server routing requests that aren’t real files or directories into WordPress’s index.php.
On Apache this is commonly handled through .htaccess.
Nginx does not use WordPress’s .htaccess file. The equivalent routing needs to be configured in the Nginx server {} block.
If your configuration currently says:
location / {
    try_files $uri $uri/ =404;
}
Nginx checks whether the URL points to a real file or directory and, if it doesn’t, immediately returns a 404.
For a WordPress URL like /wordpress-solving-404-error/, there usually isn’t a physical folder with that name. WordPress is supposed to interpret the URL and decide which post to show.
That one line is still the configuration shown in WordPress’s current Nginx documentation.
The logic is basically:
Request /some-post/
↓
Does a real file called /some-post/ exist?
↓ no
Does a real directory called /some-post/ exist?
↓ no
Send the request internally to /index.php
↓
WordPress works out which post/page you wanted :)
Find the correct Nginx config first
My original article told everyone to edit:
sudo nano /etc/nginx/sites-enabled/default
That was correct for my Debian setup at the time, but it is not a universal Nginx path.
Your WordPress server block might instead be somewhere like:
Find the server {} block handling your WordPress hostname and edit that configuration.
If WordPress is running inside Docker, a VM appliance, a hosting panel or another managed stack, the relevant Nginx configuration may not live in Debian’s normal sites-enabled directory at all. Follow the request path and edit the Nginx instance that is actually serving WordPress — not whichever random Nginx config you found first.
Test before reloading Nginx
This was missing from my original guide and it’s important.
Before reloading Nginx, test the configuration:
sudo nginx -t
You want to see that the syntax is OK and the configuration test is successful.
Then reload Nginx without taking the whole server down:
sudo systemctl reload nginx
Now refresh one of the previously broken WordPress post URLs.
If the try_files rule was the problem, your pretty permalinks should immediately start working.
Full minimal example
This is not a complete production Nginx configuration, but it shows where the permalink rule sits:
server {
listen 80;
server_name example.com www.example.com;
root /var/www/wordpress;
index index.php;
location / {
    try_files $uri $uri/ /index.php?$args;
}
location ~ \.php$ {
include fastcgi.conf;
fastcgi_pass unix:/run/php/php-fpm.sock;
}
}
Don’t blindly paste that entire example. Your PHP-FPM socket, TLS configuration, document root and server name will almost certainly differ. The important permalink bit is the location / block.
What if it still returns 404?
Confirm you edited the Nginx server {} block that actually handles the WordPress hostname.
Run sudo nginx -T and verify the active configuration contains the new try_files rule.
Run sudo nginx -t before every reload.
Confirm the site’s root points at the directory containing WordPress’s index.php.
Check that PHP-FPM itself is working. If even index.php fails, you have a different problem.
Go back to WordPress → Settings → Permalinks and confirm the permalink structure you actually want is selected.
If the homepage works, direct PHP works, but every pretty permalink returns Nginx’s own 404 page, the try_files rule is the first bloody thing I’d check.
What about .htaccess?
This catches a lot of people migrating WordPress guides from Apache.
You can regenerate .htaccess until your keyboard wears out — standalone Nginx isn’t reading it.
The permalink routing belongs in Nginx itself.
Old article verdict
Surprisingly, the actual fix from 2022 has aged perfectly:
The only bits that needed cleaning up were the old richay.com.au references, the assumption that every Debian Nginx site uses /etc/nginx/sites-enabled/default, and the lack of an nginx -t safety check.
Not bad for one of my first WordPress fixes. Apparently I occasionally knew what the fuck I was doing even back then 🙂
Status: CURRENT — SECURITY WARNING / LEGACY WORKAROUND Last reviewed: 31 August 2026 Applies to: Apache Guacamole SSH connections to modern OpenSSH/Kali Linux
Do not start by adding HostKeyAlgorithms +ssh-rsa to Kali. That re-enables the old RSA/SHA-1 signature algorithm which OpenSSH deliberately disabled by default. Update Guacamole/guacd and its SSH libraries first. Only use the old setting as a temporary compatibility workaround if you understand why the negotiation is failing.
Back in 2022 I had Guacamole refusing to SSH into a Kali Linux machine.
I found a Reddit comment suggesting this:
HostKeyAlgorithms +ssh-rsa
I added it to /etc/ssh/sshd_config on Kali and Guacamole started working.
At the time that solved the problem. In 2026, though, this absolutely needs some context before someone copies it into a current SSH server and accidentally makes security worse just to satisfy an ancient client.
Important correction: RSA itself wasn’t deprecated
The old explanation floating around in 2022 often said that “RSA was deprecated”. That’s not quite right.
OpenSSH 8.8 disabled the ssh-rsa signature algorithm by default because it uses the broken SHA-1 hash algorithm.
Existing RSA keys did not suddenly become useless. OpenSSH has supported stronger RSA signatures for years:
rsa-sha2-256
rsa-sha2-512
So this is an important distinction:
RSA key              = not automatically bad
ssh-rsa signature     = RSA + SHA-1, legacy
rsa-sha2-256 / 512    = RSA + SHA-2, modern
OpenSSH itself describes re-enabling RSA/SHA-1 as a stopgap for legacy implementations until they can be upgraded.
Why Guacamole used to have trouble
Guacamole’s SSH support is provided by libguac-client-ssh and the underlying libssh2 library.
Older Guacamole/guacd builds could therefore inherit the algorithm limitations of an older libssh2 build. A perfectly current OpenSSH server could reject the only host-key algorithm the old Guacamole side knew how to negotiate.
This is why weakening Kali was able to “fix” the connection: Kali began offering an old algorithm that the old client understood.
It worked, but we fixed the compatibility problem at the wrong end.
Recommended 2026 fix: update Guacamole first
Apache Guacamole 1.6.0 is the current release at the time of this review. Current Guacamole SSH support still uses libssh2, while newer Guacamole/libssh2 versions support modern SSH algorithms and newer key formats.
If you’re still running some prehistoric Guacamole container from the era when this article was written, update it before touching Kali’s SSH security.
For Docker, first check what you are actually running:
Don’t blindly replace two lines in a production Compose file from this snippet — database extensions, environment variables and your existing Guacamole setup still matter. The point is to get off the ancient SSH client stack first.
Check the Kali SSH server
On Kali, check the OpenSSH version:
ssh -V
Check which SSH host keys exist:
ls -l /etc/ssh/ssh_host_*_key.pub
A normal modern OpenSSH installation should generally have modern host keys available, commonly Ed25519 and/or ECDSA along with RSA.
If standard host keys are genuinely missing, OpenSSH can generate any missing defaults with:
sudo ssh-keygen -A
ssh-keygen -A generates host keys that don’t already exist; it isn’t a command for randomly replacing your existing server identity.
See what sshd is actually offering
Rather than guessing at the config, ask OpenSSH for the effective setting:
sudo sshd -T | grep -i '^hostkeyalgorithms'
Current OpenSSH defaults include modern algorithms such as:
Notice what’s missing from the normal modern default:
ssh-rsa
That’s deliberate.
Check Guacamole’s error before changing anything
If you’re using Docker:
docker logs --tail 200 guacd
Look for messages about SSH negotiation, key exchange, host-key algorithms or authentication.
Don’t assume every Guacamole SSH failure is an ssh-rsa problem. Bad credentials, a changed host key, an old key-exchange algorithm, networking, or a completely different SSH setting can all produce a failed connection.
Host key problem vs login-key problem
These are two different things and mixing them up causes a lot of shitty SSH advice on the internet.
HostKeyAlgorithms controls the algorithm the SSH server uses to prove its identity to the client.
PubkeyAcceptedAlgorithms controls signature algorithms accepted when a user authenticates with a public key.
If Guacamole cannot even negotiate the server’s host key, blindly adding PubkeyAcceptedAlgorithms +ssh-rsa isn’t fixing the same problem — it’s just weakening another setting for bonus points.
Last resort: temporarily re-enable ssh-rsa
CAUTION — LEGACY COMPATIBILITY ONLY
Only do this if you’ve confirmed that an old Guacamole/libssh2 client genuinely requires ssh-rsa and you cannot update it immediately. OpenSSH disabled this algorithm because it uses SHA-1. Remove the workaround once the client has been fixed.
Current Guacamole supports SSH host verification using either an ssh_known_hosts file or a per-connection host-key value.
Surprisingly, Guacamole leaves host identity verification disabled if you don’t provide either of those.
For a private homelab that’s easy to ignore, but verifying the SSH server’s host key protects against connecting to the wrong machine or a man-in-the-middle. If you’re already cleaning up an old Guacamole SSH setup, it’s worth doing properly rather than merely making the red error box disappear.
Old article verdict
The old fix genuinely worked, so I’m not deleting it or pretending it never existed.
But the order of operations in 2026 should be:
1. Update Guacamole + guacd
2. Check guacd SSH logs
3. Confirm Kali has modern SSH host keys
4. Confirm modern algorithms are being offered
5. Fix the old client/library if possible
6. ONLY THEN temporarily enable ssh-rsa if absolutely required
Not:
Guacamole won't connect
        ↓
WEAKEN SSH UNTIL IT DOES
        ↓
sweet, fixed :D
Past me got the connection working. Current me would just like to stop past me from leaving a SHA-1-shaped rake on the lawn for someone else to step on 😅.
Status: CURRENT — WITH CAUTION Last reviewed: 31 August 2026 Applies to: Current Nextcloud, including Docker/LinuxServer installs and data directories on filesystems that cannot represent normal Unix permissions
The check_data_directory_permissions option still exists in current Nextcloud. However, Nextcloud’s own documentation says disabling this check is intended for rare setups where the underlying storage cannot correctly represent the expected permissions. In normal installs, fix the permissions instead of turning the check off.
This is a common Nextcloud first-run error, especially after moving the data directory onto another filesystem or NAS.
In my case I had moved Nextcloud’s data onto a Windows NAS. Nextcloud looked at the mounted filesystem, couldn’t see the Unix-style 0770 permissions it expected, and basically went:
NOPE. GIVE ME 0770.
The annoying bit is that some filesystems — particularly SMB/CIFS mounts — don’t necessarily expose Unix permissions in the same way a normal local Linux filesystem does. So chmod 0770 may either do nothing useful or report something that doesn’t really represent what the NAS is enforcing.
Do not disable the check first
This is the important bit that my original article was missing.
Nextcloud’s current documentation says check_data_directory_permissions defaults to true and that disabling it is intended for rare environments where permissions cannot be corrected normally. For regular installations, Nextcloud explicitly discourages changing the flag.
So before bypassing anything, check whether you actually have a normal permission problem.
1. Check where the data directory actually is
For a normal install, check your Nextcloud config:
If you’re using the LinuxServer Nextcloud image, the current recommended layout maps persistent storage to:
/config  # Nextcloud configuration/application state
/data    # User data
Make sure you are fixing the storage Nextcloud is actually using and not chmod’ing some completely unrelated directory while Nextcloud watches in disappointment.
2. If it’s a normal Linux filesystem, fix the permissions
On a normal local Linux filesystem, don’t bypass the check just because it’s easier.
The web/PHP process needs genuine access to the data directory. The exact owner depends on your install, but a traditional Debian/Ubuntu Nextcloud install commonly runs as www-data.
For example, after confirming the correct path and ownership for your setup:
Don’t blindly run that on a giant existing NAS share. Recursive ownership changes can ruin permissions for other services/users. Work out who actually owns the files first. A five-second copy/paste fix can create a really shit afternoon.
3. When disabling the check actually makes sense
The bypass can be reasonable when all of these are true:
The data directory is on a filesystem/mount that cannot represent the expected Unix mode properly — SMB/CIFS is a common example.
Nextcloud’s process really can read, write, create, rename and delete files in the directory.
The storage itself is securely restricted even though Nextcloud cannot verify that restriction through Unix mode bits.
You understand that disabling this setting skips a safety check; it does not magically fix access.
If Nextcloud can’t actually write to the share, changing this flag won’t fix shit. You’ll simply get past one warning and hit a different error five minutes later.
Preferred method: use occ
Rather than manually editing PHP, current Nextcloud provides the occ config:system:set command.
Much cleaner than opening config.php, adding a comma in the wrong place and discovering that PHP has opinions.
Manual config.php method
The old method is still valid if occ isn’t available yet — for example during an installation that hasn’t completed.
Regular installation
sudo nano /var/www/nextcloud/config/config.php
LinuxServer Docker
The LinuxServer config still lives inside the container at:
/config/www/nextcloud/config/config.php
You can open a shell:
docker exec -it nextcloud /bin/bash
Then edit:
nano /config/www/nextcloud/config/config.php
Add this inside the $CONFIG array:
'check_data_directory_permissions' => false,
Save it and reload Nextcloud.
Docker image matters: that /config/www/nextcloud/config/config.php path is for the LinuxServer image. Other Nextcloud images use different paths — the official image commonly keeps its application under /var/www/html. Don’t wander into a random container path because Google showed you a 2022 LinuxServer guide. Yes, including this one 😅.
If you’re using a Windows NAS, consider External Storage instead
This is the other thing I’d do differently today.
If your goal is simply to make files already sitting on a Windows/Samba NAS available inside Nextcloud, you don’t necessarily need to make that share Nextcloud’s primary data directory.
Nextcloud has an External Storage app with native SMB/CIFS support. You can connect the NAS as a folder inside Nextcloud instead.
Current Nextcloud recommends the PHP smbclient module where possible because it is more reliable than falling back to the standalone smbclient executable.
That architecture looks more like:
Nextcloud primary data
        ↓
normal local/Docker storage

Existing Windows NAS
        ↓
Nextcloud External Storage
        ↓
SMB/CIFS
For a lot of homelab setups that’s cleaner than making Nextcloud’s entire data directory depend on a network share and then spending the weekend arm-wrestling CIFS permissions.
How to turn the check back on
If you later move back to storage with proper Unix permissions, put the safety check back:
It does not make a publicly readable data directory safe.
It does not fix ownership or UID/GID mismatches.
It simply tells Nextcloud to stop rejecting the directory because its permission-mode check doesn’t look the way Nextcloud expects.
Think of it as telling Nextcloud, “yes mate, I know the permission bits look weird; I’ve checked the storage myself.” Not “YOLO, permissions are optional now.”
Old article verdict
The actual setting from my 2022 fix is still completely real:
'check_data_directory_permissions' => false,
What changed is the recommendation around it. My old article made it sound like the easy fix was automatically the right fix. Current Nextcloud documentation is much clearer: use this for weird storage where normal permission correction genuinely isn’t possible; otherwise fix the underlying permissions.
So past me wasn’t wrong. Past me was just a little too excited about finding the switch that made the angry red box fuck off 😀
Status: CURRENT — 2026 CLEANUP Last reviewed: 31 August 2026 Applies to: Debian/Ubuntu Linux mounting an SMB/CIFS share from Windows, TrueNAS, Samba or another NAS
The basic /etc/fstab method from my original guide is still perfectly useful. The big changes are tightening the old 0777 permissions, putting credentials somewhere sensible, and using systemd’s network/automount options so a slow or unavailable NAS doesn’t make boot unnecessarily cactus.
One of the first hurdles I hit when I started playing with Linux VMs was getting them to use storage sitting on my NAS.
Windows/Samba shares use SMB/CIFS, and Linux can mount them just like another filesystem. Once it’s in /etc/fstab, the VM can bring the share in automatically and applications can use a normal Linux path instead of knowing anything about SMB.
Basically:
//NAS/share
     ↓
mount.cifs
     ↓
/mnt/nas-share
     ↓
Linux apps / Docker / whatever other nonsense I'm running :)
1. Install cifs-utils
On Debian/Ubuntu:
sudo apt update
sudo apt install cifs-utils
cifs-utils provides the mount.cifs helper used by the normal Linux mount command and /etc/fstab.
2. Create a mount point
I now prefer /mnt for a system/NAS mount rather than /media, which is more commonly used for removable/user-mounted media.
sudo mkdir -p /mnt/nas-share
Call it whatever makes sense. If the share contains TV, movies or backups, use a name that future-you won’t have to decode at 2am.
3. Create a credentials file
Do not put the SMB username and password directly into /etc/fstab. It works, but now every local user that can read the file gets a free NAS password. Nice one.
Use the numeric values in fstab. Numeric IDs avoid relying on name lookup while the system is mounting filesystems during boot.
5. Test the SMB mount manually first
Before permanently touching /etc/fstab, test the exact share and credentials.
sudo mount -t cifs //NAS_OR_IP/SHARE /mnt/nas-share -o credentials=/etc/samba/credentials-nas,uid=1000,gid=1000,file_mode=0660,dir_mode=0770
Then:
findmnt /mnt/nas-share
ls -lah /mnt/nas-share
If that fails, fix SMB credentials, DNS/networking or share permissions before adding it to boot. Otherwise you’re just making a broken mount more persistent 😅.
Unmount the test:
sudo umount /mnt/nas-share
6. Add it to /etc/fstab
Back up fstab first because a typo here can make boot considerably more exciting than intended:
credentials=... — keeps the username/password out of fstab.
uid=1000,gid=1000 — presents files locally as owned by that Linux UID/GID.
file_mode=0660 — local presentation: owner/group read + write, no access for everyone else.
dir_mode=0770 — owner/group can access/write directories, no access for everyone else.
iocharset=utf8 — sensible filename character handling.
nofail — don’t fail the entire boot just because the NAS is unavailable.
_netdev — explicitly tells the init system this filesystem depends on networking.
x-systemd.automount — creates an automount so the share is mounted when first accessed rather than blocking boot waiting for it.
x-systemd.idle-timeout=10min — allows systemd to unmount it after ten minutes idle; the next access automatically mounts it again.
Don’t want the mount to idle-unmount? Remove x-systemd.idle-timeout=10min. I like automounting because NASes and networks occasionally decide to have a little fucking nap during boot, but a permanently busy application mount won’t normally become idle anyway.
Why I removed vers=3.0
My original fstab line explicitly used:
vers=3.0
That isn’t necessarily wrong, but I no longer pin a protocol version unless I have a reason to.
Modern CIFS clients can negotiate a suitable modern SMB dialect with the server. Hard-coding a version can become unnecessary baggage later when both ends support something newer.
If a particular old NAS needs a specific version, add it deliberately after checking what the server supports. Do not fall all the way back to SMB1 just to make an ancient box stop complaining — that’s a different flavour of cactus.
Why 0777 was a bit enthusiastic
The original guide used:
file_mode=0777,dir_mode=0777
Which basically says “everyone gets everything”. That made permission problems disappear very efficiently because permissions themselves had also disappeared 😂.
For a single-user VM I now prefer something like:
file_mode=0660
dir_mode=0770
Adjust them for your actual use case. If multiple Linux services need the mount, using a shared group and a deliberate GID is much cleaner than opening it to everybody.
Important: Linux mode bits are not your NAS ACL
This catches people constantly.
uid, gid, file_mode and dir_mode control how the SMB mount is presented to Linux locally. They do not override whatever permissions the NAS/Windows server applies to the SMB account.
If the NAS user only has read access, giving the mount file_mode=0777 does not magically make the server allow writes.
That’s why sometimes you can stare at chmod for half an hour and nothing changes. You’re arguing with the wrong bloody computer.
7. Validate fstab before rebooting
After saving /etc/fstab, reload systemd’s generated mount units:
sudo systemctl daemon-reload
Check the file for obvious problems:
sudo findmnt --verify --verbose
Then trigger the mount by accessing it:
ls /mnt/nas-share
findmnt /mnt/nas-share
If it works now, a reboot shouldn’t contain any horrible surprises.
That keeps SMB credentials and mount behaviour on the host instead of teaching five different containers how to connect to the same NAS. Fewer moving parts, fewer places for shit to break.