Proxmox Unprivelliged LXC with shared Intel ARC GPU for Plex or Jellyfin transcoding

This is to create Plex and/or Jellyfin using docker within an Unprivilleged LXC container using Proxmox with access to the LXC’s host Intel ARC GPU.

I’m using Debian Trixie LXC for this example. This assumes you have:

Check the render device group on the host

ls -l /dev/dri/render*


Example output:

crw-rw---- 1 root render 226, 128 Nov 16 21:02 /dev/dri/renderD128
crw-rw---- 1 root render 226, 129 Nov 16 21:02 /dev/dri/renderD129


This is for the iGPU and the ARC GPU, the ARC GPU is renderD129. Both are part of the device GROUP 226 this will be needed later on.

Find the GID of the render group on the host – HOST_GID

getent group render


Example output:

render:x:993:


We also need the render group of the LXC – LXC_GID

getent group render


Example output:

render:x:105:


On the proxmox host, edit the config for the lxc

nano /etc/pve/lxc/<CTID>.conf


Add these lines in, remembering:
GROUP: 226
LXC_GID: 105
HOST_GID: 993
SUBUID_START: 100000 (constant)
BASE_RANGE: 65536 (constant)

lxc.cgroup2.devices.allow: c 226:0 rwm
lxc.cgroup2.devices.allow: c 226:128 rwm
lxc.mount.entry: /dev/dri/renderD128 dev/dri/renderD128 none bind,optional,create=file
lxc.cgroup2.devices.allow: c 226:129 rwm
lxc.mount.entry: /dev/dri/renderD129 dev/dri/renderD129 none bind,optional,create=file
lxc.idmap: u 0 100000 105
lxc.idmap: g 0 100000 105
lxc.idmap: u 105 993 1
lxc.idmap: g 105 993 1
lxc.idmap: u 106 100106 65430
lxc.idmap: g 106 100106 65430


This is to share both the iGPU and ARC GPU with 226 being the group.
The idmaps are rather complicated but you should be fine if you follow the rules

lxc.idmap: u 0 SUBUID_START BASE_RANGE = lxc.idmap: u 0 100000 105
lxc.idmap: g 0 SUBUID_START BASE_RANGE = lxc.idmap: g 0 100000 105

lxc.idmap: u LXC_GID HOST_GID 1 = lxc.idmap: u 105 993 1
lxc.idmap: g LXC_GID HOST_GID 1 = lxc.idmap: g 105 993 1

lxc.idmap: u (LXC_GID+1) (SUBUID_START + LXC_GID + 1) (BASE_RANGE - (LXC_GID+1)) = lxc.idmap: u 106 100106 65430
lxc.idmap: g (LXC_GID+1) (SUBUID_START + LXC_GID + 1) (BASE_RANGE - (LXC_GID+1)) = lxc.idmap: g 106 100106 65430


Save and exit the config.

We need to add the HOST_GID to the proxmox host subuid and subgid files

nano /etc/subuid


This should be as follows, then save and close

root:100000:65536
root:993:1


The same for the subgid

nano /etc/subgid
root:100000:65536
root:993:1


Restart the LXC container so the new config is loaded. Nearly there..

Docker Compose

For both Plex and Jellyfin the ARC GPU needs to be passed through into the container, add these lines into the docker compose file

    devices:
      - /dev/dri:/dev/dri

Plex

For Plex, go to Settings, Transcoder then scroll down to Hardware transcoding device your ARC should be there. Mine shows Intel DG2 [Arc A310]. If it’s not here, double check the idmaps in the LXC config from the proxmox host

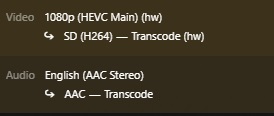
Test the transcoding by playing any video, then in the Play Settings change the quality to something lower, then go to Activity, Dashboard and see if its transcoding with a hardware (hw) tag

NOTE: Hardware transcoding does require a subscription.
 

Jellyfin

For Jellyfin, top left 3 bars, Adminstration, Dashboard
Then Playback, Transcoding
Under Hardware Acceleration select Intel Quicksync (QSV)
With QSC Device enter /dev/dri/renderD129 for your ARC GPU
(or /dev/dri/renderD128 if you dont have iGPU)

To test play a video, go to the Play Settings, lower the quality, then click Playback Info
Look through the info for Play method Transcoding.
When Jellyfin transcoding is incorrectly setup videos wont play at all, check the idmaps in the LXC config from the proxmox host

Proxmox cluster with Traefik

With Traefik you can load balance between the different nodes of your cluster with one web page.

ie, https://proxmox.richay.au could access either one of the three nodes I have available, but it comes with one issue, you wont be able to use the shell as the websocket it uses needs to be upgraded in Traefik.

This is my dynamic config.yaml in traefik

http:
  routers:
    proxmox:
      entryPoints:
        - "https"
      rule: "Host(`proxmox.richay.au`)"
      middlewares:
        - https-redirectscheme
        - websocket-upgrade
      tls: {}
      service: proxmox
 
  services:
    proxmox:
      loadBalancer:
        sticky:
          cookie: {}
        servers:
          - url: "https://10.10.10.1:8006" # IP of node 1
          - url: "https://10.10.10.2:8006" # IP of node 2
          - url: "https://10.10.10.3:8006" # IP of node 3
        passHostHeader: true

  middlewares:
    https-redirectscheme:
      redirectScheme:
        scheme: https
        permanent: true
    websocket-upgrade:
      headers:
        CustomRequestHeaders:
          Upgrade: websocket
          Connection: Upgrade


This will allow the proxmox shells to work 🙂

Ansible – updating proxmox host kernel with LXC shared GPU

This is to automate the updating of proxmox host when there is a kernel update which will break the LXC link to the GPU.

It just requires you to reinstall the graphics driver and do a reboot otherwise.

This is after you have done an update / upgrade of your proxmox host.
You will have to change the IP Addresses for your setup.

For me..
10.77.69.2 – Proxmox Host
10.77.69.103 – LXC Plex

########
- hosts: nvidia
  become: true
  become_user: root
  tasks:
    - name: Wait for 10.77.69.2 to become available
      wait_for_connection:
        delay: 5
        timeout: 300

    - name: Check if NVIDIA kernel module is loaded
      shell: lsmod | grep -q '^nvidia'
      register: nvidia_module_check
      ignore_errors: true

    - name: Set NVIDIA module check result as fact
      set_fact:
        nvidia_module_rc: "{{ nvidia_module_check.rc }}"

    - name: Reinstall NVIDIA driver if module is not loaded
      shell: sh /root/NVIDIA-Linux-x86_64-535.154.05.run --silent
      args:
        executable: /bin/bash
      when: nvidia_module_check.rc != 0

    - name: Set fact if NVIDIA driver was installed
      set_fact:
        driver_installed: true
      when: nvidia_module_check.rc != 0

    - name: Reboot system if NVIDIA driver was reinstalled
      reboot:
      when: nvidia_module_check.rc != 0

    - name: Wait for 10.77.69.2 to become available after reboot
      wait_for_connection:
        delay: 10
        timeout: 600
      when: nvidia_module_check.rc != 0

########
- hosts: plex
  become: true
  become_user: root
  tasks:
    - name: Install NVIDIA driver in LXC
      shell: sh /root/NVIDIA-Linux-x86_64-535.154.05.run --no-kernel-module --silent
      args:
        executable: /bin/bash
      when: hostvars['10.77.69.2'].driver_installed | default(false)

    - name: Reboot 10.77.69.103
      reboot:
      when: hostvars['10.77.69.2'].driver_installed | default(false)

    - name: Wait for 10.77.69.103 to become available
      wait_for_connection:
        delay: 10
        timeout: 300
      when: hostvars['10.77.69.2'].driver_installed | default(false)


This will check to see if the kernels for nvidia (my gpu) has been loaded, if not it will reinstall in silent mode. This will also flag a GPU install in ansible to also reinstall the GPU driver in the LXC, only if it needs though.

Nvidia GPU passthrough in LXC

Link to original article here.

1. Install host drivers
When doing PCIe passthrough, the first step is to blacklist the driver to ensure the host kernel doesn’t try to load the device. Here we need to do the opposite: Install and configure the correct drivers.

You’ll need to install the actual nvidia drivers. The easiest way to do this is to download the driver from nvidia.com. This not only ensures you’re using the latest driver, but means it won’t accidentally update during a system update, as it’s important that the host and guest OS have the exact same driver version. You can still install it using the system package manager, just be aware of updates – especially if the guest and host OS are different distributions.

wget https://us.download.nvidia.com/XFree86/Linux-x86_64/450.80.02/NVIDIA-Linux-x86_64-450.80.02.run
sh NVIDIA*


Next you’ll need to make sure the drivers are loaded on boot. To do this, edit the add the following to this file:

nano /etc/modules-load.d/modules.conf
# Nvidia modules
nvidia
nvidia_uvm


Once that’s done, you’ll need to update the initramfs with:

update-initramfs -u -k all


The final step is to add a udev rule to create the required device files for the nvidia driver, which for reasons aren’t created automatically. This is done in:

nano /etc/udev/rules.d/70-nvidia.rules
KERNEL=="nvidia", RUN+="/bin/bash -c '/usr/bin/nvidia-smi -L && /bin/chmod 666 /dev/nvidia*'"
KERNEL=="nvidia_uvm", RUN+="/bin/bash -c '/usr/bin/nvidia-modprobe -c0 -u && /bin/chmod 0666 /dev/nvidia-uvm*'"


Now you can reboot, and check the GPU is being detected correctly with:

nvidia-smi


The output should look like:

+-----------------------------------------------------------------------------+
| NVIDIA-SMI 450.80.02    Driver Version: 450.80.02    CUDA Version: 11.0     |
|-------------------------------+----------------------+----------------------+
| GPU  Name        Persistence-M| Bus-Id        Disp.A | Volatile Uncorr. ECC |
| Fan  Temp  Perf  Pwr:Usage/Cap|         Memory-Usage | GPU-Util  Compute M. |
|                               |                      |               MIG M. |
|===============================+======================+======================|
|   0  GeForce GTX 760     Off  | 00000000:03:00.0 N/A |                  N/A |
|  0%   34C    P0    N/A /  N/A |      0MiB /  1996MiB |     N/A      Default |
|                               |                      |                  N/A |
+-------------------------------+----------------------+----------------------+

+-----------------------------------------------------------------------------+
| Processes:                                                                  |
|  GPU   GI   CI        PID   Type   Process name                  GPU Memory |
|        ID   ID                                                   Usage      |
|=============================================================================|
|  No running processes found                                                 |
+-----------------------------------------------------------------------------+


There’s my GPU being detected correctly, using driver version 450.80.02 – we’ll be needing this later.

2. Configure container
Next, create your container. There’s nothing special about this process, just choose the OS and resource requirements for you.

Before starting your container, we need to make some changes to the config file directly to pass through the GPU. This config file will probably live in:

nano /etc/pve/lxc/<id>.conf # ID of the LXC


Where id is the id of your container. You need to add the following lines:

# Allow cgroup access
lxc.cgroup2.devices.allow: c 195:* rwm
lxc.cgroup2.devices.allow: c 243:* rwm

# Pass through device files
lxc.mount.entry: /dev/nvidia0 dev/nvidia0 none bind,optional,create=file
lxc.mount.entry: /dev/nvidiactl dev/nvidiactl none bind,optional,create=file
lxc.mount.entry: /dev/nvidia-uvm dev/nvidia-uvm none bind,optional,create=file
lxc.mount.entry: /dev/nvidia-modeset dev/nvidia-modeset none bind,optional,create=file
lxc.mount.entry: /dev/nvidia-uvm-tools dev/nvidia-uvm-tools none bind,optional,create=file


These lines allow the container to communicate with the nvidia driver, and pass through the control files needed for the guest to actually communicate with the GPU. These lines probably won’t work out the box, so we need to compare them to our actual control files:

ls -l /dev/nvidia*


The output should look like:

crw-rw-rw- 1 root root 195, 254 Dec 22 20:51 /dev/nvidia-modeset
crw-rw-rw- 1 root root 243,   0 Dec 22 20:51 /dev/nvidia-uvm
crw-rw-rw- 1 root root 243,   1 Dec 22 20:51 /dev/nvidia-uvm-tools
crw-rw-rw- 1 root root 195,   0 Dec 22 20:51 /dev/nvidia0
crw-rw-rw- 1 root root 195, 255 Dec 22 20:51 /dev/nvidiactl


Note: If you don’t see all 5 files, it probably means the drivers haven’t loaded correctly. Best check the logs.

These files are character devices (as shown by the c at the start of the line), which the kernel module uses to communicate with the hardware. lxc.mount.entry binds these into the container.

The lxc.cgroup2.devices.allow lines denote the cgroups which own the nvidia drivers. For the some files we have, 195:* will match the groups owning those, and the uvm files will match 243:*. If the config doesn’t match, you’ll need to change it. Note that the order doesn’t matter, so long as the cgroup lines are before the mounts.

3. Install guest drivers
Now that the host is configured, and the control files passed through, the guest needs configuring.

The gist of the configuration is to also install the nvidia drivers, but without the kernel modules. The simplest way to do this is to use the same driver binary downloaded from nvidia.com, and run it with:

wget https://us.download.nvidia.com/XFree86/Linux-x86_64/450.80.02/NVIDIA-Linux-x86_64-450.80.02.run
sh NVIDIA* --no-kernel-module


4. Test it
Now, from your container, you should be able to run nvidia-smi, and it’ll show the right version GPU and driver:

nvidia-smi
+-----------------------------------------------------------------------------+
| NVIDIA-SMI 450.80.02    Driver Version: 450.80.02    CUDA Version: 11.0     |
|-------------------------------+----------------------+----------------------+
| GPU  Name        Persistence-M| Bus-Id        Disp.A | Volatile Uncorr. ECC |
| Fan  Temp  Perf  Pwr:Usage/Cap|         Memory-Usage | GPU-Util  Compute M. |
|                               |                      |               MIG M. |
|===============================+======================+======================|
|   0  GeForce GTX 760     Off  | 00000000:03:00.0 N/A |                  N/A |
|  0%   34C    P0    N/A /  N/A |      0MiB /  1996MiB |     N/A      Default |
|                               |                      |                  N/A |
+-------------------------------+----------------------+----------------------+

+-----------------------------------------------------------------------------+
| Processes:                                                                  |
|  GPU   GI   CI        PID   Type   Process name                  GPU Memory |
|        ID   ID                                                   Usage      |
|=============================================================================|
|  No running processes found                                                 |
+-----------------------------------------------------------------------------+


This shows the GPU is detected correctly, but doesn’t prove it’s working correctly. The best way to do this is to actually try and use it. For me this involved installing Jellyfin, loading in some content and checking the GPU was doing the transcoding, not the CPU – Which it was!

Because it’s simply passing through the device files rather than the actual PCIe device, you can repeat this process multiple times for multiple containers.