
This is where I share my deep dives into IT projects and recount various random adventures. Consider this a collaborative space – your insights, advice, and helpful hints in the comments are always welcome!
Docker Commands Taking 1–2 Minutes to Respond
Status: CURRENT — ENVIRONMENT-SPECIFIC FIX
Last reviewed: 31 August 2026
Applies to: Debian-based Proxmox LXC containers running Docker wheresystemd-networkd-wait-onlineis enabled even though networking is actually handled by ifupdownMy Docker commands were taking roughly two minutes to respond after the LXC started. Docker itself wasn’t slow. A redundant
systemd-networkd-wait-online.servicewas sitting there for about two minutes waiting for a network state that was never going to arrive, while Docker waited behindnetwork-online.target.
This one annoyed me because Docker looked guilty as hell.
I would run:
docker psand… nothing.
No error. No useful message. Just a blinking cursor for a good minute or two.
Then suddenly the command would return and basically every container showed:
Up Less than a secondWhich was the first clue that Docker hadn’t been sitting there slowly thinking about the answer. Docker had only just been allowed to bloody start.
It also seemed to be affecting Plex
This LXC also runs my Plex server.
Before I fixed the network wait, refreshing app.plex.tv would load my Plex account quickly enough, but my own server/library could take another 10–15 seconds to actually appear.
After fixing this Docker/network startup mess, the library population became basically instant.
I can’t prove the extra Plex delay was caused by exactly the same systemd wait-online mechanism. What I can say is that both problems disappeared when I cleaned up the networking on this LXC. So I would treat slow Plex server discovery as another clue that the host/container networking is worth looking at rather than immediately blaming Plex itself.
It also appeared to clear up some of the weird Plex indirect/relay behaviour I’d been seeing around the same time. Again: observed before/after, not a peer-reviewed scientific paper about my Plex box 😀
First: prove Docker is actually the thing that’s slow
Check Docker:
systemctl status docker --no-pager -l
systemctl status containerd --no-pager -lThen look at boot timing:
systemd-analyze blame | head -30
systemd-analyze critical-chain docker.serviceMy result was hilariously obvious:
2min 149ms systemd-networkd-wait-online.service
    1.052s docker.service
1.011s ifupdown-wait-online.serviceDocker itself took about one second.
The two-minute corpse lying across the road was systemd-networkd-wait-online.service.
The critical chain made it even clearer
systemd-analyze critical-chain docker.serviceMine showed:
docker.service +1.052s
└─network-online.target @2min 384ms
└─ifupdown-wait-online.service @123ms +1.011sSo the Docker daemon wasn’t taking two minutes to initialise. It was ordered behind network-online.target, and that target wasn’t being considered ready until the networking wait mess had finished.
systemd’s own documentation describes network-online.target as an active synchronisation point that can deliberately delay services until networking is considered online. The matching wait-online service is supposed to come from the network manager you’re actually using.
Key phrase there:
the network manager you're actually usingI had two wait-online systems in the same LXC
This command exposed the stupid bit:
systemctl list-units --all | grep -E 'wait-online|network-online'My LXC had:
ifupdown-wait-online.service
    active / exited

systemd-networkd-wait-online.service
    failed / failed

network-online.target
activeAnd:
systemctl --failedshowed systemd-networkd-wait-online.service sitting there failed.
This Debian LXC was using the traditional ifupdown networking from /etc/network/interfaces. It already had ifupdown-wait-online.service, which completed in about one second.
Meanwhile systemd-networkd-wait-online was also enabled and waiting for systemd-networkd’s idea of an online network.
It never got happy, so it eventually hit its timeout.
The current systemd manual says the default systemd-networkd-wait-online timeout is 120 seconds.
Oh look. There’s our two bloody minutes.
Check which network manager is actually configuring the LXC
Do not blindly disable systemd-networkd on every Linux machine because this article fixed my LXC. If your machine genuinely uses systemd-networkd, then its wait-online service may be completely legitimate and you need to fix the networkd configuration instead.
Check the classic Debian config first:
cat /etc/network/interfaces
ls -la /etc/network/interfaces.d/Then check the services:
systemctl is-active networking
systemctl is-enabled ifupdown-wait-online.service
systemctl is-enabled systemd-networkd.service
systemctl is-enabled systemd-networkd-wait-online.serviceAnd if you think systemd-networkd is genuinely in use:
networkctl list
networkctl status
ls -la /etc/systemd/network/In my case, ifupdown was doing the actual networking job. The extra networkd wait-online service was just standing in the doorway refusing to let Docker through.
The fix in my LXC
Because this container was using ifupdown rather than systemd-networkd for its network configuration, I disabled the redundant wait-online service:
systemctl disable --now systemd-networkd-wait-online.serviceIf it has previously been force-enabled by something and keeps coming back, you can inspect its enablement first:
systemctl is-enabled systemd-networkd-wait-online.service
systemctl cat systemd-networkd-wait-online.serviceI would only mask it if I had confirmed the LXC does not need it and something kept trying to start it:
systemctl mask systemd-networkd-wait-online.serviceMasking is stronger than disabling, so don’t throw it around just because it sounds more decisive.
Should I disable systemd-networkd itself?
Not automatically.
The broken bit I actually found was the wait-online service. If your LXC is definitely configured entirely through ifupdown and systemd-networkd has no job at all, then removing the redundant network manager may also make sense:
systemctl disable --now systemd-networkd.serviceBut only do that after checking /etc/systemd/network, networkctl and your actual interface configuration.
Turning off the network manager that really owns your IP address is an impressively efficient way to turn a remote server into a trip across the house.
Reboot and test it properly
I rebooted the LXC because that was the scenario where the delay actually mattered:
rebootThen immediately checked:
time docker ps
systemd-analyze blame | head -20
systemctl --failedInstead of staring at a blinking cursor for two minutes, docker ps was basically instant.
And unlike before, the containers weren’t all reporting that they’d come alive one second ago because Docker had been held hostage for the first two minutes of the boot.
Why docker ps looked like it was hanging
My boot logs showed docker.socket becoming available very early, while docker.service was still waiting further down the boot chain.
Docker can be socket-activated by systemd. So from the user’s point of view:
run docker ps
    ↓
Docker client connects to /run/docker.sock
    ↓
systemd wants docker.service
    ↓
docker.service is waiting behind network-online.target
    ↓
systemd-networkd-wait-online sits there
    ↓
120 second timeout
    ↓
dockerd starts in ~1 second
    ↓
all containers start
    ↓
docker ps finally returnsWhich is why this felt like a Docker command problem even though the real delay was happening one layer underneath it.
The Docker logs were actually pretty clean
Once Docker was allowed to start, the daemon did exactly what it was supposed to do:
Loading containers: done.
Daemon has completed initialization
API listen on /run/docker.sockThat was another useful clue.
If dockerd starts in a second and its logs show normal container restoration, don’t spend the next hour rebuilding Docker networks because a completely different systemd service stole 120 seconds before Docker even got a turn.
Ignore unrelated LXC noise until it proves it’s relevant
The logs also had some very scary-looking container-specific rubbish such as:
mount: /sys/kernel/config: permission denied
modprobe: FATAL: Module overlay not found in directory /lib/modules/...Those messages are worth understanding, but they weren’t the thing consuming two minutes in my timing output.
This is why systemd-analyze blame was so useful. It stopped me chasing every red-looking log line and pointed directly at the bastard actually eating the time.
If you really do use systemd-networkd
Don’t disable its wait service just to make the number disappear.
The current systemd-networkd-wait-online tool can be told to:
- Wait for a particular interface with
--interface=. - Ignore interfaces with
--ignore=. - Succeed when any suitable interface is online with
--any. - Use a different timeout with
--timeout=. - Ignore a link for online decisions using
RequiredForOnline=noin its.networkconfig.
If networkd genuinely owns the network, fix why it thinks an interface isn’t online. Don’t just remove the smoke alarm because it’s noisy.
My Plex result was the nice bonus
The Docker fix was obvious: two-minute CLI hang became instant.
The nicer surprise was Plex.
BEFORE

refresh app.plex.tv
      ↓
account loads
      ↓
wait...
      ↓
10–15 seconds
      ↓
my own library finally appears


AFTER

refresh app.plex.tv
      ↓
boom — library is thereI wouldn’t use that as proof that systemd-networkd-wait-online directly causes slow Plex discovery on every system.
But if Docker startup is stuck behind broken network readiness and Plex is acting weird with server discovery, relay/indirect connections or slow library population, I’d absolutely investigate the underlying Linux network state before pulling Plex apart.
Quick diagnosis version
# What is actually slow?
systemd-analyze blame | head -30

# What is Docker waiting for?
systemd-analyze critical-chain docker.service

# Do I have multiple wait-online systems?
systemctl list-units --all | grep -E 'wait-online|network-online'

# What has actually failed?
systemctl --failed

# Which networking system am I using?
cat /etc/network/interfaces
networkctl listIf you see:
ifupdown-wait-online.service            active
systemd-networkd-wait-online.service      failed
systemd-networkd-wait-online ~120 secondsand you’ve confirmed ifupdown is the real network manager, you’ve probably found the same stupid little problem I did.
Final result
Docker was not slow.

Docker:
  ~1 second

Wrong wait-online service:
  ~2 minutes

Plex library:
  10–15 seconds → instant

Time spent blaming Docker:
more than Docker deservedThis is one of those fixes I love because nothing needed more CPU, more RAM, a Docker reinstall or some heroic network rebuild.
One stale/redundant service was sitting in the boot path waiting two minutes for something the LXC wasn’t even using.
Removed the pointless wait and suddenly Docker stopped looking drunk, Plex woke up properly, and the whole box felt normal again.
Linux: where the problem is never the thing you’re currently swearing at 😀
References
Intel Arc A310 Hardware Transcoding in a Proxmox LXC
Status: CURRENT
Last reviewed: 31 August 2026
Applies to: Proxmox VE 8.2+/9, unprivileged LXC, Intel Arc A310 and Plex hardware transcodingThis is how I pass my Intel Arc A310 through to an unprivileged Plex LXC on Proxmox. Current Proxmox can pass the render device straight into the container, so the old cgroup/idmap/bind-mount witchcraft is no longer required.
I use an Intel Arc A310 in my Proxmox box purely because it is a tiny little transcoding monster for Plex.
Plex itself runs inside an unprivileged LXC, with Plex running in Docker inside that container. Sounds like three layers of bullshit, but the GPU path is actually pretty simple:
Intel Arc A310
      ↓
Proxmox host
      ↓
/dev/dri/renderD128
      ↓
unprivileged Plex LXC
      ↓
Docker
      ↓
Plex
      ↓
hardware transcode :)The important device for video transcoding is normally the render node. Plex on Linux uses Intel VAAPI for hardware decode/encode, so we don’t need to PCI-passthrough the whole GPU like we would with a VM.
1. Make sure Proxmox can see the Arc
On the Proxmox host:
lspci -k | grep -EA3 'VGA|3D|Display'

ls -la /dev/dri
ls -la /dev/dri/by-pathOn my machine the Arc currently appears as:
/dev/dri/card1
/dev/dri/renderD128Your cardX number can be different, especially if the CPU also has integrated graphics.
The by-path directory is handy for confirming which DRM device belongs to which PCI GPU before blindly passing through the first thing called renderD128.
Intel’s current Linux guidance says modern Ubuntu distributions have Arc graphics support in the normal distro/kernel stack; you generally don’t need to bolt on one of Intel’s old custom driver repositories just to make the GPU exist. The Intel Media Driver/VAAPI userspace components may still be needed by applications that use VAAPI.
2. Pass the GPU device into the LXC
This is the bit that has become much nicer in modern Proxmox.
Shut the Plex LXC down, then go to:
Plex LXC
→ Resources
→ Add
→ Device PassthroughAdd the render device:
/dev/dri/renderD128I also pass the matching card device through because it makes GPU diagnostics inside the container easier:
/dev/dri/card1Proxmox’s current pct tooling exposes these as normal dev0, dev1 device entries. No manual lxc.cgroup2.devices.allow, no hand-written bind mount, no sacrificing a goat to UID mapping.
The CLI equivalent looks like:
pct set 103 -dev0 /dev/dri/renderD128
pct set 103 -dev1 /dev/dri/card1Then:
pct config 103You should see the device entries in the container configuration.
3. Start the LXC and check /dev/dri
pct start 103
pct enter 103
ls -la /dev/driOn my Plex LXC I currently have:
card1
renderD128If the devices aren’t there, stop. Plex isn’t going to magically discover a GPU that the LXC cannot see.
4. Fix access to the render device
Inside my container the useful groups are:
video:x:44
render:x:105My Plex user is a member of both:
getent group video
getent group renderFor my current setup I get:
video:x:44:plex
render:x:105:root,plex,richayIf Plex isn’t in the groups, add it:
sudo usermod -aG video plex
sudo usermod -aG render plexThen restart the service/container so the new group membership actually applies.
Quick permission test: Proxmox device passthrough also lets you assign a mode/GID to the device. Using something like
mode=0666can be useful for proving that a failure is purely permissions, but I wouldn’t leave the GPU world-writable just because it made the red error disappear. Fix the group access afterwards.
5. Pass /dev/dri into the Plex Docker container
Now the LXC has the GPU, Docker needs it too.
In my Plex Compose stack:
services:
  plex:
    devices:
- /dev/dri:/dev/driThen recreate Plex:
docker compose up -d
docker exec plex ls -la /dev/driIf Docker can see renderD128, we’ve successfully pushed the GPU through both layers:
Proxmox host     ✓
LXC              ✓
Docker container ✓
Plex ...your turn mate6. Enable hardware transcoding in Plex
In Plex Web:
Settings
→ Server
→ Transcoder
→ Show Advanced

✓ Use hardware acceleration when available
✓ Use hardware-accelerated video encodingPlex currently requires Plex Pass for normal hardware-accelerated streaming.
If more than one GPU is available, Plex also has a Hardware transcoding device selector. I explicitly select the Intel Arc rather than leaving it on Auto when I want to be absolutely sure which device Plex is using.
Plex’s current Linux transcoder uses Intel VAAPI for both hardware decode and hardware encode when supported.
7. Actually prove it is working
Seeing the GPU in /dev/dri is nice. It does not prove Plex is using it.
Start playing a video, then deliberately force a transcode by dropping the playback quality to something like 480p.
Open the Plex Dashboard and expand the playback details.
What I want to see is:
Video
Transcode (hw)Plex’s own documentation specifically says the (hw) marker is the way to confirm hardware acceleration is being used.
If it just says Transcode with no (hw), congratulations: your expensive little GPU is currently decorative.
Watching the Arc work from the Proxmox host
I also like watching the GPU directly while forcing a transcode.
Install Intel’s GPU tools on the Proxmox host if you don’t already have them:
apt update
apt install intel-gpu-toolsThen:
intel_gpu_topForce a Plex transcode and you should see the media/video engines wake up.
This is my favourite test because the Plex Dashboard can say whatever lovely thing it wants — watching the GPU actually do work removes the guesswork.
Optional VAAPI test inside the LXC
If Plex still refuses to use the GPU, test VAAPI independently of Plex.
apt update
apt install vainfo intel-media-va-driver-non-free

vainfo --display drm --device /dev/dri/renderD128If vainfo can enumerate the Arc’s decode/encode capabilities, the Linux/VAAPI path is alive and the problem is further up the stack.
Don’t install random Intel driver repositories just because an old guide tells you to. Intel’s current Linux guidance says modern Ubuntu releases include Arc graphics support in the normal distribution stack. Add extra driver packages only when your actual distro/application needs them.
The old way can stay dead
Older Proxmox LXC GPU guides tended to involve things like:
lxc.cgroup2.devices.allow = c 226:* rwm
lxc.mount.entry = /dev/dri ...
subuid
subgid
custom idmaps
chmod
prayerSome of that was necessary at the time.
For a current Proxmox LXC, native device passthrough is dramatically cleaner. Proxmox’s current pct configuration supports passing a host device directly into a container and assigning the device node’s UID, GID and access mode if needed.
Use the modern feature before manually rebuilding the old plumbing underneath it.
My final setup
Intel Arc A310
    ↓
Proxmox device passthrough
    ↓
/dev/dri/renderD128
    ↓
Plex unprivileged LXC
    ↓
Docker /dev/dri mapping
    ↓
Plex VAAPI
    ↓
Transcode (hw)
    ↓
CPU gets to stop screaming :)That’s really all there is to it now.
The Arc A310 doesn’t need the whole VM PCI-passthrough treatment for this job. Let the Proxmox host own the GPU, hand the render device to the LXC, hand it through Docker, and let Plex chew on it.
Much cleaner than the old janky config I eventually deleted — and considerably easier to remember the next time I inevitably break it myself 😀
References
Using a JetKVM as a Homelab Test Bench
Status: CURRENT
Last reviewed: 31 August 2026
Applies to: JetKVM used as a temporary PC/server test-bench KVMI somehow spent time trying to work out a clever way to stop moving keyboards, mice and monitor cables around every time I test another PC… while already owning a JetKVM. Once that penny finally dropped, my test bench became considerably less stupid.
I test a fair bit of random homelab hardware.
Old PCs, replacement motherboards, Raspberry Pis, Proxmox boxes, fresh Linux installs, machines I’m trying to PXE boot, machines that were working five minutes ago and have now decided they no longer believe in Ethernet.
The annoying part wasn’t normally the computer itself.
It was this shit:
Unplug keyboard
Unplug mouse
Find spare monitor input
Find cable
Move cable
Realise target PC only has DisplayPort
Find another adapter
Crawl under desk
Boot machine
Need BIOS
Repeat foreverI was literally thinking I needed some sort of monitor/USB switch or dedicated test-bench setup.
Then I remembered:
I OWN A FUCKING JETKVM.Oh.
Problem solved 😂.
What JetKVM actually replaces on my bench
JetKVM is a KVM-over-IP device — Keyboard, Video and Mouse over the network. It gives me the target computer’s display in a browser and presents remote keyboard/mouse input back to that machine.
The key difference from RDP, SSH, VNC, AnyDesk or whatever else is that the target operating system doesn’t need to be working yet.
Normal remote desktop:
PC boots
→ OS boots
→ network works
→ remote service starts
→ then I can connect

JetKVM:
press power
→ BIOS appears
→ I'm already thereJetKVM’s current documentation specifically lists BIOS changes, boot failures and fresh operating-system installations as normal use cases. It streams up to 1080p60 video and sends keyboard/mouse input directly to the target machine.
For a test bench, that’s the whole bloody point.
My extremely complicated test bench
Target PC
   │
   ├── video out ─────→ JetKVM HDMI input
   │
   └── USB ───────────→ JetKVM
                         │
                         └── Ethernet / network
                                 ↓
                           my normal PC
                                 ↓
browserThat’s basically it.
I leave my normal keyboard, mouse and monitors exactly where they are. The test machine gets JetKVM.
Then I open the JetKVM web interface and suddenly the random PC sitting on the bench is just another browser tab.
DisplayPort target? Watch the adapter direction
One of the machines I wanted to use on the bench only had DisplayPort available, while JetKVM takes HDMI video.
So I grabbed a short adapter/cable rather than rearranging the whole desk again.
Adapter direction matters. For a PC with DisplayPort output going into JetKVM’s HDMI input, you want a cable/adapter intended for DisplayPort source → HDMI display/sink. HDMI-to-DisplayPort adapters are not necessarily reversible, and some conversions need active electronics.
It’s a tiny thing, but nothing improves your mood like buying an adapter that physically fits both ends and electronically does absolutely fuck-all.
Fresh OS installs without a keyboard, mouse or USB stick
This is where JetKVM goes from convenient to genuinely excellent for a test bench.
Its Mount Drive feature can emulate a read-only CD/DVD or disk drive to the target PC, and the virtual media is available during BIOS/UEFI boot.
Current JetKVM supports:
ISO
IMG
QCOW2
WDI
VMDKOnly one image can be mounted at a time, but for installing an OS that’s hardly a problem.
JetKVM currently gives you three ways to provide the image:
- Storage mount — upload the image to JetKVM first; JetKVM recommends this for the best performance.
- URL mount — JetKVM streams an image from an HTTP/HTTPS URL.
- Browser mount — stream the image from the computer running your browser; the browser tab needs to remain open.
So my new fresh-install process can basically be:
Plug test PC into JetKVM
        ↓
Power on
        ↓
Enter BIOS remotely
        ↓
Mount ISO in JetKVM
        ↓
Boot virtual media
        ↓
Install Proxmox / Debian / Windows / whatever
        ↓
Never move my keyboardWhich is considerably nicer than my previous enterprise-grade solution of “where the fuck did I leave that Ventoy SSD?”
PXE booting is nicer too
PXE is another perfect test-bench use case because JetKVM doesn’t care whether the target OS has an IP address yet.
JetKVM only needs its own network connection. The target PC can be sitting in BIOS with no operating system whatsoever.
I can remotely:
Power / boot test PC
        ↓
enter BIOS or boot menu
        ↓
select network / PXE boot
        ↓
watch DHCP + PXE attempt
        ↓
fix whatever I broke
        ↓
try again without leaving chairThat’s useful when I’m testing network booting because the machine I’m troubleshooting obviously can’t run RDP if it currently contains precisely zero operating systems.
Keyboard and mouse are emulated by JetKVM
I originally wondered whether a keyboard and mouse would need to be plugged directly into a PC during a fresh install.
Nope.
JetKVM presents the keyboard/mouse input over USB to the target, so BIOS and installers can see them without drivers from the installed operating system.
It also has a virtual keyboard and a Paste from Host feature, which is extremely handy when an installer wants a hostname or some horrible password that I have no intention of typing manually.
Current JetKVM documentation notes that its keyboard mapping is US layout, so keep that in mind if your local keyboard layout expects symbols in different places.
What about powering the test PC on and off?
For a quick bench test I can obviously just press the case power button like some sort of caveman.
If I want the full remote experience, JetKVM also has an optional ATX Extension Board that provides remote desktop-PC power and reset control.
That makes more sense for a machine that stays connected to JetKVM permanently. For machines constantly arriving and leaving the test bench, physically pressing the power button is hardly the part of the workflow that was ruining my life.
Powering JetKVM itself
The normal setup can power JetKVM from the target computer’s USB-C connection if that port remains powered.
JetKVM also ships with a USB-C power/data splitter so power can come from a separate 5V supply while USB data still goes to the target PC.
For a test bench I actually like separate power because JetKVM stays alive even while I’m shutting the target down, breaking it, rebuilding it and generally treating the machine with the respect test hardware deserves.
Local access is enough for my bench
JetKVM supports optional remote/cloud access, but for a machine sitting a few metres away on my own network I don’t need to make this complicated.
JetKVM’s local web interface is available directly from its IP address, which is shown on the device’s front screen.
Current JetKVM lets you password-protect local access, and I would enable that. Without it, anyone on the same network who knows the IP can access the KVM interface.
A KVM literally gets keyboard/video access to a machine before the operating system has started. Probably not the device to protect with “eh, she’ll be right”.
My actual before and after
Before JetKVM entered my brain:
Need to test PC
→ find spare keyboard
→ find mouse
→ steal monitor cable
→ wrong connector
→ find adapter
→ crawl around desk
→ install OS
→ put everything back
→ repeat next timeAfter remembering the JetKVM sitting there:
Need to test PC
→ HDMI/DP adapter + USB
→ open browser
→ doneMy god.
I was so happy when I realised this that it was immediately followed by the much less flattering realisation that I already owned the bloody thing.
Things JetKVM is now useful for around my homelab
- Testing random PCs without stealing my desktop peripherals.
- BIOS/UEFI configuration.
- Fresh Proxmox, Linux and Windows installations.
- PXE boot testing.
- Diagnosing a machine with broken networking.
- Watching boot errors before SSH/RDP could possibly exist.
- Recovery environments and bootable ISOs.
- Temporary access to a headless server that has decided today is the day it stops booting properly.
Basically, anything where my normal reaction used to be:
"sigh... guess I need to plug a monitor into it"is now a JetKVM job.
Would I use one specifically as a test-bench tool?
Absolutely.
A normal KVM switch is great when the same few computers stay permanently wired to one desk. My problem is different: the computer keeps changing.
JetKVM means the permanent side of the test bench is my browser. Only the target-side HDMI/USB cables move.
And virtual media means even the installation USB stick can fuck off.
Very elegant solution.
Would’ve been even more elegant if I’d remembered I owned it before spending half an hour trying to invent it again 😂.
References
Using a TrueNAS SMB Share as a Steam Library
Status: CURRENT — HOMELAB / UNSUPPORTED-ISH STEAM SETUP
Last reviewed: 31 August 2026
Applies to: TrueNAS SMB shares, Windows Steam clients and a separate Steam updater VMThis is how I keep most of my Steam library on TrueNAS instead of filling every gaming PC with duplicate installs. It works very well for me, but Steam does not officially document one shared SMB library being actively managed by multiple Steam clients as a supported setup. I deliberately use one VM as the updater and keep Steam from starting automatically on my gaming PC to reduce the amount of simultaneous fiddling with the shared library.
I have a lot of Steam games.
Keeping every one of them on fast local NVMe would be lovely, but apparently storage manufacturers still expect money in exchange for 8 TB SSDs. Rude.
So most of my Steam library now lives on a TrueNAS SMB share. My gaming PCs can access the same game files over the network, while I still keep a local NVMe Steam library for the games where I actually care about maximum storage performance.
The part that makes the setup especially useful is a small Windows VM whose entire job is basically:
Steam updater VM
      ↓
Steam stays running
      ↓
Shared TrueNAS library
      ↓
Games update in the background

Gaming PC
      ↓
Steam DOES NOT start with Windows
      ↓
I want to play something
      ↓
Open Steam
      ↓
boom — game is already updated :)I don’t need Steam sitting on my gaming PC all day downloading patches in the background. The VM babysits that nonsense for me.
Why SMB instead of iSCSI?
I actually tried iSCSI first.
On paper it looked perfect: present storage from TrueNAS as a block device, Windows sees a normal disk, Steam is happy.
The problem is that a normal Windows filesystem such as NTFS expects to own that block device. Having multiple normal Windows machines mount the same iSCSI filesystem at the same time is not what it’s designed for unless you’re using a proper clustered filesystem/setup.
That killed the idea for me because I specifically wanted:
Updater VM
    +
Gaming PC
    +
Sim PC / other clients
    ↓
same game storageSMB is file sharing, so multiple clients are exactly what it’s for. TrueNAS uses Samba for SMB and supports Windows-style ACLs and multiple users/devices. Much better fit for what I was actually trying to build.
My layout
TrueNAS
└── Steam dataset
    └── SMB share
        ↓
        ├── Updater VM
        ├── Main gaming PC
        └── Other gaming/sim PC

Each Windows machine maps the share
to the same drive letter where possible.I like using the same drive letter on every Windows machine simply because it removes another variable when troubleshooting.
1. Create a dedicated Steam dataset in TrueNAS
Don’t share the root of the pool. TrueNAS’s current SMB documentation recommends creating a dedicated child dataset for SMB rather than exporting the pool/root dataset itself.
Something like:
tank
└── steamWhen creating the dataset, use the SMB dataset preset.
Current TrueNAS uses an NFSv4 ACL for datasets created with the SMB preset. That’s what I want here because the clients are Windows machines and Steam needs normal read/write/traverse behaviour across a massive tree of game directories.
2. Create the SMB user and permissions
Create or use a normal TrueNAS user with Samba Authentication enabled. Don’t use root for SMB access.
Give that user or a dedicated Steam group the access it needs to the dataset.
For my Steam library the clients need to be able to:
- Read game files.
- Create/update files.
- Delete old files during patches.
- Traverse directories.
- Write Steam’s
appmanifest_*.acffiles.
TrueNAS has both a Share ACL and the underlying Filesystem ACL. They’re separate layers. Make sure you aren’t fixing one while the other is still telling Windows to piss off.
The ACL problem I hit
This was the annoying bastard in my setup.
I initially reused storage that had been set up more like a generic Unix dataset. Steam could see the games, but Windows started throwing permission errors when actually trying to launch some game executables.
The tell was that applying the correct SMB ACL recursively made the executables work again.
That proved the network share itself wasn’t the real problem — inherited permissions on the existing files were.
Do not make “apply ACL recursively every time Steam updates” your permanent fix. If new files keep arriving with the wrong permissions, fix the dataset/ACL inheritance properly. I eventually moved the library off, corrected the dataset as a proper SMB dataset, then moved the data back rather than continuing to play permission whack-a-mole forever.
If you’re creating the Steam dataset fresh, doing it correctly from the beginning saves a lot of moving several terabytes back and forth while questioning your life choices.
3. Create the SMB share
In TrueNAS:
Shares
→ Windows (SMB) Shares
→ Add
→ select the Steam dataset
→ enable the SMB serviceFor example, if the TrueNAS hostname is truenas and the share is called steam:
\\truenas\steam4. Map it in Windows
On the gaming PC and updater VM, map the SMB share to a drive letter.
For example:
S: → \\truenas\steamYou can do that through This PC → Map network drive, or from a command prompt:
net use S: \\truenas\steam /persistent:yesWindows will use the credentials you supply/store for the TrueNAS SMB account.
I prefer mapping the drive before Steam starts. If Steam launches before Windows can see the network library, it can decide the storage has vanished and your entire library suddenly looks uninstalled. The files are usually still there; Steam is just having a moment.
5. Add the network library to Steam
Current Steam uses the Storage Manager:
Steam
→ Settings
→ Storage
→ Add Drive / +
→ Let me choose another location
→ select S:\SteamLibraryIf the library already contains games, Steam should discover the existing installations once the library folder is added.
Valve’s support documentation also recommends re-adding an existing library through Storage Manager if installed games suddenly appear as uninstalled.
My updater VM is the bit I really like
I have a small Windows VM pointed at the same Steam SMB library.
Steam stays open on that VM and its job is basically to watch the library and keep games patched.
For every game I care about keeping ready, I set:
Game
→ Properties
→ Updates
→ Automatic Updates
→ High Priority - Always auto-update this game before othersYes, I went through and set the games to High Priority. Yes, it was tedious. No, I don’t particularly want to do it again 😂.
Steam officially describes that setting as keeping the game at high priority so it auto-updates before other games.
The VM isn’t there to play anything. It’s a glorified game-patch babysitter.
Steam does NOT start with my gaming PC
This is the other half of the workflow.
On my actual gaming PC:
Steam
→ Settings
→ Interface
→ Run Steam when my computer starts
→ OFFValve still officially provides that startup toggle.
I don’t need the gaming PC sitting there all day checking a library that the VM is already maintaining.
When I actually want to play:
Turn on gaming PC
      ↓
SMB drive maps
      ↓
do normal PC stuff
      ↓
decide I want to play something
      ↓
open Steam
      ↓
shared library appears
      ↓
game is already patched
      ↓
boom :)That’s the whole reason I like this setup. The updater VM does the boring waiting while the gaming machine only runs Steam when I actually want Steam.
A warning about multiple Steam clients
This is the unsupported-ish part. Steam does not document a single SMB Steam library being concurrently managed by several Steam clients as a supported storage architecture.
The shared directory contains not just the game data but also Steam metadata such as:
steamapps/
├── common/
├── downloading/
├── shadercache/
└── appmanifest_123456.acfCommunity reports show that two Steam clients can disagree about or rewrite the shared appmanifest state, making games appear to require another update or disappear/reappear.
My way of reducing that mess is to give the updater VM the update job and not use the gaming PC as another always-running updater.
I also don’t deliberately kick off updates to the same game from two clients at once. Multiple machines trying to be clever with the same files is exactly how a nice simple idea turns into a Sunday afternoon repair job.
Local NVMe still has a job
I don’t force every single game onto the NAS just because I can.
My main gaming PC still has a local NVMe Steam library for FPS games and anything where I want the lowest possible storage latency or where a particular game simply behaves better locally.
Everything else can happily live on the big NAS pool.
That gives me:
Local NVMe
  → shooters / demanding favourites

TrueNAS SMB
  → giant bulk Steam library
  → older games
  → single-player games
→ games I want installed but don't play every dayIt’s not about proving a NAS is faster than NVMe — obviously it isn’t. It’s about not buying absurd amounts of local flash storage for games that spend 99% of their life doing absolutely nothing.
What about performance?
My network is 2.5 GbE, so sequential throughput from the NAS is perfectly respectable for a lot of games.
The bigger difference compared with local NVMe is latency and random I/O, not simply the headline link speed.
Some games load a mountain of tiny files and care more than others. If a game feels shit from the network library, I don’t spend three hours trying to win an argument with physics — I move that one back to NVMe.
Steam’s official alternative: Local Network Game Transfers
Valve does have an officially supported feature for moving game installs and update files between Steam machines over the LAN: Local Network Game Transfers.
That’s a really good option if your goal is:
PC 1 already has game
        ↓
PC 2 installs game
        ↓
Steam copies most/all available data over LAN
instead of downloading it again from the internetMy setup solves a different problem. I don’t want another full copy on every machine — I want most of the games to live centrally on the NAS.
If the SMB-library weirdness ever annoys you, Valve’s Local Network Transfer feature is the much more conventional fallback.
If Steam suddenly says every game is uninstalled
First, do not immediately start reinstalling 3 TB of games.
Check:
1. Is S: actually mapped?
2. Can Windows open S:\SteamLibrary?
3. Does S:\SteamLibrary\steamapps still contain the appmanifest files?
4. Does Steam → Settings → Storage still list that library?If the files are still there but Steam forgot the library, re-add the existing library folder through Storage Manager. Valve documents this as the recovery path for games that appear uninstalled even though the data still exists.
If a game EXE won’t launch from the share
This is where my original TrueNAS ACL problem showed itself.
If Steam can read/download the game but Windows fails opening executables or newly updated files behave differently from older files, inspect the TrueNAS filesystem ACL and inheritance.
For an SMB dataset, make sure the SMB user/group has the intended read/write/traverse permissions and that new files/directories inherit the correct ACL.
TrueNAS’s current SMB documentation distinguishes the SMB Share ACL from the dataset’s Filesystem ACL. Both can affect whether the Windows client actually gets the access you thought you gave it.
Would I do it again?
Yep.
iSCSI was neater when I was thinking about one Windows machine. SMB became the obvious choice once the requirement changed to one large library shared between several machines.
The updater VM is what turns it from a storage experiment into something I actually enjoy using.
VM:
"Don't worry mate, I downloaded the 87 GB patch."

Gaming PC:
"Cheers."

Me:
*opens Steam and plays the game*No giant local library on every machine, no Steam running on my desktop when I don’t need it, and far less of the “sweet, I have an hour to play — here’s a 46 GB update” experience.
Is it the most normal way to run Steam? Absolutely not.
Does that appear to have stopped me anywhere else on this website? 🙂
References
Authentik Federated Login with Google for SSO
Status: CURRENT
Last reviewed: 31 August 2026
Applies to: authentik with Google OAuth as a federated login source, then authentik SSO to self-hosted applicationsIn my setup I don’t use a normal authentik password for my everyday account. I authenticate to authentik with Google, then authentik handles the login to the rest of my web apps. One Google login, one authentik session, and most of the homelab stops asking me who I am every five bloody minutes.
What I’m actually doing
This sounds more complicated than it is because identity systems have managed to invent twelve names for “prove who you are”.
The important bit is:
Google
   ↓
federated login
   ↓
authentik
   ↓
SSO / OIDC / SAML / Forward Auth
   ↓
my self-hosted apps
Google is not directly logging me into Plex, Portainer, code-server, Nextcloud or whatever else I’ve decided needs a web interface this week.
Google authenticates me to authentik. Once authentik trusts who I am, authentik becomes the identity provider for the applications behind it.
authentik calls Google a Source. The application side uses authentik Providers.
Google OAuth Source
        ↓
     authentik
        ↓
Proxy / OIDC / SAML Provider
        ↓
ApplicationOnce I finally understood that direction, the whole thing became a lot less identity-management wizardry and a lot more “oh… that’s actually pretty logical”.
Why I use Google for the authentik login
My everyday authentik account is federated through Google rather than relying on another standalone password that I need to manage.
That gives me Google’s login security at the front door — including whatever MFA/passkey protection I have on the Google account — then authentik handles authorization and SSO for the homelab behind it.
The end result is lovely:
Open app
   ↓
app sends me to authentik
   ↓
already logged into authentik?
   ├── yes → straight back into app
   └── no  → authenticate with Google
                ↓
             authentik
                ↓
back to appSo after I’ve logged into authentik with Google once, opening the next protected app is normally almost instant. It might bounce through authentik for half a second, but there’s no second password prompt because authentik already has my session.
Google Cloud OAuth or Google Workspace SAML?
authentik currently supports multiple ways to use Google as a federated identity provider.
- Google Cloud OAuth — the easy option for a personal Google account or normal “Sign in with Google” setup. This is what this guide uses.
- Google Workspace SAML — useful if you manage a Google Workspace organisation and want the Workspace tenant to act as the identity provider.
For my use case I just want Google authentication into authentik, so OAuth is the simpler path.
1. Create the Google OAuth application
In Google Cloud, create a project for authentik and configure the OAuth consent screen.
Then create an OAuth Client ID with the application type:
Web applicationThe important bit is the authorized redirect URI.
If my authentik installation was at:
https://auth.example.comand I use the source slug google, the redirect URI is:
https://auth.example.com/source/oauth/callback/google/The trailing slash and source slug matter. If the Google redirect URI and authentik source slug don’t match, OAuth will chuck a tantrum instead of politely guessing what you meant.
Google will give you:
- Client ID
- Client Secret
Keep the secret secret. Revolutionary advice, I know.
2. Create the Google source in authentik
In the authentik Admin interface go to:
Directory → Federation and Social login → New SourceSelect:
Google OAuth SourceGive it something sensible:
Name: Google
Slug: google
Consumer key: <Google Client ID>
Consumer secret: <Google Client Secret>The slug must match the callback URI we created in Google:
/source/oauth/callback/google/Save the source.
3. Put Google on the authentik login screen
Creating the source does not automatically mean it appears on the default login page.
Go to:
Flows and Stages
→ Flows
→ default-authentication-flow
→ Stage Bindings
→ default-authentication-identification
→ Edit StageUnder Source settings, add the Google source to Selected sources.
Now the authentik login page should offer Google as an authentication option.
4. First Google login and account enrollment
The first time you sign in through the Google source, authentik can enroll/create the corresponding authentik user.
Google doesn’t provide a separate traditional username field, so authentik’s default enrollment may ask you to choose one.
If you want new Google users to automatically use their email address as the authentik username, authentik documents an expression policy for the source enrollment flow.
The relevant idea is:
email = request.context["prompt_data"]["email"]
request.context["prompt_data"]["username"] = email
return FalseI personally like email as the username here because the account relationship becomes bloody obvious when I’m looking at users later.
My authentik account does not use a normal password
This is the part that made me want federated login in the first place.
For my normal day-to-day account, Google is the login path. I don’t need another password prompt in authentik and then another one in every application behind it.
That means the trust chain is:
Google proves:
"Yep, this is richay"

authentik decides:
"Yep, richay is allowed into this app"

application receives:
"authentik says this is richay"

Everybody stops asking me for another bloody password.Depending on the application, authentik may protect it with Forward Auth, or the application may use authentik directly through OIDC/SAML.
Forward Auth apps
Forward Auth is useful for applications that either don’t have useful SSO support or where I simply want the reverse proxy to enforce authentication before the request reaches the application.
With Traefik the basic flow is:
Browser
   ↓
Traefik
   ↓
authentik Forward Auth check
   ├── authenticated → app
└── not authenticated → authentik login → Google if requiredauthentik currently supports both single-application and domain-level Forward Auth.
- Single application — each app gets its own authentik application/provider and can have its own policies.
- Domain level — one Forward Auth provider can cover multiple applications under the same parent domain, but you lose per-application policy control.
I prefer single-application when I care about different permissions. Domain-level is wonderfully lazy when everything under the domain is for the same trusted people.
OIDC / SAML apps
If an application supports proper OIDC or SAML, I generally prefer letting the application talk directly to authentik.
Then the flow is:
Application
    ↓
redirect to authentik
    ↓
authentik session already exists
    ↓
issue OIDC/SAML response
    ↓
application creates its own sessionThis is still single sign-on even though the application creates its own local session. The important bit is that I didn’t need to type another password.
Why it feels like Google logs me into everything
Technically Google only authenticates me to authentik.
But from my point of view:
1. Login to authentik with Google
2. Open Portainer
3. Logged in
4. Open another protected app
5. Logged in
6. Open another one
7. Still logged in

Me:
"well this is fucking lovely" :)That’s because the browser already has a valid authentik session. Each application can send me through authentik, authentik recognises me, and the round trip finishes without asking me to authenticate again.
Important: keep a break-glass local admin
Do not make Google your only possible route into authentik administration.
If Google is down, your OAuth app is misconfigured, the client secret expires/gets replaced, DNS is cactus, or you accidentally break the authentik authentication flow, a federated-only admin account can leave you standing outside your own front door.
I keep a separate local administrator/recovery path that is not my everyday account.
Give it a strong unique password, protect it appropriately, don’t use it for normal browsing, and keep the details somewhere safe.
authentik also has a recovery-key mechanism if you’ve managed to lock yourself out. For a Docker Compose deployment, from the authentik Compose directory the current recovery command is:
docker compose run --rm server create_recovery_key 10 akadminThat produces a recovery link valid for the specified number of minutes — ten in the example above.
Treat that URL like a password. Anyone holding it gets direct access as the selected authentik user while the key is valid.
Google account security now matters a lot
The convenience comes with an obvious trade-off: Google is now the first link in the authentication chain.
If someone compromises that Google account, they may also gain the ability to authenticate to authentik and therefore reach applications that account is authorised to use.
So I absolutely want strong MFA/passkeys and good account-recovery settings on the Google side. SSO is brilliant, but it also means the one key you’re carrying opens more doors.
This does not automatically give every Google user access
Federating Google into authentik and authorising applications are separate jobs.
authentik can bind policies to sources and applications, use groups, Grants or other policy logic to decide who actually gets access.
If you’re using a public Google OAuth application, don’t assume “has a Google account” should equal “welcome to my Proxmox dashboard, stranger”. That would be a fairly spectacular own goal.
Logging out
Because there are multiple sessions involved, logout can be slightly less magical than login.
- Logging out of an individual application may only destroy that application’s session.
- The authentik browser session may still exist, so revisiting the app can log you straight back in.
- Logging out of authentik doesn’t necessarily sign you out of Google itself.
That’s not a bug — Google, authentik and the application are separate layers. SSO makes them feel like one thing right up until logout reminds you there are actually three sets of cookies having a meeting behind the scenes.
My end result
Google account
     ↓
authentik Google OAuth Source
     ↓
authentik session
     ↓
┌──────────────┬──────────────┬──────────────┐
│ Forward Auth │     OIDC     │     SAML     │
└──────────────┴──────────────┴──────────────┘
     ↓               ↓               ↓
self-hosted apps, without another pile of passwordsI log into authentik with Google, then authentik handles my identity for the rest of the web apps. The apps don’t need my Google password, Google doesn’t need to know about every random container in my homelab, and I get proper SSO without maintaining another password for every bloody service.
One front door, lots of rooms. Just make sure you’ve hidden a spare key somewhere sensible before welding the other doors shut 🙂
References
Mounting NAS Shares in LXC Containers on Proxmox
Status: CURRENT
Last reviewed: 31 August 2026
Applies to: Proxmox VE 8/9, LXC containers, host-mounted SMB/CIFS or NFS sharesThis is the clean way I mount NAS storage into my Proxmox LXC containers: mount the network share once on the Proxmox host, then pass that host directory into whichever containers need it using a Proxmox bind mount.
When I rebuilt my Proxmox setup, one of the first things I needed was access to the same NAS shares from multiple LXC containers.
You can try mounting SMB/NFS directly inside each container, but I much prefer doing it once on the Proxmox host and then bind-mounting the result into the LXCs.
That gives me one place for NAS credentials and mount behaviour, while each container just sees a normal Linux directory. Fewer moving parts, fewer opportunities for something to go cactus.
The layout is basically:
NAS / SMB / NFS
       ↓
Proxmox host mounts share
       ↓
/mnt/nas/media
       ↓
Proxmox bind mount
       ↓
LXC sees /mnt/media
       ↓
Plex / Docker / whatever needs it1. Mount the share on the Proxmox host first
The network share needs to be working on the Proxmox host before we pass it into the container.
For SMB/CIFS I use /etc/fstab. I have a separate guide for that here:
Mount a Windows / SMB Share in Linux with fstab
For this guide I’ll assume the NAS share is already mounted on the Proxmox host at:
/mnt/nas/mediaBefore touching the LXC, confirm that path really is the network mount and not just an empty local directory:
findmnt -T /mnt/nas/media
ls -lah /mnt/nas/mediaThis check matters. If the NAS mount is broken but the empty local mount-point directory still exists, you can accidentally bind that empty directory into the LXC. Worse, an application may start writing into the Proxmox host’s local disk thinking it’s writing to the NAS. That’s a fun one to discover after the root filesystem fills up 😅.
2. Pick where the share should appear inside the LXC
The host path and container path do not need to be the same.
For example:
Proxmox host:
  /mnt/nas/media

Inside LXC:
/mnt/mediaPersonally I like keeping container paths simple. The LXC doesn’t need to know that the files came from some NAS sitting elsewhere on the network.
3. Stop the LXC
I’ll use container 103 in the examples:
pct stop 1034. Add the bind mount with pct
Proxmox officially supports bind mounts for exposing arbitrary host directories inside an LXC.
Add the NAS path as the first mount point:
pct set 103 -mp0 /mnt/nas/media,mp=/mnt/mediaCheck the resulting container configuration:
pct config 103You should see something similar to:
mp0: /mnt/nas/media,mp=/mnt/mediaUnder the hood that lives in:
/etc/pve/lxc/103.confYou can edit the config directly, but I prefer pct set for something this simple. Less chance of fat-fingering the container config because I’ve decided I suddenly know better than the tooling.
Read-only mount for media
If the container only needs to read the files — a Plex container is a good example — make the bind mount read-only:
pct set 103 -mp0 /mnt/nas/media,mp=/mnt/media,ro=1If Plex can stream the media without needing to modify it, there is no bloody reason to give it write access to the whole library.
5. Start the container and test it
pct start 103
pct exec 103 -- ls -lah /mnt/mediaOr enter the container normally:
pct enter 103
ls -lah /mnt/mediaIf you can see the NAS files, the actual bind mount is done.
Unprivileged LXC permissions
This is normally the bit where a perfectly good mount suddenly becomes Permission denied.
Proxmox creates new LXCs as unprivileged containers by default. That’s a good thing for security, but it means UIDs inside the container are mapped to different unprivileged UIDs on the Proxmox host.
With the usual default Proxmox mapping:
LXC UID 0      → host UID 100000
LXC UID 1000   → host UID 101000
LXC UID 1001   → host UID 101001
...So if an application runs as UID 1000 inside an unprivileged LXC, the bind-mounted files need to be accessible to the corresponding mapped host UID — normally 101000 with the default map.
Check whether the container is unprivileged:
pct config 103 | grep -E 'unprivileged|lxc.idmap'Don’t blindly assume the 100000 offset if you’ve configured custom ID mappings. The example above is the normal/default arrangement. Custom
lxc.idmapentries change the maths.
If the host share is SMB/CIFS
This is actually handy because CIFS lets you control the UID/GID that Linux presents for the mounted files.
For example, if the application needs UID/GID 1000:1000 inside an unprivileged LXC using the default map, the host CIFS mount can present the files as:
uid=101000,gid=101000An fstab mount might therefore contain:
//NAS/media /mnt/nas/media cifs credentials=/etc/samba/credentials-nas,uid=101000,gid=101000,file_mode=0660,dir_mode=0770,nofail,_netdev,x-systemd.automount 0 0The NAS still controls the real SMB permissions. These UID/GID options just control how the files appear to Linux on the Proxmox host and therefore through the bind mount.
If the host share is NFS
NFS permissions are much more directly tied to numeric UID/GID values supplied by the NFS server, so make sure the IDs exported by the NAS line up with what the mapped LXC user needs.
This is one reason SMB can sometimes be easier for a simple media bind mount: I can explicitly choose the host-side presented UID/GID in the CIFS mount options.
Privileged containers are easier — but that’s not a reason to use one
In a privileged LXC, UID 1000 inside generally corresponds directly to UID 1000 on the host, which makes bind-mount permissions simpler.
That does not mean I’d convert a container to privileged just to make a NAS mount easier. Proxmox explicitly considers unprivileged containers the safer design.
Fix the ID/permission mapping rather than trading away container isolation because Linux permissions hurt your feelings for ten minutes 🙂
Multiple shares
You can add more mount points as mp1, mp2, etc.
pct set 103 -mp0 /mnt/nas/media,mp=/mnt/media,ro=1
pct set 103 -mp1 /mnt/nas/downloads,mp=/mnt/downloads
pct set 103 -mp2 /mnt/nas/backups,mp=/mnt/backupsThat is essentially how I like to build service LXCs: give each one only the bits of storage it actually needs rather than mounting the entire NAS because apparently restraint is illegal.
Bind mounts are NOT included in normal LXC backups
Important: Proxmox does not include the contents of bind-mounted host directories in normal
vzdumpcontainer backups.
For a 40 TB media share this is normally exactly what I want. Backing up a tiny Plex LXC should not suddenly decide it also needs to copy the entire bloody NAS.
But it means your backup plan needs to treat these as two separate things:
LXC backup
  → container OS/config/application data

NAS backup
→ the actual files inside the bind-mounted shareDon’t restore an LXC backup six months later and wonder why 20 TB of movies didn’t magically emerge from it.
Snapshots are the same story
Bind mounts are not managed container storage, so their contents are not part of normal Proxmox LXC snapshots either.
The NAS remains responsible for its own snapshots, ZFS protection, replication, backups, prayers to the storage gods, etc.
Don’t bind-mount random host system directories
Proxmox specifically warns against bind-mounting things such as /, /var or /etc into containers.
Use dedicated source directories for the data you’re intentionally sharing.
Also, the bind-mount source path must not contain symlinks.
A nice boring path such as:
/mnt/nas/mediais exactly what we want. Boring storage paths are good storage paths.
NAS unavailable when Proxmox boots
This deserves a mention because network storage occasionally decides it wants a sleep-in.
On the Proxmox host I use network-friendly fstab options such as:
nofail,_netdev,x-systemd.automountThe automount means the network share is mounted when the path is first accessed rather than forcing Proxmox to sit there during boot waiting for the NAS.
Before manually starting a container after a NAS outage, I still check:
ls /mnt/nas/media >/dev/null
findmnt -T /mnt/nas/mediaIf that doesn’t show the expected CIFS/NFS mount, fix the host mount first. Don’t let the container happily write into an empty local directory underneath the missing NAS mount. That’s how mystery disk usage is born.
Remove a bind mount
Stop the container first:
pct stop 103
pct set 103 -delete mp0Then confirm:
pct config 103My preferred setup
For NAS-backed LXC services I now keep the design pretty boring:
NAS
 ↓
SMB/NFS mounted once on Proxmox
 ↓
Dedicated /mnt/nas/... directories
 ↓
Proxmox mp0/mp1 bind mounts
 ↓
Unprivileged LXCs
 ↓
Read-only wherever possibleNo SMB passwords copied into every container, no privileged LXC just because UID mapping was annoying, and no 40 TB surprise hiding inside a vzdump job.
Mount it once, pass through what each container needs, then leave the bastard alone while it’s working 🙂
References
Proxmox Unprivelliged LXC with shared Intel ARC GPU for Plex or Jellyfin transcoding
Status: CURRENT
Last reviewed: 31 August 2026
Applies to: Proxmox VE 8.2+ / 9.x, unprivileged LXC, Intel Arc GPU
Example LXC: Debian TrixieThis guide originally used manual cgroup, UID/GID, subuid and subgid mappings. Modern Proxmox has native LXC Device Passthrough, so the current method is much simpler.
This guide is for running Plex and/or Jellyfin in Docker inside an unprivileged Proxmox LXC, while sharing an Intel Arc GPU from the Proxmox host for hardware transcoding.
I’m using a Debian Trixie LXC for this example. This assumes you have:
- Created an unprivileged LXC (Proxmox instructions)
- Installed Docker inside the LXC (Docker instructions)
- An Intel Arc GPU detected and working on the Proxmox host
- An active Plex Pass subscription if you want to use Plex hardware transcoding
Find the Intel Arc render device
On the Proxmox host, check the available render devices:
ls -l /dev/dri/render*Example output from my host:
crw-rw---- 1 root render 226, 128 Nov 16 21:02 /dev/dri/renderD128
crw-rw---- 1 root render 226, 129 Nov 16 21:02 /dev/dri/renderD129In my system, renderD128 is the Intel iGPU and renderD129 is the Intel Arc A310. Your device numbers may be different, so don’t blindly copy mine.
If you’re not sure which render device belongs to which GPU, check the DRI device links:
ls -l /dev/dri/by-path/You can compare the PCI addresses shown there with:
lspci | grep -Ei 'VGA|Display'Pass the Arc GPU into the LXC
This is the bit that became much easier in newer Proxmox versions.
In the Proxmox web interface, select the LXC and go to:
Resources → Add → Device Passthrough
- Device Path: select your Intel Arc render device. Mine is
/dev/dri/renderD129 - Mode:
0666 - UID: leave blank
- GID: leave blank
For my system, Proxmox creates an LXC config entry equivalent to:
dev0: /dev/dri/renderD129,mode=0666That’s it. No manual lxc.idmap entries, no editing /etc/subuid or /etc/subgid, and no manually-created cgroup or bind-mount rules.
Why 0666?
This gives processes inside the LXC read/write access to the passed-through render device, which avoids the UID/GID mapping mess used by older methods. For a dedicated unprivileged Plex/Jellyfin LXC this is the simple option. If you want tighter permissions, Proxmox also supports assigning a specific UID/GID to the device instead.
Restart the LXC after adding the device, then check from inside the LXC:
ls -l /dev/dri/You should see the render device you passed through. In my case that is renderD129.
Docker Compose
The Arc render device also needs to be passed from the LXC into the Plex or Jellyfin Docker container.
Add the following to the Plex or Jellyfin service in your Compose file, changing the render device if yours is different:
devices:
- /dev/dri/renderD129:/dev/dri/renderD129If your Arc GPU is renderD128, use /dev/dri/renderD128:/dev/dri/renderD128 instead.
After recreating the Docker container, you can confirm the device is visible inside it:
docker exec -it <container-name> ls -l /dev/dri/Plex
In Plex, go to Settings → Server → Transcoder and enable Show Advanced if required.
- Enable Use hardware acceleration when available
- Enable Use hardware-accelerated video encoding
- Under Hardware transcoding device, select the Intel Arc GPU
Mine appears as Intel DG2 [Arc A310].
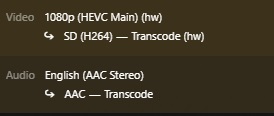
To test it, play a video and force a transcode by changing the quality to something lower. Then go to Activity → Dashboard. The video transcode should show the hardware (hw) tag.
If the Arc GPU doesn’t appear in Plex, check the device in this order:
- Proxmox host:
ls -l /dev/dri/ - Inside the LXC:
ls -l /dev/dri/ - Inside the Docker container:
docker exec -it <container-name> ls -l /dev/dri/
Note: Plex hardware-accelerated transcoding requires an active Plex Pass subscription.
Jellyfin
For Jellyfin, open the Administration Dashboard, then go to Playback → Transcoding.
- Under Hardware Acceleration, select Intel Quick Sync (QSV)
- Set the QSV device to the Intel Arc render device. Mine is
/dev/dri/renderD129
If the Arc GPU is the only Intel GPU in your system it will often be /dev/dri/renderD128. Again, use the device you identified earlier rather than assuming the number.
To test Jellyfin, play a video, lower the playback quality so it has to transcode, then open Playback Info. Look for Play method: Transcoding.
If transcoding fails completely, first confirm that the render device exists inside both the LXC and the Jellyfin Docker container. Jellyfin’s Intel hardware acceleration documentation also includes additional QSV/VA-API and driver checks if required:
Jellyfin Intel GPU hardware acceleration documentation

Verify the GPU is actually being used
If you want to confirm the GPU itself is doing the work, install intel-gpu-tools on the Proxmox host and run intel_gpu_top while a transcode is active. You should see activity on the Intel GPU’s video engines.
Archived method: manual UID/GID mapping
ARCHIVED – November 2025 method
The original version of this guide manually added
lxc.cgroup2.devices.allow, bind-mounted the DRI devices, created customlxc.idmaprules and edited/etc/subuidand/etc/subgid.That method worked, but it is no longer the recommended path for a current Proxmox install. Native LXC Device Passthrough creates the device node for the container and can assign its mode, UID and GID directly, so the old mapping instructions have been removed from the active guide to avoid unnecessary complexity.
If you’re deliberately running an older Proxmox release, use documentation appropriate for that version rather than copying the old mappings from this article.
Credit: Thanks to gnd-7000 in the comments for pointing out that Proxmox 9 no longer needs the old GID mapping method and that the GPU can be added directly through Resources → Device Passthrough. Much cleaner 🙂
References: Proxmox pct documentation · Jellyfin Intel GPU documentation · Plex Transcoder documentation
Bypassing CGNAT for Plex with Tailscale funnels
Status: CURRENT — WITH CAVEAT
Last reviewed: 31 August 2026
Applies to: Tailscale Funnel, Plex Media Server, Proxmox VM/LXCThis method still works and I could not find anything in Tailscale’s current Terms of Service or Acceptable Use Policy that explicitly prohibits Plex or media streaming through Funnel. However, Funnel traffic has non-configurable bandwidth limits, and Tailscale’s AUP prohibits use that creates an undue burden on its service. So yes, it’s still a handy CGNAT workaround — just don’t treat Tailscale like you’ve accidentally discovered a free unlimited Plex CDN and absolutely send it 😅.
This is not legal advice. Terms and product limits can change, so check Tailscale’s current documentation and policies before relying on Funnel for heavy traffic.
I’m currently on a static public IP and run Plex with normal remote access now, so I don’t actually need this workaround anymore. I did spend plenty of time fighting CGNAT before that though, and I remember the pain well enough to keep this guide alive.
With IPv4 addresses becoming scarce, more ISPs are putting customers behind CGNAT. The annoying bit for self-hosting is that you no longer have your own publicly reachable IPv4 address, so normal port forwarding for Plex may not work. Your router can forward the port perfectly and the internet still basically says, “yeah nah”.
Why Tailscale Funnel?
Tailscale Funnel can expose a service running on a Tailscale device to the public internet using a .ts.net HTTPS address. Traffic reaches Tailscale’s Funnel relay servers and is then proxied back to the service on your machine.
For Plex, that means you can expose local port 32400 through a public HTTPS address even if your ISP has you trapped behind CGNAT. That’s the neat bit we’re here for.
A better option when possible: If every device that needs Plex can run Tailscale, don’t use Funnel at all. Install Tailscale on the Plex server and client devices and access Plex privately across your tailnet. No point making something public just for the hell of it. Funnel is mainly useful when you need a normal public HTTPS endpoint — for example, a Plex client that cannot run Tailscale itself.
Tailscale and Cloudflare terms
As of 31 August 2026, I could not find an explicit rule in Tailscale’s Terms of Service or Acceptable Use Policy banning Plex, video streaming or media servers through Funnel.
There are still two important catches:
- Tailscale documents that Funnel traffic is subject to non-configurable bandwidth limits.
- Tailscale’s Acceptable Use Policy prohibits use that interferes with, disrupts or creates an undue burden on the Tailscale service or connected infrastructure.
So while personal Plex streaming through Funnel does not appear to be explicitly prohibited, I wouldn’t take the piss and treat it as a free unlimited CDN or relay. Heavy or continuous streaming may hit bandwidth limits and could potentially become an acceptable-use issue.
Cloudflare Tunnel is different. Cloudflare’s current documentation states that public-hostname Tunnel traffic on Free, Pro and Business plans is subject to service-specific terms requiring an appropriate paid service to serve video and other large files. So I would not use a standard public Cloudflare Tunnel as a Plex streaming workaround on those plans.
Set up the Tailscale domain
Create a Tailscale account if you don’t already have one, then open the Tailscale Admin Console and head to DNS.
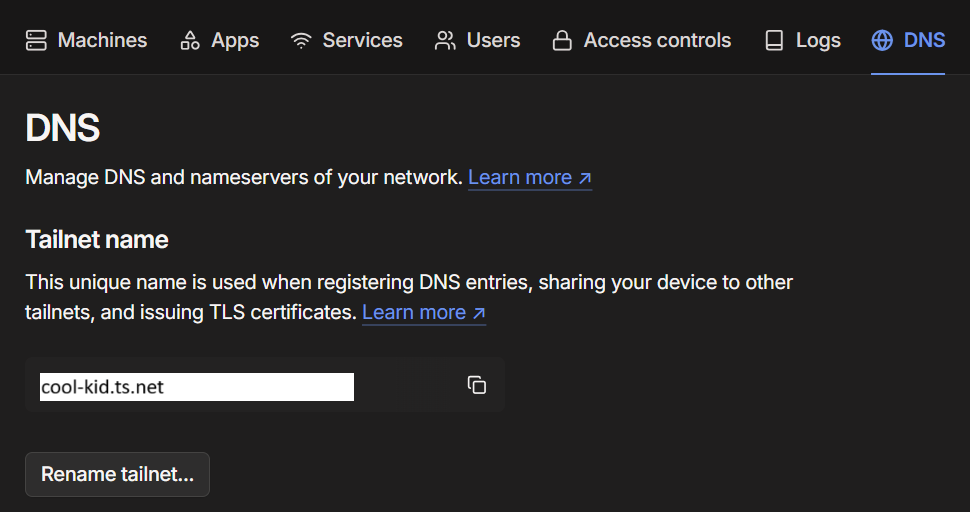
You can hit Rename tailnet until you get something cool 😉
For this example I’ll use:
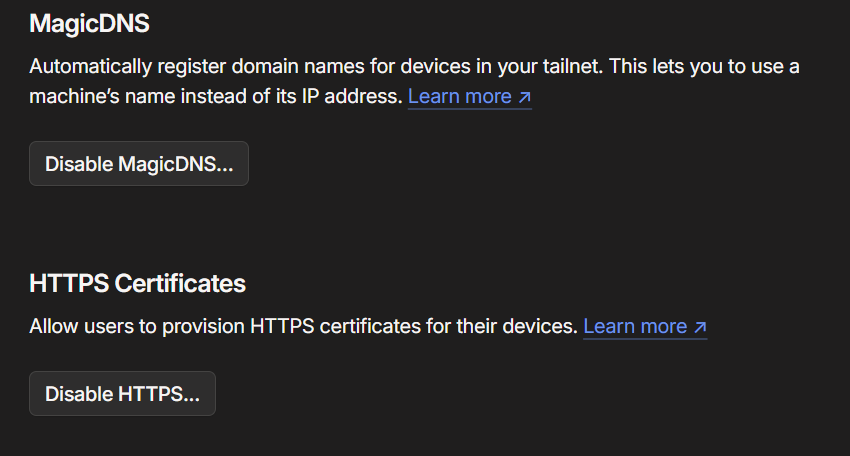
cool-kid.ts.netMake sure MagicDNS and HTTPS Certificates are enabled. The Funnel command can also prompt you to enable the requirements if they aren’t already configured.
Install Tailscale on the Plex VM or LXC
Install Tailscale using the current Linux installation instructions, or use Tailscale’s install script:
curl -fsSL https://tailscale.com/install.sh | shIf Plex is running inside an unprivileged Proxmox LXC
Tailscale needs access to /dev/net/tun. Older Proxmox guides manually edited the LXC config with cgroup and bind-mount entries, but current Proxmox versions can do this directly from the web interface. Thankfully, no cgroup archaeology required anymore.
Shut down the LXC, then in Proxmox go to:
LXC → Resources → Add → Device Passthrough
Enter the following Device Path:
/dev/net/tunStart the LXC again. The equivalent configuration entry is:
dev0: /dev/net/tunYou can confirm the TUN device exists from inside the LXC:
ls -l /dev/net/tunTailscale also supports userspace networking if you don’t want to pass through /dev/net/tun, but for a normal Proxmox LXC the native device passthrough method is straightforward and has a lot less weird shit hiding underneath it.
Connect the server to Tailscale
For both a VM and LXC, bring Tailscale up:
tailscale upFollow the authentication link it gives you. Once complete, the Plex server should appear in your Tailscale Admin Console.
Create the Plex Funnel
Now for the bit we actually came here for. Plex listens on port 32400, so run:
tailscale funnel --bg http://127.0.0.1:32400The first time you use Funnel, Tailscale may give you a link to approve the required Funnel permissions for the tailnet. One little hoop to jump through, then you’re off.
Once enabled, the output should look similar to:
Available on the internet:

https://plex.cool-kid.ts.net/
|-- proxy http://127.0.0.1:32400

Funnel started and running in the background.The --bg flag keeps the Funnel configuration running in the background and Tailscale documents that it will resume after a reboot or a tailscale down/tailscale up cycle.
You can check the current Funnel configuration at any time with:
tailscale funnel statusTo remove the Funnel later:
tailscale funnel --https=443 offTell Plex about the Funnel address
Open your local Plex server:
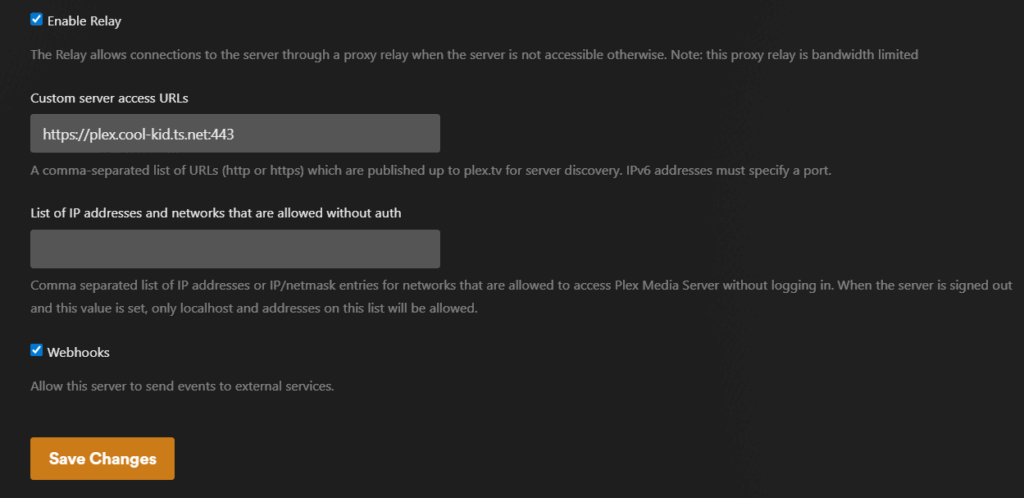
http://<YourIP>:32400/webGo to Settings → Server → Network, enable Show Advanced, then find Custom server access URLs.
Enter the HTTPS address created by Funnel. I explicitly include port 443 so Plex publishes the correct external HTTPS endpoint rather than inheriting the normal Plex remote-access port:
https://plex.cool-kid.ts.net:443Save the changes and restart Plex for good measure. Probably not strictly necessary every time, but Plex has taught me not to argue with a cheap reboot 🙂
About Plex Remote Access: You do not need a normal router port-forward for this Funnel method. If native Plex Remote Access cannot work because you’re behind CGNAT, the custom Funnel URL gives Plex another address to advertise. I no longer recommend explicitly disabling Plex Remote Access as a required step: leaving it enabled can preserve Plex Relay as a fallback if direct access fails. Basically, don’t fight Plex more than you need to — the Funnel URL is the important part of this setup.
Test it
Test from a device that is genuinely outside your home network — mobile data is an easy option. Don’t leave your phone on Wi-Fi, see Plex working and congratulate yourself too early 😅. Open Plex through the normal Plex app or hosted web app and start a stream.
If it isn’t working, check the chain in order before changing six things at once and creating an entirely new problem:
tailscale status— confirm the Plex server is connected to your tailnet.tailscale funnel status— confirm the Funnel is active.- Open the
https://...ts.netFunnel address directly in a browser and confirm it reaches Plex. - Check Plex Settings → Server → Network → Custom server access URLs contains the correct Funnel URL with
:443.
One quirk I found with this method is that remote connections may not appear in the Plex dashboard graph the same way a normal direct remote connection does. Plex being Plex — if the stream works, don’t let one slightly weird graph send you down a three-hour rabbit hole.
Keep the rest of your homelab private
If you also use Tailscale for private access to the rest of your self-hosted services, you don’t need to Funnel everything publicly. Expose the thing that needs exposing and leave the rest of the homelab tucked away where random internet goblins can’t poke it.
Tailscale’s Split DNS can send requests for your own domain — for example richay.au — to your Pi-hole or AdGuard DNS server while you’re connected to the tailnet. Your internal DNS can then point those names at your private reverse proxy.
That gives you public access only where you deliberately want it, while the rest of the homelab stays private. My guide is here: Tailscale Split DNS by Domain for Secure Home Server Access.
For normal public websites like this blog, Cloudflare Tunnel is still a great CGNAT workaround. The video/large-file restriction discussed above applies to public-hostname traffic serving those types of content; it doesn’t mean Cloudflare Tunnel itself is unsuitable for ordinary websites.
Archived notes from the original guide
ARCHIVED — older Proxmox LXC method
The original version of this article manually added:
lxc.cgroup2.devices.allow: c 10:200 rwm
lxc.mount.entry: /dev/net/tun dev/net/tun none bind,create=file
Those lines are still relevant to older Proxmox releases, but current Proxmox versions support
/dev/net/tunthrough native LXC Device Passthrough and Tailscale’s own current Proxmox/LXC documentation recommends the GUI method.
References
- Tailscale Funnel documentation
- Tailscale Funnel CLI reference
- Tailscale in LXC containers
- Tailscale Terms of Service
- Tailscale Acceptable Use Policy
- Cloudflare Tunnel routing documentation
- Plex Network settings documentation
And that’s it. CGNAT can remain cactus, Plex can still get out, and you haven’t had to beg your ISP for a public IPv4 address. Not a bad little workaround 🙂
Browser VSCode docker image used to manage docker host with addon
Status: CURRENT — SECURITY SENSITIVE
Last reviewed: 31 August 2026
Applies to: LinuxServer.io code-server, Docker Engine, Docker ComposeThis setup deliberately gives a browser-accessible code-server instance control of the Docker daemon on the host. That is extremely powerful and should be treated as effectively giving the application administrator-level access to the Docker host.
What this does
This setup runs VS Code in the browser using LinuxServer.io’s code-server image, then adds the LinuxServer universal-docker mod so the Docker CLI and Docker Compose are available inside the container.
I also mount my host’s Docker Compose and Docker data folders into the code-server workspace. This lets me edit Compose files, configs and other Docker-related files from the browser, then use the built-in terminal to run normal Docker commands against the host.
The important bits are:
DOCKER_MODS=linuxserver/mods:universal-dockerinstalls the Docker CLI, Buildx and Compose plugin inside code-server.- The Docker socket is mounted into the container so those Docker commands control the host Docker daemon.
- Host folders containing Compose files and container data can be mounted into the workspace for easy editing.
⚠️ Security warning — read this before copying the Compose file
Mounting
/var/run/docker.sockinto a container is a major security decision. Docker’s own documentation warns that only trusted users should be able to control the Docker daemon because Docker can mount arbitrary host directories into containers. In practical terms, a process with unrestricted access to the Docker socket can usually gain root-level control of the host.That means if this code-server instance is compromised, you should assume the Docker host is compromised as well.
Do not expose this directly to the public internet unless you fully understand and accept that risk.
How I recommend accessing it
When I originally wrote this guide I used Traefik and Authentik in front of code-server. That’s still useful, but for an application with this much control I now recommend keeping it private to your LAN/Tailscale network wherever possible.
My preferred setup is:
- Do not publish the code-server hostname publicly.
- Use Tailscale when accessing your home network remotely.
- Use Tailscale Split DNS to resolve your private domain to your internal reverse proxy only while connected to your tailnet.
- Keep Authentik in front of code-server as another authentication layer. MFA is strongly recommended.
- Optionally keep code-server’s own hashed password enabled as a second independent authentication layer.
I have a separate guide for the private DNS side here: Tailscale Split DNS by Domain for Secure Home Server Access.
Tailscale’s current documentation calls this a restricted nameserver, or Split DNS. Queries for only your chosen private domain are sent to your own DNS server while other DNS continues normally.
Start with the LinuxServer.io code-server image
LinuxServer.io’s current base Compose example looks like this:
services:
  code-server:
    image: lscr.io/linuxserver/code-server:latest
    container_name: code-server
    environment:
      - PUID=1000
      - PGID=1000
      - TZ=Etc/UTC
      - PASSWORD=password # optional
      - HASHED_PASSWORD= # optional
      - SUDO_PASSWORD=password # optional
      - SUDO_PASSWORD_HASH= # optional
      - PROXY_DOMAIN=code-server.my.domain # optional
      - DEFAULT_WORKSPACE=/config/workspace # optional
      - PWA_APPNAME=code-server # optional
    volumes:
      - /path/to/code-server/config:/config
    ports:
      - 8443:8443
restart: unless-stoppedCheck the current LinuxServer.io code-server documentation before deploying, as image options can change over time.
Add Docker host control
LinuxServer provides the universal-docker Docker Mod, which adds the Docker CLI, Buildx and Docker Compose plugin to the container.
DOCKER_MODS=linuxserver/mods:universal-dockerThe Docker socket then needs to be mounted:
/var/run/docker.sock:/var/run/docker.sock:roImportant: The
:roon the bind mount does not make the Docker API read-only. It prevents the container from replacing or modifying the socket file itself, but commands sent through that socket can still create, stop, remove and otherwise control containers if the Docker API permits them.If you only need to view Docker information rather than manage the host, LinuxServer also publishes a Docker Socket Proxy that can restrict which API endpoints are available. That is safer, but it defeats the purpose of this particular setup if you want full Docker/Compose management.
My folder layout
On my Docker host I keep:
/home/richay/docker-compose/for Compose files and small hand-managed configuration files, and:
/home/richay/docker/for persistent container data.
Mounting those into the code-server workspace gives me quick browser access to the files I normally need to edit.
Recommended Compose — private reverse proxy + Authentik
This is the version closest to what I use. There is no published Docker port; Traefik reaches code-server over the external proxy network.
I recommend making the hostname available only through your LAN/private DNS or Tailscale Split DNS rather than creating a public DNS record for it.
services:
  code-server:
    image: lscr.io/linuxserver/code-server:latest
    container_name: code-server
    environment:
      - PUID=1000
      - PGID=1000
      - TZ=Australia/Perth
      - DEFAULT_WORKSPACE=/config/workspace
      - PWA_APPNAME=code-server
      - DOCKER_MODS=linuxserver/mods:universal-docker

      # Optional but recommended as a second auth layer.
      # Generate a strong hash rather than using PASSWORD in plain text.
      # - HASHED_PASSWORD=$2a$...

    volumes:
      - /home/richay/docker/code:/config
      - /home/richay/docker-compose:/config/workspace/docker-compose
      - /home/richay/docker:/config/workspace/docker
      - /var/run/docker.sock:/var/run/docker.sock:ro

    restart: unless-stopped

    labels:
      - "traefik.enable=true"
      - "traefik.docker.network=proxy"
      - "traefik.http.routers.code-secure.entrypoints=https"
      - "traefik.http.routers.code-secure.rule=Host(`code-server.richay.au`)"
      - "traefik.http.routers.code-secure.tls=true"
      - "traefik.http.routers.code-secure.tls.certresolver=cloudflare"
      - "traefik.http.routers.code-secure.service=code"
      - "traefik.http.services.code.loadbalancer.server.port=8443"
      - "traefik.http.routers.code-secure.middlewares=authentik@file"

    networks:
      - proxy

networks:
  proxy:
external: trueThe port is deliberately not published with ports:. That stops code-server bypassing Traefik/Authentik through something like http://host-ip:8443.
With Split DNS, code-server.richay.au can resolve to the internal reverse proxy while you’re at home or connected to Tailscale, without exposing that hostname/service publicly.
If you don’t use a reverse proxy
You can still run code-server directly, but I would keep it on a trusted LAN/VPN rather than forwarding port 8443 from the internet.
Use a hashed password and bind the port to the Docker host’s private LAN address rather than every interface. Replace 192.168.1.10 with the actual LAN IP of your Docker host:
services:
  code-server:
    image: lscr.io/linuxserver/code-server:latest
    container_name: code-server
    environment:
      - PUID=1000
      - PGID=1000
      - TZ=Australia/Perth
      - HASHED_PASSWORD=$2a$...
      - DEFAULT_WORKSPACE=/config/workspace
      - PWA_APPNAME=code-server
      - DOCKER_MODS=linuxserver/mods:universal-docker

    volumes:
      - /path/to/code-server/config:/config
      - /path/to/docker-compose:/config/workspace/docker-compose
      - /path/to/docker:/config/workspace/docker
      - /var/run/docker.sock:/var/run/docker.sock:ro

    ports:
      - 192.168.1.10:8443:8443

restart: unless-stoppedYou would then access it at:
http://192.168.1.10:8443Again: do not port-forward 8443 from your router to this container. If you need it away from home, use Tailscale or another trusted VPN.
Test Docker access
Open a terminal inside code-server and run:
docker psIf the Docker Mod and socket are working, you should see the containers running on the host.
Docker Compose should also be available:
docker compose versionFrom there you can open your mounted Compose folder in VS Code, edit a stack and use the terminal as you normally would.
What happens if code-server is compromised?
This is worth spelling out because mounting the Docker socket can look harmless if you’ve never dealt with Docker’s security model.
An attacker who gains usable access to the Docker daemon could potentially create a container that mounts the host filesystem, access other containers and their volumes, read Docker secrets/configuration, start privileged workloads or otherwise take control of the machine.
So the security boundary is not:
attacker → code-server container → stopped by Docker container isolationIt is much closer to:
attacker → code-server → Docker socket → host controlThat’s why I now recommend keeping this service private behind Tailscale/LAN access even if you also use Authentik.
Optional: Docker Socket Proxy for read-only use
If your goal is only to view containers rather than start/stop/deploy them, don’t give code-server unrestricted access to the raw Docker socket.
LinuxServer’s Docker Socket Proxy can expose only selected Docker API endpoints. For example, a proxy can allow container listing while blocking API POST requests.
For full Docker Compose management this isn’t particularly useful because the permissions required to create containers and mount host paths are the same powerful permissions we’re trying to protect. But for monitoring/read-only workflows it’s a much safer design.
References
- LinuxServer.io code-server documentation
- LinuxServer universal-docker Mod
- Docker Engine security documentation
- Docker daemon socket protection
- Tailscale DNS / Split DNS documentation
- My Tailscale Split DNS guide
Once it’s locked down properly, having direct browser access to your Compose files and the Docker CLI is bloody convenient 🙂
Tailscale split dns by domain for secure home server access
Status: CURRENT
Last reviewed: 31 August 2026
Applies to: Tailscale Split DNS, subnet routers, AdGuard Home and a private reverse proxyThis setup lets you keep selected services publicly reachable while resolving your private services to internal IP addresses only when you’re at home or connected to Tailscale. Basically: public where I actually want public, private everywhere else. Much nicer than throwing the whole bloody homelab onto the internet.
What this setup does
I use the same domain for both public and private services. Public services can still be reachable normally, while private subdomains resolve through my own DNS server and point at my internal reverse proxy when I’m connected to Tailscale. One domain, two completely different paths depending on where I am. Neat little trick 🙂
For this example:
- Domain:
richay.au - AdGuard Home:
10.10.10.10— local DNS / ad blocker - Traefik v3:
10.10.10.20— internal reverse proxy - AdGuard DNS rewrite:
*.richay.au → 10.10.10.20 - Cloudflare Tunnel: only for services I deliberately expose publicly, such as this blog
- Tailscale: remote private access, subnet routing and Split DNS
The important distinction is that DNS and routing are separate things. AdGuard can correctly answer private.richay.au → 10.10.10.20, but your remote device still needs a Tailscale route to 10.10.10.20 or the browser won’t be able to reach it. DNS can tell you exactly where the house is; it doesn’t magically build the bloody road there.
Split DNS is not an access-control system. Split DNS decides which DNS server answers a query. Subnet routes decide how packets reach the private IP. Tailscale Grants/ACLs decide whether that traffic is actually allowed. Three different jobs, even though they’re all holding hands by the end of this guide.
1. Install Tailscale on the subnet router
Install Tailscale on a machine that can reach both your DNS server and reverse proxy over the LAN. It doesn’t need to be anything fancy — it just needs to sit in the right spot and not randomly disappear when you need it.
In this example I’m installing Tailscale on the Traefik host at 10.10.10.20. That machine will also act as a Tailscale subnet router.
You can install Tailscale using the current Linux installation instructions.
2. Enable IP forwarding
Tailscale requires IP forwarding on a Linux subnet router. For most modern Linux distributions with /etc/sysctl.d:
echo 'net.ipv4.ip_forward = 1' | sudo tee -a /etc/sysctl.d/99-tailscale.conf
echo 'net.ipv6.conf.all.forwarding = 1' | sudo tee -a /etc/sysctl.d/99-tailscale.conf
sudo sysctl -p /etc/sysctl.d/99-tailscale.confIf you’re only using IPv4 you technically only need IPv4 forwarding, but I’ve left Tailscale’s current IPv4 + IPv6 example intact. Future me can deal with IPv6 properly one day instead of pretending it doesn’t exist 😅.
3. Advertise the private routes
This is the bit I had slightly wrong in the original version of this guide. DNS was working, so naturally I stared at DNS for too long even though the missing bit was actually routing. Classic.
The remote Tailscale client needs to reach both the DNS server at 10.10.10.10 and the reverse proxy at 10.10.10.20. Advertising only the AdGuard address lets DNS queries work, but doesn’t create a route to the private IP returned by AdGuard. So you get a perfectly correct DNS answer followed immediately by absolutely fuck-all happening in the browser.
For the tightest routing, advertise only those two hosts:
sudo tailscale set --advertise-routes=10.10.10.10/32,10.10.10.20/32If you deliberately want your Tailscale devices to access the whole LAN instead, you could advertise the subnet:
sudo tailscale set --advertise-routes=10.10.10.0/24I prefer the two /32 routes for this guide because they expose only the DNS and reverse-proxy hosts rather than the whole subnet. No need to hand Tailscale the keys to the whole neighbourhood when two houses will do.
4. Approve the routes in Tailscale
Open the Tailscale Machines page, locate the subnet-router machine, open its menu and choose Edit route settings.
Approve 10.10.10.10/32 for AdGuard and 10.10.10.20/32 for Traefik.
Route approval and Tailscale access policy are separate. The route makes those addresses reachable through the tailnet; your Grants/ACLs decide who is actually allowed to connect to them. Reachable does not automatically mean invited in.
Linux client note: Windows, macOS, iOS and Android accept advertised subnet routes by default. Linux clients do not. On a Linux client that needs to use these routes, run:
sudo tailscale set --accept-routes=true5. Configure Tailscale Split DNS
Now open the Tailscale DNS page.
- Select Add nameserver → Custom.
- Enter your internal DNS server:
10.10.10.10. - Enable Restrict to search domain.
- Enter
richay.auas the search domain. - Save the nameserver.
Tailscale calls this a restricted nameserver. It is also commonly called Split DNS. Same idea, slightly more corporate name.
With that configured, DNS queries for names under richay.au are sent to AdGuard while you’re connected to Tailscale. Normal DNS queries can continue using the device’s normal resolver.
You do not need to enable Override DNS servers just to use this Split DNS setup. Override DNS servers is for forcing global tailnet DNS behaviour, whereas here we only want richay.au queries sent to AdGuard. No point hijacking every DNS query when we’re only interested in our own little corner of the internet.

6. Configure AdGuard Home
AdGuard now needs to return the internal Traefik address for your private services. This is where the whole thing starts feeling suspiciously clever for something that’s actually pretty simple.
In my setup I use a wildcard DNS rewrite equivalent to:
*.richay.au → 10.10.10.20This means names such as:
code-server.richay.au
proxmox.richay.au
homeassistant.richay.aucan all resolve to Traefik’s private IP without creating public DNS records for every private service. Which is exactly what I want — nice names internally, no giant public sign saying “hey look, here’s all my homelab shit”.
The original article called this a CNAME record. That’s not quite right when you’re directly rewriting a wildcard name to an IP address — this is better described as an AdGuard wildcard DNS rewrite. Tiny terminology fix, but if I’m going back through these articles I may as well stop lying to future me 😄.
7. Let Traefik route the hostname
Traefik can continue routing each hostname to the correct application exactly as it does on your LAN. It doesn’t care that the request came in through Tailscale; as far as Traefik is concerned, business as usual.
The connection path is:
Remote device
    ↓
Tailscale
    ↓
Split DNS query for app.richay.au
    ↓
AdGuard 10.10.10.10
    ↓
Returns 10.10.10.20
    ↓
Tailscale subnet route
    ↓
Traefik 10.10.10.20
    ↓
Private web appPublic applications can remain completely separate. For example, this blog can still have a public Cloudflare Tunnel while code-server.richay.au exists only in your private DNS. Public stuff stays public, private stuff stays private, and the two don’t need to become one giant networking casserole.
Access control
Don’t confuse private DNS with permission. Hiding the sign doesn’t lock the door.
A device that knows the private IP does not automatically gain access unless your Tailscale policy allows the connection. Tailscale now recommends Grants for new access-control policies; legacy ACLs still work but aren’t receiving new features.
If your tailnet is just your own trusted devices, the default policy may be enough. For a larger tailnet, use Grants to limit which users/devices can reach the advertised private addresses and ports.
Test the setup
Connect a phone or laptop to Tailscale while away from your home network. Mobile data is handy here so you know you’re genuinely testing the remote path and not accidentally proving that your own Wi-Fi still works. First confirm the private DNS server and reverse proxy are reachable:
ping 10.10.10.10
ping 10.10.10.20On Windows, Tailscale recommends using Resolve-DnsName rather than relying on nslookup when testing advanced DNS behaviour such as Split DNS:
Resolve-DnsName -Name code-server.richay.auThe result should return 10.10.10.20. Then open the private hostname in your browser:
https://code-server.richay.auTroubleshooting
If DNS resolution fails, check that Tailscale can reach AdGuard and that the restricted nameserver is configured for the correct domain. Don’t start kicking Traefik yet — it hasn’t even been invited to this part of the problem.
If DNS resolves correctly to 10.10.10.20 but the website won’t open, that’s usually a routing or access-policy problem, not DNS. Confirm the Traefik address is included in the advertised and approved routes. This is the point where DNS has done its job and gets to sit back while routing takes the blame.
Useful checks:
tailscale status
tailscale status --routesIf a Linux client can reach normal Tailscale 100.x addresses but not the advertised LAN addresses, enable subnet route acceptance:
sudo tailscale set --accept-routes=trueIf Linux DNS itself is behaving strangely, make sure your resolver configuration is compatible with Tailscale. On distributions that use it, Tailscale recommends systemd-resolved rather than a manually overwritten or locked /etc/resolv.conf.
The end result
With this setup I can keep genuinely public services public, while the rest of my homelab uses the same nice *.richay.au hostnames without exposing those applications to the internet.
At home, AdGuard resolves the private names directly. Away from home, Tailscale Split DNS sends only richay.au lookups back to AdGuard, and the subnet routes carry the connection to Traefik.
Much nicer than remembering a pile of IP addresses and ports 🙂
Once this is working it’s one of those setups that feels almost suspiciously tidy: same domain everywhere, no public DNS records for the private stuff, and remote access behaves like you’re sitting at home. Took a few moving parts to get there, but bloody hell it’s nice when it all clicks 🙂