
Status: CURRENT — WITH CAVEAT
Last reviewed: 31 August 2026
Applies to: Tailscale Funnel, Plex Media Server, Proxmox VM/LXCThis method still works and I could not find anything in Tailscale’s current Terms of Service or Acceptable Use Policy that explicitly prohibits Plex or media streaming through Funnel. However, Funnel traffic has non-configurable bandwidth limits, and Tailscale’s AUP prohibits use that creates an undue burden on its service. So yes, it’s still a handy CGNAT workaround — just don’t treat Tailscale like you’ve accidentally discovered a free unlimited Plex CDN and absolutely send it 😅.
This is not legal advice. Terms and product limits can change, so check Tailscale’s current documentation and policies before relying on Funnel for heavy traffic.
I’m currently on a static public IP and run Plex with normal remote access now, so I don’t actually need this workaround anymore. I did spend plenty of time fighting CGNAT before that though, and I remember the pain well enough to keep this guide alive.
With IPv4 addresses becoming scarce, more ISPs are putting customers behind CGNAT. The annoying bit for self-hosting is that you no longer have your own publicly reachable IPv4 address, so normal port forwarding for Plex may not work. Your router can forward the port perfectly and the internet still basically says, “yeah nah”.
Why Tailscale Funnel?
Tailscale Funnel can expose a service running on a Tailscale device to the public internet using a .ts.net HTTPS address. Traffic reaches Tailscale’s Funnel relay servers and is then proxied back to the service on your machine.
For Plex, that means you can expose local port 32400 through a public HTTPS address even if your ISP has you trapped behind CGNAT. That’s the neat bit we’re here for.
A better option when possible: If every device that needs Plex can run Tailscale, don’t use Funnel at all. Install Tailscale on the Plex server and client devices and access Plex privately across your tailnet. No point making something public just for the hell of it. Funnel is mainly useful when you need a normal public HTTPS endpoint — for example, a Plex client that cannot run Tailscale itself.
Tailscale and Cloudflare terms
As of 31 August 2026, I could not find an explicit rule in Tailscale’s Terms of Service or Acceptable Use Policy banning Plex, video streaming or media servers through Funnel.
There are still two important catches:
- Tailscale documents that Funnel traffic is subject to non-configurable bandwidth limits.
- Tailscale’s Acceptable Use Policy prohibits use that interferes with, disrupts or creates an undue burden on the Tailscale service or connected infrastructure.
So while personal Plex streaming through Funnel does not appear to be explicitly prohibited, I wouldn’t take the piss and treat it as a free unlimited CDN or relay. Heavy or continuous streaming may hit bandwidth limits and could potentially become an acceptable-use issue.
Cloudflare Tunnel is different. Cloudflare’s current documentation states that public-hostname Tunnel traffic on Free, Pro and Business plans is subject to service-specific terms requiring an appropriate paid service to serve video and other large files. So I would not use a standard public Cloudflare Tunnel as a Plex streaming workaround on those plans.
Set up the Tailscale domain
Create a Tailscale account if you don’t already have one, then open the Tailscale Admin Console and head to DNS.
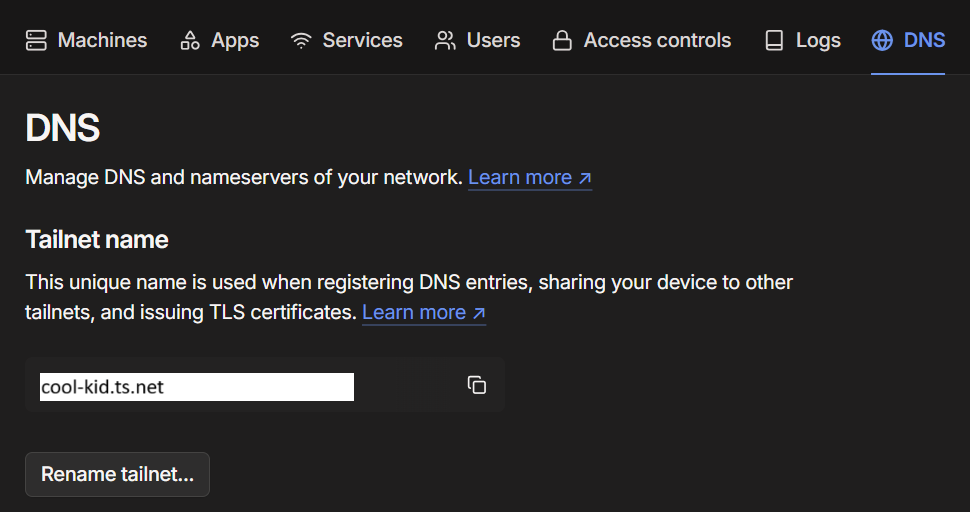
You can hit Rename tailnet until you get something cool 😉
For this example I’ll use:
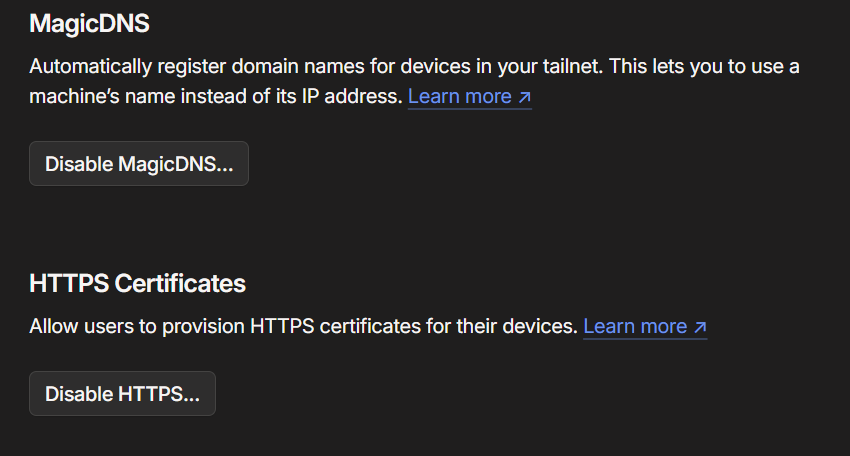
cool-kid.ts.netMake sure MagicDNS and HTTPS Certificates are enabled. The Funnel command can also prompt you to enable the requirements if they aren’t already configured.
Install Tailscale on the Plex VM or LXC
Install Tailscale using the current Linux installation instructions, or use Tailscale’s install script:
curl -fsSL https://tailscale.com/install.sh | shIf Plex is running inside an unprivileged Proxmox LXC
Tailscale needs access to /dev/net/tun. Older Proxmox guides manually edited the LXC config with cgroup and bind-mount entries, but current Proxmox versions can do this directly from the web interface. Thankfully, no cgroup archaeology required anymore.
Shut down the LXC, then in Proxmox go to:
LXC → Resources → Add → Device Passthrough
Enter the following Device Path:
/dev/net/tunStart the LXC again. The equivalent configuration entry is:
dev0: /dev/net/tunYou can confirm the TUN device exists from inside the LXC:
ls -l /dev/net/tunTailscale also supports userspace networking if you don’t want to pass through /dev/net/tun, but for a normal Proxmox LXC the native device passthrough method is straightforward and has a lot less weird shit hiding underneath it.
Connect the server to Tailscale
For both a VM and LXC, bring Tailscale up:
tailscale upFollow the authentication link it gives you. Once complete, the Plex server should appear in your Tailscale Admin Console.
Create the Plex Funnel
Now for the bit we actually came here for. Plex listens on port 32400, so run:
tailscale funnel --bg http://127.0.0.1:32400The first time you use Funnel, Tailscale may give you a link to approve the required Funnel permissions for the tailnet. One little hoop to jump through, then you’re off.
Once enabled, the output should look similar to:
Available on the internet:

https://plex.cool-kid.ts.net/
|-- proxy http://127.0.0.1:32400

Funnel started and running in the background.The --bg flag keeps the Funnel configuration running in the background and Tailscale documents that it will resume after a reboot or a tailscale down/tailscale up cycle.
You can check the current Funnel configuration at any time with:
tailscale funnel statusTo remove the Funnel later:
tailscale funnel --https=443 offTell Plex about the Funnel address
Open your local Plex server:
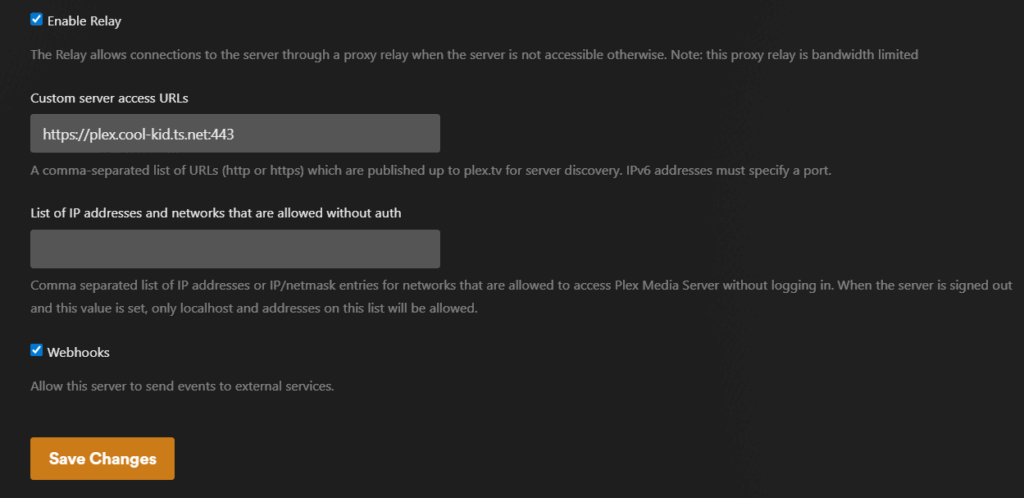
http://<YourIP>:32400/webGo to Settings → Server → Network, enable Show Advanced, then find Custom server access URLs.
Enter the HTTPS address created by Funnel. I explicitly include port 443 so Plex publishes the correct external HTTPS endpoint rather than inheriting the normal Plex remote-access port:
https://plex.cool-kid.ts.net:443Save the changes and restart Plex for good measure. Probably not strictly necessary every time, but Plex has taught me not to argue with a cheap reboot 🙂
About Plex Remote Access: You do not need a normal router port-forward for this Funnel method. If native Plex Remote Access cannot work because you’re behind CGNAT, the custom Funnel URL gives Plex another address to advertise. I no longer recommend explicitly disabling Plex Remote Access as a required step: leaving it enabled can preserve Plex Relay as a fallback if direct access fails. Basically, don’t fight Plex more than you need to — the Funnel URL is the important part of this setup.
Test it
Test from a device that is genuinely outside your home network — mobile data is an easy option. Don’t leave your phone on Wi-Fi, see Plex working and congratulate yourself too early 😅. Open Plex through the normal Plex app or hosted web app and start a stream.
If it isn’t working, check the chain in order before changing six things at once and creating an entirely new problem:
tailscale status— confirm the Plex server is connected to your tailnet.tailscale funnel status— confirm the Funnel is active.- Open the
https://...ts.netFunnel address directly in a browser and confirm it reaches Plex. - Check Plex Settings → Server → Network → Custom server access URLs contains the correct Funnel URL with
:443.
One quirk I found with this method is that remote connections may not appear in the Plex dashboard graph the same way a normal direct remote connection does. Plex being Plex — if the stream works, don’t let one slightly weird graph send you down a three-hour rabbit hole.
Keep the rest of your homelab private
If you also use Tailscale for private access to the rest of your self-hosted services, you don’t need to Funnel everything publicly. Expose the thing that needs exposing and leave the rest of the homelab tucked away where random internet goblins can’t poke it.
Tailscale’s Split DNS can send requests for your own domain — for example richay.au — to your Pi-hole or AdGuard DNS server while you’re connected to the tailnet. Your internal DNS can then point those names at your private reverse proxy.
That gives you public access only where you deliberately want it, while the rest of the homelab stays private. My guide is here: Tailscale Split DNS by Domain for Secure Home Server Access.
For normal public websites like this blog, Cloudflare Tunnel is still a great CGNAT workaround. The video/large-file restriction discussed above applies to public-hostname traffic serving those types of content; it doesn’t mean Cloudflare Tunnel itself is unsuitable for ordinary websites.
Archived notes from the original guide
ARCHIVED — older Proxmox LXC method
The original version of this article manually added:
lxc.cgroup2.devices.allow: c 10:200 rwm
lxc.mount.entry: /dev/net/tun dev/net/tun none bind,create=file
Those lines are still relevant to older Proxmox releases, but current Proxmox versions support
/dev/net/tunthrough native LXC Device Passthrough and Tailscale’s own current Proxmox/LXC documentation recommends the GUI method.
References
- Tailscale Funnel documentation
- Tailscale Funnel CLI reference
- Tailscale in LXC containers
- Tailscale Terms of Service
- Tailscale Acceptable Use Policy
- Cloudflare Tunnel routing documentation
- Plex Network settings documentation
And that’s it. CGNAT can remain cactus, Plex can still get out, and you haven’t had to beg your ISP for a public IPv4 address. Not a bad little workaround 🙂