Proxmox Unprivelliged LXC with shared Intel ARC GPU for Plex or Jellyfin transcoding

Status: CURRENT
Last reviewed: 31 August 2026
Applies to: Proxmox VE 8.2+ / 9.x, unprivileged LXC, Intel Arc GPU
Example LXC: Debian Trixie

This guide originally used manual cgroup, UID/GID, subuid and subgid mappings. Modern Proxmox has native LXC Device Passthrough, so the current method is much simpler.

This guide is for running Plex and/or Jellyfin in Docker inside an unprivileged Proxmox LXC, while sharing an Intel Arc GPU from the Proxmox host for hardware transcoding.

I’m using a Debian Trixie LXC for this example. This assumes you have:

  • Created an unprivileged LXC (Proxmox instructions)
  • Installed Docker inside the LXC (Docker instructions)
  • An Intel Arc GPU detected and working on the Proxmox host
  • An active Plex Pass subscription if you want to use Plex hardware transcoding

Find the Intel Arc render device

On the Proxmox host, check the available render devices:

ls -l /dev/dri/render*


Example output from my host:

crw-rw---- 1 root render 226, 128 Nov 16 21:02 /dev/dri/renderD128
crw-rw---- 1 root render 226, 129 Nov 16 21:02 /dev/dri/renderD129


In my system, renderD128 is the Intel iGPU and renderD129 is the Intel Arc A310. Your device numbers may be different, so don’t blindly copy mine.

If you’re not sure which render device belongs to which GPU, check the DRI device links:

ls -l /dev/dri/by-path/


You can compare the PCI addresses shown there with:

lspci | grep -Ei 'VGA|Display'


Pass the Arc GPU into the LXC

This is the bit that became much easier in newer Proxmox versions.

In the Proxmox web interface, select the LXC and go to:

Resources → Add → Device Passthrough

  • Device Path: select your Intel Arc render device. Mine is /dev/dri/renderD129
  • Mode: 0666
  • UID: leave blank
  • GID: leave blank

For my system, Proxmox creates an LXC config entry equivalent to:

dev0: /dev/dri/renderD129,mode=0666


That’s it. No manual lxc.idmap entries, no editing /etc/subuid or /etc/subgid, and no manually-created cgroup or bind-mount rules.

Why 0666?
This gives processes inside the LXC read/write access to the passed-through render device, which avoids the UID/GID mapping mess used by older methods. For a dedicated unprivileged Plex/Jellyfin LXC this is the simple option. If you want tighter permissions, Proxmox also supports assigning a specific UID/GID to the device instead.

Restart the LXC after adding the device, then check from inside the LXC:

ls -l /dev/dri/


You should see the render device you passed through. In my case that is renderD129.

Docker Compose

The Arc render device also needs to be passed from the LXC into the Plex or Jellyfin Docker container.

Add the following to the Plex or Jellyfin service in your Compose file, changing the render device if yours is different:

devices:
  - /dev/dri/renderD129:/dev/dri/renderD129


If your Arc GPU is renderD128, use /dev/dri/renderD128:/dev/dri/renderD128 instead.

After recreating the Docker container, you can confirm the device is visible inside it:

docker exec -it <container-name> ls -l /dev/dri/


Plex

In Plex, go to Settings → Server → Transcoder and enable Show Advanced if required.

  • Enable Use hardware acceleration when available
  • Enable Use hardware-accelerated video encoding
  • Under Hardware transcoding device, select the Intel Arc GPU

Mine appears as Intel DG2 [Arc A310].

To test it, play a video and force a transcode by changing the quality to something lower. Then go to Activity → Dashboard. The video transcode should show the hardware (hw) tag.

If the Arc GPU doesn’t appear in Plex, check the device in this order:

  1. Proxmox host: ls -l /dev/dri/
  2. Inside the LXC: ls -l /dev/dri/
  3. Inside the Docker container: docker exec -it <container-name> ls -l /dev/dri/

Note: Plex hardware-accelerated transcoding requires an active Plex Pass subscription.
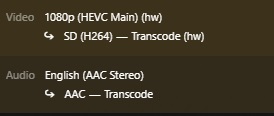
Plex hardware transcoding using Intel Arc

Jellyfin

For Jellyfin, open the Administration Dashboard, then go to Playback → Transcoding.

  • Under Hardware Acceleration, select Intel Quick Sync (QSV)
  • Set the QSV device to the Intel Arc render device. Mine is /dev/dri/renderD129

If the Arc GPU is the only Intel GPU in your system it will often be /dev/dri/renderD128. Again, use the device you identified earlier rather than assuming the number.

To test Jellyfin, play a video, lower the playback quality so it has to transcode, then open Playback Info. Look for Play method: Transcoding.

If transcoding fails completely, first confirm that the render device exists inside both the LXC and the Jellyfin Docker container. Jellyfin’s Intel hardware acceleration documentation also includes additional QSV/VA-API and driver checks if required:

Jellyfin Intel GPU hardware acceleration documentation

Jellyfin Intel Quick Sync transcoding settings

Verify the GPU is actually being used

If you want to confirm the GPU itself is doing the work, install intel-gpu-tools on the Proxmox host and run intel_gpu_top while a transcode is active. You should see activity on the Intel GPU’s video engines.

Archived method: manual UID/GID mapping

ARCHIVED – November 2025 method

The original version of this guide manually added lxc.cgroup2.devices.allow, bind-mounted the DRI devices, created custom lxc.idmap rules and edited /etc/subuid and /etc/subgid.

That method worked, but it is no longer the recommended path for a current Proxmox install. Native LXC Device Passthrough creates the device node for the container and can assign its mode, UID and GID directly, so the old mapping instructions have been removed from the active guide to avoid unnecessary complexity.

If you’re deliberately running an older Proxmox release, use documentation appropriate for that version rather than copying the old mappings from this article.

Credit: Thanks to gnd-7000 in the comments for pointing out that Proxmox 9 no longer needs the old GID mapping method and that the GPU can be added directly through Resources → Device Passthrough. Much cleaner 🙂

References: Proxmox pct documentation · Jellyfin Intel GPU documentation · Plex Transcoder documentation

Tailscale split dns by domain for secure home server access

Status: CURRENT
Last reviewed: 31 August 2026
Applies to: Tailscale Split DNS, subnet routers, AdGuard Home and a private reverse proxy

This setup lets you keep selected services publicly reachable while resolving your private services to internal IP addresses only when you’re at home or connected to Tailscale. Basically: public where I actually want public, private everywhere else. Much nicer than throwing the whole bloody homelab onto the internet.

What this setup does

I use the same domain for both public and private services. Public services can still be reachable normally, while private subdomains resolve through my own DNS server and point at my internal reverse proxy when I’m connected to Tailscale. One domain, two completely different paths depending on where I am. Neat little trick 🙂

For this example:

  • Domain: richay.au
  • AdGuard Home: 10.10.10.10 — local DNS / ad blocker
  • Traefik v3: 10.10.10.20 — internal reverse proxy
  • AdGuard DNS rewrite: *.richay.au → 10.10.10.20
  • Cloudflare Tunnel: only for services I deliberately expose publicly, such as this blog
  • Tailscale: remote private access, subnet routing and Split DNS

The important distinction is that DNS and routing are separate things. AdGuard can correctly answer private.richay.au → 10.10.10.20, but your remote device still needs a Tailscale route to 10.10.10.20 or the browser won’t be able to reach it. DNS can tell you exactly where the house is; it doesn’t magically build the bloody road there.

Split DNS is not an access-control system. Split DNS decides which DNS server answers a query. Subnet routes decide how packets reach the private IP. Tailscale Grants/ACLs decide whether that traffic is actually allowed. Three different jobs, even though they’re all holding hands by the end of this guide.

1. Install Tailscale on the subnet router

Install Tailscale on a machine that can reach both your DNS server and reverse proxy over the LAN. It doesn’t need to be anything fancy — it just needs to sit in the right spot and not randomly disappear when you need it.

In this example I’m installing Tailscale on the Traefik host at 10.10.10.20. That machine will also act as a Tailscale subnet router.

You can install Tailscale using the current Linux installation instructions.

2. Enable IP forwarding

Tailscale requires IP forwarding on a Linux subnet router. For most modern Linux distributions with /etc/sysctl.d:

echo 'net.ipv4.ip_forward = 1' | sudo tee -a /etc/sysctl.d/99-tailscale.conf
echo 'net.ipv6.conf.all.forwarding = 1' | sudo tee -a /etc/sysctl.d/99-tailscale.conf
sudo sysctl -p /etc/sysctl.d/99-tailscale.conf


If you’re only using IPv4 you technically only need IPv4 forwarding, but I’ve left Tailscale’s current IPv4 + IPv6 example intact. Future me can deal with IPv6 properly one day instead of pretending it doesn’t exist 😅.

3. Advertise the private routes

This is the bit I had slightly wrong in the original version of this guide. DNS was working, so naturally I stared at DNS for too long even though the missing bit was actually routing. Classic.

The remote Tailscale client needs to reach both the DNS server at 10.10.10.10 and the reverse proxy at 10.10.10.20. Advertising only the AdGuard address lets DNS queries work, but doesn’t create a route to the private IP returned by AdGuard. So you get a perfectly correct DNS answer followed immediately by absolutely fuck-all happening in the browser.

For the tightest routing, advertise only those two hosts:

sudo tailscale set --advertise-routes=10.10.10.10/32,10.10.10.20/32


If you deliberately want your Tailscale devices to access the whole LAN instead, you could advertise the subnet:

sudo tailscale set --advertise-routes=10.10.10.0/24


I prefer the two /32 routes for this guide because they expose only the DNS and reverse-proxy hosts rather than the whole subnet. No need to hand Tailscale the keys to the whole neighbourhood when two houses will do.

4. Approve the routes in Tailscale

Open the Tailscale Machines page, locate the subnet-router machine, open its menu and choose Edit route settings.

Approve 10.10.10.10/32 for AdGuard and 10.10.10.20/32 for Traefik.

Route approval and Tailscale access policy are separate. The route makes those addresses reachable through the tailnet; your Grants/ACLs decide who is actually allowed to connect to them. Reachable does not automatically mean invited in.

Linux client note: Windows, macOS, iOS and Android accept advertised subnet routes by default. Linux clients do not. On a Linux client that needs to use these routes, run:

sudo tailscale set --accept-routes=true


5. Configure Tailscale Split DNS

Now open the Tailscale DNS page.

  1. Select Add nameserver → Custom.
  2. Enter your internal DNS server: 10.10.10.10.
  3. Enable Restrict to search domain.
  4. Enter richay.au as the search domain.
  5. Save the nameserver.

Tailscale calls this a restricted nameserver. It is also commonly called Split DNS. Same idea, slightly more corporate name.

With that configured, DNS queries for names under richay.au are sent to AdGuard while you’re connected to Tailscale. Normal DNS queries can continue using the device’s normal resolver.

You do not need to enable Override DNS servers just to use this Split DNS setup. Override DNS servers is for forcing global tailnet DNS behaviour, whereas here we only want richay.au queries sent to AdGuard. No point hijacking every DNS query when we’re only interested in our own little corner of the internet.

Tailscale Split DNS custom nameserver configuration

6. Configure AdGuard Home

AdGuard now needs to return the internal Traefik address for your private services. This is where the whole thing starts feeling suspiciously clever for something that’s actually pretty simple.

In my setup I use a wildcard DNS rewrite equivalent to:

*.richay.au  →  10.10.10.20


This means names such as:

code-server.richay.au
proxmox.richay.au
homeassistant.richay.au


can all resolve to Traefik’s private IP without creating public DNS records for every private service. Which is exactly what I want — nice names internally, no giant public sign saying “hey look, here’s all my homelab shit”.

The original article called this a CNAME record. That’s not quite right when you’re directly rewriting a wildcard name to an IP address — this is better described as an AdGuard wildcard DNS rewrite. Tiny terminology fix, but if I’m going back through these articles I may as well stop lying to future me 😄.

7. Let Traefik route the hostname

Traefik can continue routing each hostname to the correct application exactly as it does on your LAN. It doesn’t care that the request came in through Tailscale; as far as Traefik is concerned, business as usual.

The connection path is:

Remote device
    ↓
Tailscale
    ↓
Split DNS query for app.richay.au
    ↓
AdGuard 10.10.10.10
    ↓
Returns 10.10.10.20
    ↓
Tailscale subnet route
    ↓
Traefik 10.10.10.20
    ↓
Private web app


Public applications can remain completely separate. For example, this blog can still have a public Cloudflare Tunnel while code-server.richay.au exists only in your private DNS. Public stuff stays public, private stuff stays private, and the two don’t need to become one giant networking casserole.

Access control

Don’t confuse private DNS with permission. Hiding the sign doesn’t lock the door.

A device that knows the private IP does not automatically gain access unless your Tailscale policy allows the connection. Tailscale now recommends Grants for new access-control policies; legacy ACLs still work but aren’t receiving new features.

If your tailnet is just your own trusted devices, the default policy may be enough. For a larger tailnet, use Grants to limit which users/devices can reach the advertised private addresses and ports.

Test the setup

Connect a phone or laptop to Tailscale while away from your home network. Mobile data is handy here so you know you’re genuinely testing the remote path and not accidentally proving that your own Wi-Fi still works. First confirm the private DNS server and reverse proxy are reachable:

ping 10.10.10.10
ping 10.10.10.20


On Windows, Tailscale recommends using Resolve-DnsName rather than relying on nslookup when testing advanced DNS behaviour such as Split DNS:

Resolve-DnsName -Name code-server.richay.au


The result should return 10.10.10.20. Then open the private hostname in your browser:

https://code-server.richay.au


Troubleshooting

If DNS resolution fails, check that Tailscale can reach AdGuard and that the restricted nameserver is configured for the correct domain. Don’t start kicking Traefik yet — it hasn’t even been invited to this part of the problem.

If DNS resolves correctly to 10.10.10.20 but the website won’t open, that’s usually a routing or access-policy problem, not DNS. Confirm the Traefik address is included in the advertised and approved routes. This is the point where DNS has done its job and gets to sit back while routing takes the blame.

Useful checks:

tailscale status
tailscale status --routes


If a Linux client can reach normal Tailscale 100.x addresses but not the advertised LAN addresses, enable subnet route acceptance:

sudo tailscale set --accept-routes=true


If Linux DNS itself is behaving strangely, make sure your resolver configuration is compatible with Tailscale. On distributions that use it, Tailscale recommends systemd-resolved rather than a manually overwritten or locked /etc/resolv.conf.

The end result

With this setup I can keep genuinely public services public, while the rest of my homelab uses the same nice *.richay.au hostnames without exposing those applications to the internet.

At home, AdGuard resolves the private names directly. Away from home, Tailscale Split DNS sends only richay.au lookups back to AdGuard, and the subnet routes carry the connection to Traefik.

Much nicer than remembering a pile of IP addresses and ports 🙂

Once this is working it’s one of those setups that feels almost suspiciously tidy: same domain everywhere, no public DNS records for the private stuff, and remote access behaves like you’re sitting at home. Took a few moving parts to get there, but bloody hell it’s nice when it all clicks 🙂

References

Proxmox cluster with Traefik

Status: CURRENT
Last reviewed: 31 August 2026
Applies to: Proxmox VE 8/9 cluster + Traefik v3.x

Traefik can sit in front of multiple Proxmox nodes so a single hostname such as proxmox.richay.au reaches whichever cluster node is available. Modern Traefik supports Proxmox shell/noVNC WebSockets without a special WebSocket middleware.

Why put a Proxmox cluster behind Traefik?

Each node in a Proxmox cluster provides the web interface, and Proxmox cluster management can be performed by connecting to any cluster node.

Instead of remembering:

https://10.10.10.1:8006
https://10.10.10.2:8006
https://10.10.10.3:8006


I can use one address:

https://proxmox.richay.au


Traefik then load balances the browser traffic between the available nodes.

Security: Proxmox is a management interface with control over your VMs, containers, storage and cluster. I recommend keeping this hostname private rather than publishing it to the open internet.

I use Tailscale Split DNS for this type of service so proxmox.richay.au resolves only while I’m at home or connected to Tailscale. My guide is here: Tailscale Split DNS by Domain for Secure Home Server Access.

The old WebSocket workaround is no longer needed

The original version of this article added these request headers manually:

Upgrade: websocket
Connection: Upgrade


That is no longer required with current Traefik. Traefik v3 supports WebSocket and WebSocket Secure connections out of the box and automatically handles the protocol upgrade using normal HTTP routing.

So there is no need for a custom websocket-upgrade middleware just to make the Proxmox shell or noVNC console work.

Current Traefik dynamic configuration

This is the modern equivalent of my original config.yaml.

This example assumes your Proxmox nodes are using their normal cluster-generated HTTPS certificates and Traefik is connecting to them by IP address. Because those certificates are normally signed by the private Proxmox cluster CA, the example uses a dedicated ServersTransport with certificate verification disabled.

http:
  routers:
    proxmox:
      entryPoints:
        - "https"
      rule: "Host(`proxmox.richay.au`)"
      service: proxmox
      tls: {}

  services:
    proxmox:
      loadBalancer:
        serversTransport: proxmox-transport

        sticky:
          cookie:
            name: proxmox_lb
            secure: true
            httpOnly: true
            sameSite: lax

        servers:
          - url: "https://10.10.10.1:8006" # Proxmox node 1
          - url: "https://10.10.10.2:8006" # Proxmox node 2
          - url: "https://10.10.10.3:8006" # Proxmox node 3

  serversTransports:
    proxmox-transport:
      insecureSkipVerify: true


That’s it. No manual WebSocket headers.

Why use a sticky cookie?

Traefik’s load balancer normally distributes requests between the backend servers. Enabling a sticky cookie keeps subsequent requests from the same browser session on the same Proxmox node where possible.

For a normal website that may not matter much, but for a management UI with long-running shell/noVNC connections I prefer keeping the browser pinned to one node during the session.

The example also marks Traefik’s affinity cookie as Secure and HTTPOnly.

About insecureSkipVerify

insecureSkipVerify: true does not disable HTTPS. Traffic between Traefik and Proxmox is still encrypted, but Traefik does not verify that the backend certificate is trusted and belongs to the expected server.

That’s convenient for a trusted home management network, but it is weaker than actually trusting the Proxmox cluster CA.

Proxmox creates its own cluster CA by default and generates a node certificate for each node. The public cluster CA is stored at:

/etc/pve/pve-root-ca.pem


If you want proper backend certificate verification, copy only the public CA certificate to the Traefik host/container and use node hostnames that match the certificates.

For example:

http:
  services:
    proxmox:
      loadBalancer:
        serversTransport: proxmox-trusted
        sticky:
          cookie:
            name: proxmox_lb
            secure: true
            httpOnly: true

        # Use the actual DNS names present in your node certificates.
        servers:
          - url: "https://pve1.home.arpa:8006"
          - url: "https://pve2.home.arpa:8006"
          - url: "https://pve3.home.arpa:8006"

  serversTransports:
    proxmox-trusted:
      rootCAs:
        - /etc/traefik/certs/pve-root-ca.pem


This is the better option if you want end-to-end TLS verification rather than simply trusting the management LAN.

Do not copy the Proxmox cluster CA private key to Traefik. The public pve-root-ca.pem certificate is all Traefik needs to trust the cluster certificates.

HTTPS redirect

My old dynamic configuration attached an HTTPS redirect middleware to the router even though that router was already listening on the HTTPS entrypoint. That’s redundant.

If you want every request hitting port 80 to redirect to HTTPS, I prefer doing that once on the HTTP entrypoint in Traefik’s static/install configuration:

entryPoints:
  http:
    address: ":80"
    http:
      redirections:
        entryPoint:
          to: https
          scheme: https

  https:
    address: ":443" 


Then every service can use the HTTPS entrypoint without carrying around its own redirect middleware.

Testing it

Open the single cluster hostname:

https://proxmox.richay.au


Log into Proxmox and test:

  • Normal cluster navigation.
  • A node shell.
  • An LXC console.
  • A VM noVNC console.

They should work through the same Traefik route without any WebSocket-specific middleware.

If the normal web UI loads but consoles fail, check the browser developer tools for the WebSocket request and check the Traefik logs. Don’t immediately add fake Upgrade headers back in — modern Traefik already handles that part.

What happens when a node goes down?

Traefik can distribute requests across multiple Proxmox nodes, but this alone is not a full HA design. If the node your sticky cookie points to disappears, Traefik can select another backend when the failed backend is detected, but an existing shell/noVNC connection to the dead node will obviously be lost.

The reverse proxy gives you one convenient cluster URL. Proxmox clustering/HA is still what handles the actual guests and cluster state.

Archived note from the original article

ARCHIVED — old Traefik WebSocket middleware

The original article used a websocket-upgrade Headers middleware with Upgrade: websocket and Connection: Upgrade. That workaround has been removed from the active configuration because current Traefik handles WebSocket upgrades automatically.

References

Much cleaner now — one cluster URL, sticky sessions, working shells, and no janky WebSocket header hack required 🙂

Ansible – updating proxmox host kernel with LXC shared GPU

Status: ARCHIVED — HISTORICAL NVIDIA WORKAROUND
Last reviewed: 31 August 2026
Originally applied to: Proxmox + shared NVIDIA GPU into LXC using manually installed NVIDIA drivers

Do not copy the old playbook as a current NVIDIA update procedure. It hard-codes an old NVIDIA driver and treats manual driver reinstallation after a kernel update as normal. With a properly configured DKMS installation, the NVIDIA kernel module should normally rebuild for the new kernel automatically.

Is this still relevant?

Mostly no. I’m keeping the page because the problem it was trying to solve still exists, but the automation itself belongs to an older version of my setup.

The original idea was simple: after upgrading the Proxmox kernel, check whether the NVIDIA module loaded. If it didn’t, reinstall the NVIDIA .run driver on the host, reboot, then reinstall the matching NVIDIA userspace driver inside the Plex LXC.

The old playbook was built around a fixed NVIDIA driver:

NVIDIA-Linux-x86_64-535.154.05.run


That’s the first reason not to use it today. More importantly, a kernel update by itself should not normally require reinstalling the whole NVIDIA driver.

What should happen now?

For an NVIDIA driver installed with DKMS:

  1. A new Proxmox kernel is installed.
  2. The matching Proxmox kernel headers are available.
  3. DKMS builds the NVIDIA kernel module for that new kernel.
  4. You reboot into the new kernel.
  5. nvidia-smi continues to work.

NVIDIA’s current documentation says that kernel updates can occasionally leave DKMS without the correct headers or fail to rebuild the module. When that happens, the modern fix is normally to diagnose/rebuild DKMS rather than blindly reinstalling an old driver package.

Useful checks after a Proxmox kernel update

uname -r
nvidia-smi
dkms status


Make sure the headers for the running kernel are installed:

apt update
apt install proxmox-headers-$(uname -r)


Depending on the driver installation method and package naming, you can then rebuild the NVIDIA DKMS module rather than reinstalling the entire driver.

Proxmox 9 note: NVIDIA kernel/module compatibility can still genuinely break on newer Proxmox kernels. There have been current Proxmox 9.2 reports involving kernel 7.x, DKMS build failures and conflicts with newer kernel drivers. So if nvidia-smi dies after an upgrade, don’t assume your LXC passthrough configuration is the problem — check the host NVIDIA module first.

What about the LXC?

For shared NVIDIA GPU access, the LXC uses the NVIDIA kernel driver loaded by the Proxmox host. The container does not build its own kernel module.

The old playbook installed the same NVIDIA package inside the LXC using:

./NVIDIA-Linux-x86_64-535.154.05.run --no-kernel-module


That installs the userspace side without attempting to build a kernel module inside the container.

The important distinction is that a kernel update does not automatically mean those userspace libraries changed. You normally only need to revisit the LXC-side NVIDIA libraries when the actual NVIDIA driver version changes or the userspace/kernel versions no longer match.

Proxmox device passthrough is cleaner now too

Current Proxmox supports native LXC device passthrough using dev[n] entries, including configurable path, UID, GID and mode. That has replaced a lot of the older hand-written cgroup/bind-mount hacks used in historical GPU-sharing guides.

The NVIDIA-specific wrinkle remains: the host still needs a functioning NVIDIA kernel driver before any /dev/nvidia* devices can be shared into the LXC.

If I automated this today

I would automate verification, not automatic driver reinstallation.

For example, an Ansible playbook can check the host after updates and deliberately fail if the NVIDIA stack is broken:

- name: Verify NVIDIA after Proxmox update
  hosts: proxmox
  become: true

  tasks:
    - name: Check running kernel
      ansible.builtin.command: uname -r
      register: running_kernel
      changed_when: false

    - name: Check NVIDIA
      ansible.builtin.command: nvidia-smi
      register: nvidia_smi
      changed_when: false
      failed_when: false

    - name: Check DKMS state
      ansible.builtin.command: dkms status
      register: dkms_status
      changed_when: false
      failed_when: false

    - name: Stop if NVIDIA is broken
      ansible.builtin.fail:
        msg: |
          NVIDIA did not initialise after the kernel update.
          Kernel: {{ running_kernel.stdout }}
          nvidia-smi:
          {{ nvidia_smi.stdout }}
          {{ nvidia_smi.stderr }}

          DKMS:
          {{ dkms_status.stdout }}
      when: nvidia_smi.rc != 0


That gives you the automation benefit without having Ansible silently run an obsolete .run installer against whatever kernel happened to arrive that day.

Original playbook — archived for reference

ARCHIVED CODE — DO NOT USE AS-IS. This is the original playbook from this article. It is preserved so old links and search results still make sense, not because I recommend deploying it in 2026.

########
- hosts: nvidia
  become: true
  become_user: root
  tasks:
    - name: Wait for 10.77.69.2 to become available
      wait_for_connection:
        delay: 5
        timeout: 300

    - name: Check if NVIDIA kernel module is loaded
      shell: lsmod | grep -q '^nvidia'
      register: nvidia_module_check
      ignore_errors: true

    - name: Set NVIDIA module check result as fact
      set_fact:
        nvidia_module_rc: "{{ nvidia_module_check.rc }}"

    - name: Reinstall NVIDIA driver if module is not loaded
      shell: sh /root/NVIDIA-Linux-x86_64-535.154.05.run --silent
      args:
        executable: /bin/bash
      when: nvidia_module_check.rc != 0

    - name: Set fact if NVIDIA driver was installed
      set_fact:
        driver_installed: true
      when: nvidia_module_check.rc != 0

    - name: Reboot system if NVIDIA driver was reinstalled
      reboot:
      when: nvidia_module_check.rc != 0

    - name: Wait for 10.77.69.2 to become available after reboot
      wait_for_connection:
        delay: 10
        timeout: 600
      when: nvidia_module_check.rc != 0

########
- hosts: plex
  become: true
  become_user: root
  tasks:
    - name: Install NVIDIA driver in LXC
      shell: sh /root/NVIDIA-Linux-x86_64-535.154.05.run --no-kernel-module --silent
      args:
        executable: /bin/bash
      when: hostvars['10.77.69.2'].driver_installed | default(false)

    - name: Reboot 10.77.69.103
      reboot:
      when: hostvars['10.77.69.2'].driver_installed | default(false)

    - name: Wait for 10.77.69.103 to become available
      wait_for_connection:
        delay: 10
        timeout: 300
      when: hostvars['10.77.69.2'].driver_installed | default(false)


Why I’m archiving it instead of deleting it

The original problem was real and NVIDIA + new Proxmox kernels can still occasionally go cactus. But the correct troubleshooting path has changed.

Today I’d check:

  • Is the running Proxmox kernel supported by the installed NVIDIA driver?
  • Are the matching Proxmox kernel headers installed?
  • Did DKMS actually build/install the NVIDIA module for the running kernel?
  • Does nvidia-smi work on the host?
  • Do the /dev/nvidia* devices exist?
  • Only then: does the LXC have the right devices and compatible NVIDIA userspace libraries?

That’s a better model than treating every kernel update as “reinstall NVIDIA everywhere and reboot twice”.

References